Home » Entrees » Recent Articles:

Baked Sausage and Peppers

November 5, 2011 Entrees, Menu No Comments

Of all the different dishes that I’ve made over the years, it’s the the traditional, simple comfort foods that I still enjoy making the most. Italian soul food – as my good friend Lorraine Ranalli fondly calls it – has been the staple to many Italian-American households for generations. Hearty dishes like pasta and peas, potato and eggs, peppers and eggs, [fill in the blank] and eggs, giambotta…they all bring a smile to my face and a craving to my belly.

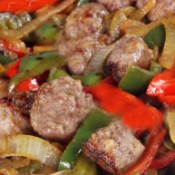
This week, I’m sharing a recipe for one of the most famous and versatile Italian comfort foods, Sausage and Peppers. Traditionally, this is a dish that is cooked on the stove top in a frying pan. Although Italian sweet or hot sausage are the most common sausage used, any kind of sausage that you prefer will work well. One of my favorites to use is a chicken sausage  from Tori’s butcher shop. The BEST! Just fry up the sausage links (whole or sliced), add some chopped onions and peppers to the mix halfway through cooking, and voila, peppers and sausage.

I’m gonna put a slightly different spin on this classic dish by baking it in the oven. I prefer the baking method because it’s less oil (pork sausage will create some very tasty juices in the oven), and it frees up some time for you. Because you want the sausage cooked throughout (no pink inside), you’re looking at a good hour of baking in the oven, especially if you’re using a pork sausage. You’re also combining all ingredients at once, so all of the flavors marry together and there is no stirring or mixing needed.

You’re going to have a decent amount of juice in the baking dish once it’s done, and you have a few options on what to do with the juices:
• you can serve the sausage and peppers it in its juices;
• you can drain or extract the juice with a baster;
• you can let the dish bake uncovered for a few extra minutes to allow it to dry out a bit;
• or as I like to do, you can add some Italian seasoning and a few tablespoons of sauce/gravy, mix it in and let it heat for a few minutes.

Once done, you can serve it as a side dish, as a topping on pasta, or my personal favorite…..on a crispy Italian roll with provolone cheese and greens.

Whichever method you prefer, it’ll be a guaranteed delicious and enjoyable meal.

BAKED SAUSAGE AND PEPPERS

1lb sausage, cut into pieces
4 bell peppers (red and green work best, you can mix them up)
1 large white onion, chopped

(optional ingredients)
1 tbspn Italian seasoning
2-3 tbspn red sauce/gravy

Preheat oven to 400˚. Place sausage, peppers and onions in a baking dish, mix, cover with aluminum foil. Bake for 60-65 minutes, until sausage is completely cooked. You can serve in its juices, drain the juices, or add the optional ingredients and allow to cook for another 5-10 minutes.

Serve as a side dish, on top of pasta or in a crispy Italian roll topped with provolone cheese and greens.

Share

Honey Fig Gorgonzola & Prosciutto Crostata

 This week on my blog I’m very excited to share Emma Caperelli Loerky’s recipe for Honey Fig Gorgonzola & Prosciutto Crostata. I’m a big believer that any dish is better when you add some prosciutto. Throw in some figs and gorgonzola too? Fuggetaboudit!!!!! I’m also a huge junkie for Easter Ham Pie, and this dish could be the perfect mid-year counterpart. So when I got Emma’s e-mail with this recipe and photos, I knew this one would be a big hit…and my teasers on Facebook proved just that. Thanks again, Emma, for sharing yet another one of your amazing recipes!

Enjoy!

Honey Fig Gorgonzola & Prosciutto Crostata
By Emma Caperelli Loerky

A few months ago, when fresh figs were just popping up in the markets out here in San Diego, I bought some not knowing what exactly I was going to make with them. After doing some internet research, I came across this recipe:  http://www.whatsforlunchhoney.net/2010/09/honey-figs-gorgonzola-and-prosciutto.html. Next thing you know, I’m making a crostata. I followed the recipe almost exactly for the filling, but, because I was worried about converting the measurements from grams to cups, I used a recipe from Smitten Kitchen for the pastry shell – which was so flaky and buttery that it reminded me of a puff pastry. I don’t know if it was the fancy pastry flour that i subbed for the all-purpose flour, freezing the butter and flour for 30 minutes before assembling the dough, or the addition of sour cream to the recipe (maybe it was a combination of all three?), but this crust was perfect in every way! 

Fast forward to the present. I’m in the market shopping for ingredients to make lunch for a friend who is visiting me with her new, beautiful baby girl and once again there are those figs. So, guess what is on the menu? You guessed it. And the nice thing about this recipe is that it can be eaten right out of the oven, warm or at room temperature. And it reheats well, too. I even assembled it the morning of, loosely wrapped it with plastic wrap and placed the unbaked crostata in the fridge for about 2 hours until just before I was ready to bake it.

If you aren’t a fan of bleu cheese, I’m sure goat cheese would work well or even ricotta. However, if you do use ricotta cheese, I would be sure to strain it through a cheesecloth for at least and hour, as the extra moisture in it could make this delicate crust soggy.

One last thing, it’s difficult to say exactly how many figs you’ll need for this recipe. The original recipe says 5 – 6 figs depending on their size, but you can add as many or as little as you like. I’ve made this recipe twice, both times I used different figs and it turned out well each time. The first time I used Brown Turkey figs, which are large so I only needed about 6 figs. This time I used Black Mission figs, which are smaller than the Brown Turkey variety, so I needed a few more than the last time. 

For the pastry (Recipe for Smitten Kitchen): 

1 1/4 cups all-purpose flour, chilled in the freezer for 30 minutes
(I used King Arthur Flour’s Unbleached Pastry Flour with terrific results)
1/4 teaspoon salt
8 tablespoons (1 stick) unsalted butter, cut into pieces and chilled in the freezer for 30 minutes
1/4 cup sour cream
2 teaspoons fresh lemon juice
1/4 cup ice water

Glaze:
1 egg yolk beaten with 1 teaspoon water

For the filling (Recipe from What’s For Lunch, Honey?):
About 1 to 1 1/2 cups Gorgonzola (or to taste)
5 – 6 figs (or more depending on your taste and the type/size fig you use), cut into quarters or eighths (one again, depending on their size)
2-3 tablespoons mild honey (I found 2 tablespoons to be plenty)
A few sprigs of fresh thyme, removed from the stem.
About 4 ounces Prosciutto (I didn’t want the Prosciutto to be too overwhelming, so I used about 2 slices, and I used scissors to cut it into slivers).


Directions:
Whisk together the flour and salt in a large bowl. Sprinkle bits of butter over dough. Using a pastry blender, cut it in until the mixture resembles coarse meal, with the biggest pieces of butter the size of tiny peas. In a small bowl, whisk together the sour cream, lemon juice and water and add this to the butter-flour mixture. With your fingertips or a wooden spoon, mix in the liquid until large lumps form. Pat the lumps into a ball; do not overwork the dough. Cover with plastic wrap and refrigerate for 1 hour, or you can refrigerate the dough overnight (as I did). If you do make the dough ahead of time, be sure to allow the dough to sit out at room temperature for a few minutes before you roll it out.

Preheat oven to 400 degrees. On a well-floured work surface, roll the dough out into a 12-inch round. Transfer to an ungreased baking sheet (or, as Smitten Kitchen recommends, use parchment paper. It makes it much easier to move the crostata from the baking sheet onto a plate after baking). Sprinkle the Gorgonzola evenly onto the bottom of the dough, leaving a 2 inch border. Place the figs on top of the cheese. Drizzle with the honey and sprinkle with the fresh thyme leaves. Fold the edges over the filling and pleat it as you go along to allow the dough to fit, and creating a crust for the crostata. Brush the crust with the egg yolk mixture.

Bake the crostata until it is golden brown, about 25 – 30 minutes. Please note:  The original recipe for the pastry says 30 – 40 minutes, but in my oven it was done after approximately 30 minutes. I recommend you watch the dough carefully after the first 20 minutes. When finished baking, sprinkle the crostata with the Prosciutto, and let it sit for 5 minutes before transferring to a plate. Serve hot, warm or at room temperature.

Share

Chicken Meatballs

August 22, 2011 Appetizer, Entrees, Menu, Soup 1 Comment

I know what you’re thinking. Has he lost his mind? Is he selling out? In short, no. There are no intentions, on my part at least, to feature chicken meatballs with Sunday Gravy and pasta. Today we’re thinking out of the box, or in this case, the ball. Stay with me on this…

I’ve heard a lot of people talking about chicken meatballs, and it’s always the same story. “They’re not bad, they tasted pretty good. But beef, pork and veal meatballs are much better with Sunday gravy.” Ground chicken, much like ground turkey, is lean and does not render fatty flavor like a traditional beef, pork and veal meatball mixture would. You can season up the turkey and chicken to taste well, but they’re not going to release any natural juices or flavors to enhance a Sunday gravy.

While thinking of how I could prepare and serve chicken meatballs, I immediately thought of our friends who made these incredible turkey burgers. They played up on the turkey concept, using traditional poultry seasoning for flavor, stuffing mixture instead of breadcrumbs for texture, and a slice of cranberry sauce instead of usual condiments like ketchup and mustard. Not only were these burgers off the hook, but you really got to appreciate and enjoy the whole turkey vibe. So that’s what I decided to do with my chicken meatballs – play up on the chicken!

The seasonings that I have listed below are what I traditionally use to season chicken. Penzey’s Bavarian spice mix is one of my favorites to use for seasoning poultry. You can use whatever seasoning that you prefer on your chicken.

How to server the chicken meatballs?

Of course, you can serve chicken meatballs with your Sunday gravy. For those who are looking to serve healthier dishes, chicken meatballs are a good alternative. But again, it’s not for me. Instead, I came up with a few ideas incorporating the flavors of traditional chicken dishes into the chicken meatballs.

I find that the best way to prepare chicken meatballs is to bake them. About 5-10 minutes before they are completely baked, try brushing the meatballs with a bit of barbecue sauce. This will add a nice, tangly glaze to the meatballs. You can also serve them with a side of honey mustard for dipping.

Chicken meatballs are the perfect addition to a chicken broth-based soup. Try adding them to a stracciatella soup with some grated parmesan!

And finally, there is no better dish that comes to mind that would work with chicken meatballs than Grandmom Dora’s Meatball Stew. What better compliment to chicken can you ask for than peas, carrots and potatoes!

I’m sure there are many more combinations that would work well with chicken meatballs. The ball is (literally) in your court….run with it and be sure to let us know what you come up with!

Chicken Meatballs

1lb ground chicken
1 egg, beaten
1 tspn poultry seasoning
1 tspn oregano
1 tspn garlic powder
1 tspn onion powder
1 tspn thyme
1 tspn parsley
1/2 cup stuffing mix
1/2 cup pamesan cheese

In a large bowl, mix all ingredients together. Shape into balls, place on a baking dish, spray with cooking spray, bake uncovered at 375º for 35-40 minutes until golden brown.

Share

Green Tomatoes: The Fall and Rise of a Damaged Vine

They say when life gives you lemons, make lemonade. But what do you do when life gives you a hurricane that rips almost all of your premature green tomatoes off of its vine? Last week’s massive storm that rolled through our area did just this. To say that I was heartbroken is an understatement. Thankfully our next door neighbor, along with being incredibly kind and patient with our kids, has the greenest thumb around! Almost immediately after telling her about my tomato tragedy, she had searched out this great website that offer suggestions for green tomatoes (click here for the site). Thank you, Fran, for taking the time to help out with suggestions!

I read through a few websites and found quite a few intriguing ideas. Of course, fried green tomatoes were on the top of every list that I read. But I was on a mission to try something a bit more unique and challenging. Listed below are the three ideas that I went with, in order that I made them. Two were inspired from recipes that I found on other websites, and the third was improvised. Thankfully I was able to put to use almost all of the prematurely picked tomatoes. The remaining greens are gonna get fried!

GREEN TOMATO SPICE CAKE
Courtesy of allrecipes.com

This recipe incorporates puréed green tomatoes into a standard spice cake recipe. Similar to a zucchini bread, the green tomatoes are added more for texture and nutrients, rather than taste. It’s a bit more moist that a traditional zucchini bread, and you do notice the occasional tomato seed, but the spice really shines through on this. Serve as is, dust with powdered sugar, or top with a cream cheese icing.

Ingredients
4 cups chopped green tomatoes
1 tablespoon salt
1/2 cup butter
2 cups white sugar
2 eggs
2 cups all-purpose flour
1 teaspoon ground cinnamon
1 teaspoon ground nutmeg
1 teaspoon baking soda
1/4 teaspoon salt
1/2 cup raisins
1/2 cup chopped walnuts

Directions
Place chopped tomatoes in a bowl and sprinkle with 1 tablespoon salt. Let stand 10 minutes.
Place in a colander, rinse with cold water and drain. Purée in a food processor.
Preheat oven to 350 degrees F (175 degrees C). Grease and flour a 9×13 inch baking pan.
Cream butter and sugar. Add eggs and beat until creamy.
Sift together flour, cinnamon, nutmeg, soda and 1/4 teaspoon salt. Add raisins and nuts to dry mixture; Add dry ingredients to creamed mixture. Dough will be very stiff. Mix well.
Add puréed tomatoes and mix well. Pour into the prepared 9 x 13 inch pan.
Bake for 40 to 45 minutes in the preheated oven, or until toothpick inserted into cake comes out clean.

GREEN TOMATO FAJITAS
This recipe was totally improvised. I started off by sautéing some garlic and onions in olive oil until onion was translucent. I added a chopped green pepper, stirred it until tender, then added the tomatoes, again cooking on medium until tender. I then added some chopped chicken, salt and pepper and some dried barbecue spice. Served it on warm tortilla shells with shredded cheddar cheese. The end results were fantastic! The onions, garlic and peppers help liven up the bland taste of the green tomatoes, and the oil and salt helped soften them up to a nice tender texture. Gonna get this in my summer rotation often!

GARLIC PICKLED GREEN TOMATOES
Here’s an old world recipe that’ll put a large amount of the tomatoes to good use. Very good use! The jars that I made are still settling – you’ll need about two weeks to let them fully marinate. Look for a follow up post when I crack open my first jar. Let’s hope for tangy-liscious results!

Ingredients
5 pounds small, firm green tomatoes
3 1/2 cups cider vinegar
3 1/2 cups water
One fourth cup canning salt
6 or 7 garlic cloves
Pickling spices (a combination of spices, such as mustard seeds, peppercorns, dill, coriander seeds, cloves, and red pepper flakes)
6 or 7 bay leaves

Directions
Wash and core tomatoes, cut into halves or quarters. Combine vinegar, water and salt; bring to a boil. Pack tomatoes into hot jars, leaving 1/4-inch headspace. Add 1 garlic clove, 1 heaping teaspoon of Pickling spices, and 1 bay leaf to each jar. Pour hot liquid over tomatoes, leaving 1/4-inch headspace. Adjust caps. Process 15 minutes in boiling water bath. Yield: about 6 or 7 pints.

Share

Archives

powered by
Socialbar