Home » cheese » Recent Articles:

Ciambella Rustica

For years, a big part of our Easter tradition has involved baked goods. We would make Easter bread, Italian rice pie (which Ava has since taken over and now claims as her own), fiadone cheese pockets, and pizza rustica—also known as pizza chena, or simply Easter ham pie.

Pizza rustica, as I prefer to call it, is a rustic pie made with eggs, various meats such as ham, salami, pepperoni, or mortadella, and cheese—provolone being my choice. I also like to add black olives, simply because I love them, and they complement this dish beautifully.

This year, I discovered an interesting variation called Ciambella Rustica, courtesy of Giovanni Siracusa. The concept and ingredients are basically the same, with the addition of flour and olive oil, which transforms it into more of a bread or savory cake. It can be baked in either a tube pan or a Bundt pan (cue My Big Fat Greek Wedding). I was intrigued and decided this was the recipe I would follow this year.

The process was wonderfully simple—everything mixed in one bowl, poured into the pan, and baked. The result had the same savory flavors as traditional pizza rustica, but with a more bread-like texture that was surprisingly complementary.

The beautiful part of traditions is the comfort of revisiting moments we love. Another wonderful part is allowing ourselves to update them—carrying the original meaning forward in a new and special way. This recipe does exactly that.

I realize I’m sharing this a bit late for Easter, but honestly, it’s a dish worth making any time of year. It’s far too delicious to enjoy just once.

To watch Giovanni Siracusa’s process and to get his recipe, click here.

Share

Baked Spaghetti Squash with Tomatoes and Herbed Cheese

February 6, 2026 Entrees, Menu No Comments

This recipe is my take on the popular feta and tomato bake that was trendy on social media a few years back. For my version, I’m using spaghetti squash, grape tomatoes and a spreadable herbed cheese.

If you are not familiar with spaghetti squash, it is an oval shaped winter squash, and the outer skin usually has a light or bright yellow color. Similar to other winter squash, like butternut or acorn squash, there is a fair number of seeds and pulp that needs to be removed once cut open. The seeds can be seasoned and roasted like pumpkin seeds. However, the taste of this squash is a bit mild compared to butternut and acorn squash. The meaty texture also shreds after being cooked, which then makes it look like…you guessed it, spaghetti!

It is a healthy, nutritional alternative to traditional spaghetti if you are looking for a low carb pasta-type dish. Spaghetti squash absorbs whatever seasonings are rubbed onto the flesh as it bakes, which makes it the perfect base for the baked tomato and cheese topping.

While I do enjoy the taste of the traditional tomato and feta version, I wanted to bring more flavor to this dish, especially because spaghetti squash could be a bit bland on its own. In place of feta, I chose to use a spreadable, herbed cheese. Two of my favorite spreadable herbed cheeses are Boursin and Alouette. Both are usually available in the specialty cheese section, deli or refrigerated dairy section of the grocery store, and each comes in a variety of flavors. You can also use a crumbled feta, classic style or Mediterranean herbed, if you prefer.

What I enjoy about this recipe is that it offers lots of flavor, yet the steps are simple. It is also a good meal to prepare either during the week or for a nice Sunday dinner!

Baked Spaghetti Squash with Tomatoes and Herbed Cheese

1 large spaghetti squash
olive oil
Salt and pepper
2 teaspoons Italian seasoning, divided
1 container of spreadable herbed cheese (5.3 ounce Boursin or 6.5 ounce Alouette, your choice)
1 pint grape tomatoes, halved

  1. Preheat oven to 425 degrees. Line a baking sheet with aluminum foil.
  2. Cut the spaghetti squash in half lengthwise, scoop out the seeds and pulp. Gently pierce the flesh throughout with a fork.
    (*Note, you can pierce the squash with a knife and microwave it for a few minutes to help soften the outer skin for cutting)
  3. Lightly brush the inside and edge of each half of the squash with olive oil. Season the oil-brushed squash with salt and pepper. Place both side face up on the baking sheet.
  4. Coat both halves of the squash evenly with the spreadable cheese, then top each side evenly with the tomatoes and 1 teaspoon Italian seasoning.
  5. Bake for 45 minutes, or until the flesh can be easily shredded with a fork.
  6. Carefully use a fork to shred the cooked squash so it looks like spaghetti strands. Mix the melted cheese and tomatoes with the squash as you are shredding.
  7. Place the shredded squash, tomatoes and cheese into a large bowl. Drizzle a bit of olive oil and stir to lightly coat the squash. Mix together and season with the remaining Italian seasoning, and salt and pepper to taste.
Share

Cacio e Pepe Spaghetti Squash with Bacon and Peas

October 24, 2021 Entrees, Menu No Comments

Traditional Cacio e Pepe is a Roman pasta dish that literally translates to “cheese and pepper.” This recipe marries together the simple yet enjoyable comfort dish with the classic combination of peas and bacon, and one of my favorite winter squashes.

If you are not familiar with spaghetti squash, it is an oval shaped winter squash, and the outer skin usually has a light or bright yellow color. Similar to other winter squash, like butternut or acorn squash, there is a fair amount of seeds and pulp that needs to be removed once cut open. The seeds can be seasoned and roasted like pumpkin seeds. However, the taste is a bit mild compared to butternut and acorn squash. The meaty texture also shreds after being cooked, which then makes it look like…you guessed it, spaghetti!

It is a healthy, nutritional alternative to traditional spaghetti if you are looking for a low carb pasta-type dish. It pairs well with spaghetti sauce, and also works well with butter, brown sugar and cinnamon, similar to what you would use for butternut squash.

What I enjoy about this recipe is that it offers lots of flavor, yet the steps are fairly simple. It is also a good meal to prepare either during the week or for a nice Sunday dinner!

Cacio e Pepe Spaghetti Squash with Bacon and Peas

1 large spaghetti squash
olive oil
1 teaspoon salt, plus more for seasoning
2 teaspoons Italian seasoning
2 teaspoons fresh cracked black pepper
1 cup cooked peas
1/2 cup cooked bacon pieces
1 cup shredded Parmesan cheese
1 cup Mozzarella cheese

  1. Preheat oven to 350 degrees. Line a baking sheet with parchment paper.
  2. Cut the spaghetti squash in half lengthwise, scoop out the seeds and pulp.
  3. Lightly brush the inside and edge of each half of the squash with olive oil. Season the oil-brushed squash with 1 teaspoon of salt and the Italian seasoning.
  4. Place the squash cut side down on the baking sheet. Bake for 45 minutes.
  5. Remove the squash from the oven, flip the squash over and let cool for a few minutes.
  6. Use a fork to shred the cooked squash so it looks like spaghetti strands. Shred most of the squash from each half, but be sure to leave a thin layer of the squash in the skin to maintain the shape. Do not discard the two empty halves.
  7. Place the shredded squash into a large bowl. Drizzle a bit of olive oil and stir to lightly coat the squash. Season with additional salt to taste. Add the cooked peas, bacon pieces, pepper and Parmesan cheese to the bowl. Mix well.
  8. Fill the empty squash halves with the mixture. Top with the Mozzarella cheese.
  9. Bake for additional 8-10 minutes, or until the cheese starts to melt.
Share

Game Day Taquitos

January 19, 2018 Appetizer, Entrees, Menu No Comments

Game time is here, and football fever is running rampant! Even if your beloved team didn’t make it to the playoffs, chances are that you will still be joining family and friends for fun food at a game day party.

As I’ve discussed in previous game day posts, the key to a successful party dish is to make it a quick hitter that is fun, tasty and easy to eat. The recipe that I’m sharing with you today tackles all of those requirements!

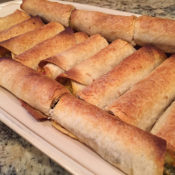
Taquitos are a Mexican dish that consists of rolled-up flour tortillas stuffed with a filling, and is crisp-fried. Think of it as a rolled-up taco. During one of our recent holiday gatherings, I decided to make my own version of taquitos, coming up with a few different filling options and choosing to bake the taquitos instead of frying them. Not only were they a big hit, they were also enjoyed by both adults and kids. Prep time (for the most part) was minimal, and the ingredients were tasty. Although the taquitos were served as a picky appetizer, they were filling enough and tasty enough to keep everyone satisfied and coming back for more. Hence, the perfect game day food!

The best part about taquitos is that you can get as creative as you wish with the fillings. While traditional fried taquitos use a flour tortilla, I found that the baked version works just as well with both flour and wheat tortilla shells. I’ve used both types of tortilla shells for my taquitos and and was happy with both versions. Listed below are a few of the fillings that I prepared, along with a few other filling suggestions that I think would work well. As always, I encourage you to get as creative as you wish.


STEP 1: THE FILLING

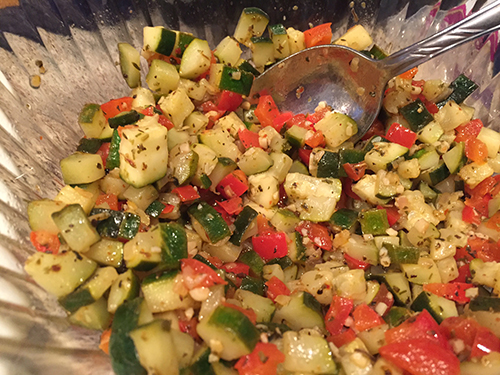
The key to a good taquito is the filling. So far, I have made two different types of taquito fillings: sautéed vegetables and chicken, cheddar and bacon. Both were able to be prepared ahead of time, and both worked well and were enjoyed by everyone.

For the sautéed vegetable filling, you will need the following:

2 tablespoons olive oil
1/2 cup chopped onion
1 clove garlic, minced
1 zucchini, finely chopped
1 yellow squash, finely chopped
1 red pepper, finely chopped
1 tablespoon chopped Italian parsley
1 teaspoon oregano
1 teaspoon dill weed
salt and pepper to taste
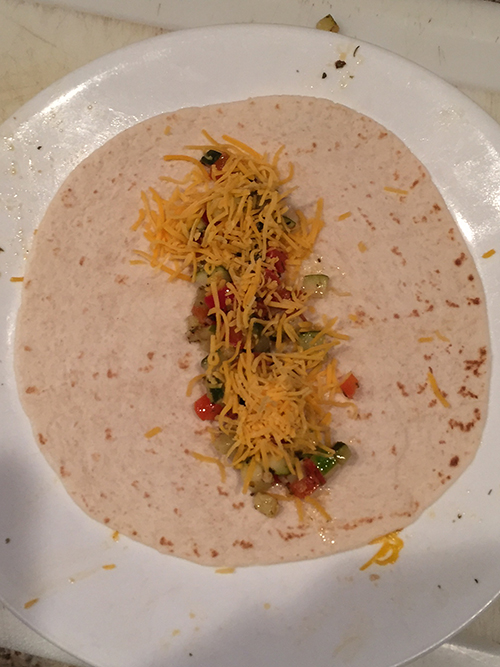
shredded mozzarella or cheddar cheese

Heat oil in medium skillet or wok over medium-high heat until hot. Add bell pepper, onion and garlic; cook and stir 2-3 minutes or until crisp-tender.

Stir in zucchini and squash; cook and stir 5-7 minutes or until tender.

Stir in herbs, cook until thoroughly heated. Season with salt and pepper to taste. Set aside to cool slightly. You will top the vegetables with the shredded cheese when you assemble the taquitos.


For the chicken, cheddar and bacon filling, you will need the following:

1/2 lb cooked and seasoned chicken breast, chopped (Perdue Short Cuts works well for this)

8-ounce package of shredded cheddar cheese

4-6 slices of cooked bacon, cut into small pieces


Other filling suggestions:

• steak, peppers and provolone

• meatballs and mozzarella

• seasoned chicken with blue cheese

• pulled pork, roasted red peppers and broccoli rabe

• marinated shrimp and scallops

….honestly, you can go any number of directions!

Regardless of what filling you prefer to try, one suggestion that I would make is to not make your fillings too wet. If you think that your fillings would go well with a sauce (say a marinara or a barbecue sauce), I would suggest that you serve those sauces as a side for dipping. Incorporating the sauces into the filling may make the tortilla shells soft and mushy, and they may not bake properly.


STEP 2: THE ASSEMBLY

Preheat your oven to 400˚.

As I mentioned earlier, I have used both flour and whole wheat tortilla shells and was very happy with the results of both.

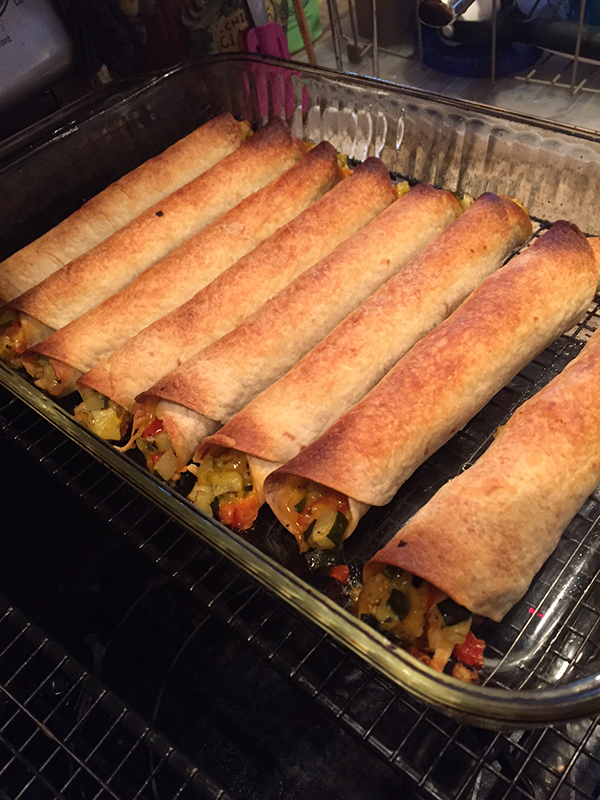
To assemble your taquitos, lay a tortilla shell out flat, and place a 1″ strip of your filling down the middle. Tightly roll up the tortilla shell, as if you were rolling up a cigar.

Place the rolled tortilla shells seam side down into a lightly sprayed 9″ x 12″ baking dish. Medium-sized tortilla shells will work the best with a 9″ x 12″ baking dish. If you have larger sized tortilla shells, you can trim the rolled shells to fit into the pan. You will fit about 8 rolled shells into the pan.

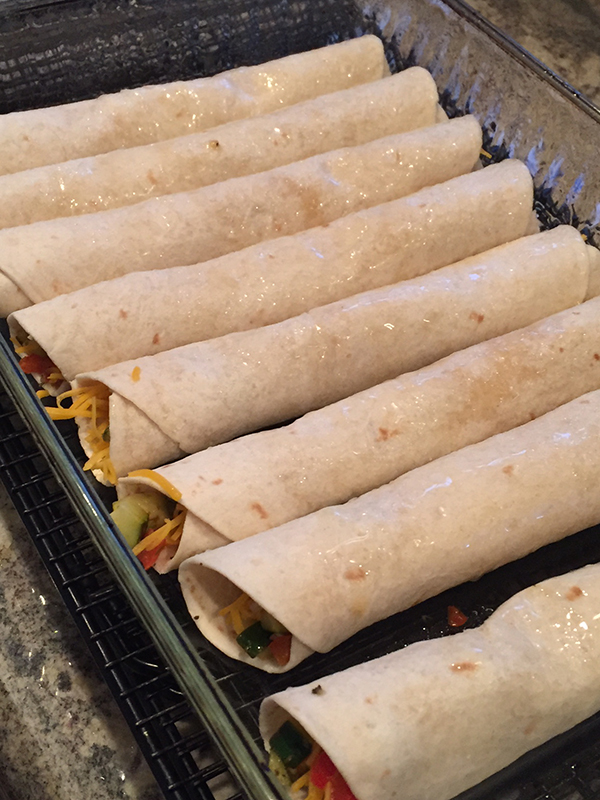
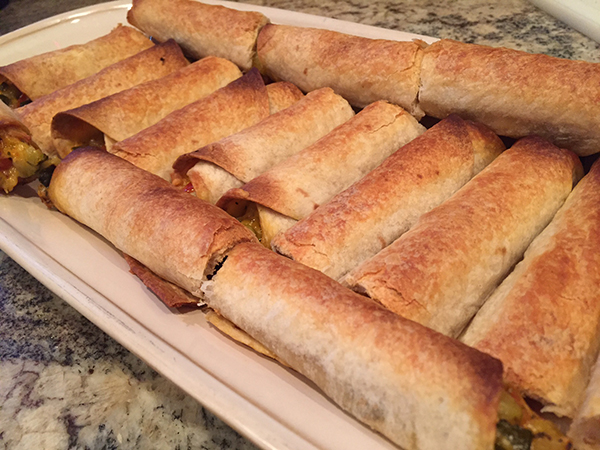
Lightly spray the top of the shells. Place the dish, uncovered, into the oven. Bake for 20-25 minutes, or until the shells start to brown and crisp. Remove from oven, let cool for a few minutes. Remove from baking dish and cut the baked taquitos in half. Serve and enjoy!

Share

Archives

powered by
Socialbar