For years, a big part of our Easter tradition has involved baked goods. We would make Easter bread, Italian rice pie (which Ava has since taken over and now claims as her own), fiadone cheese pockets, and pizza rustica—also known as pizza chena, or simply Easter ham pie.
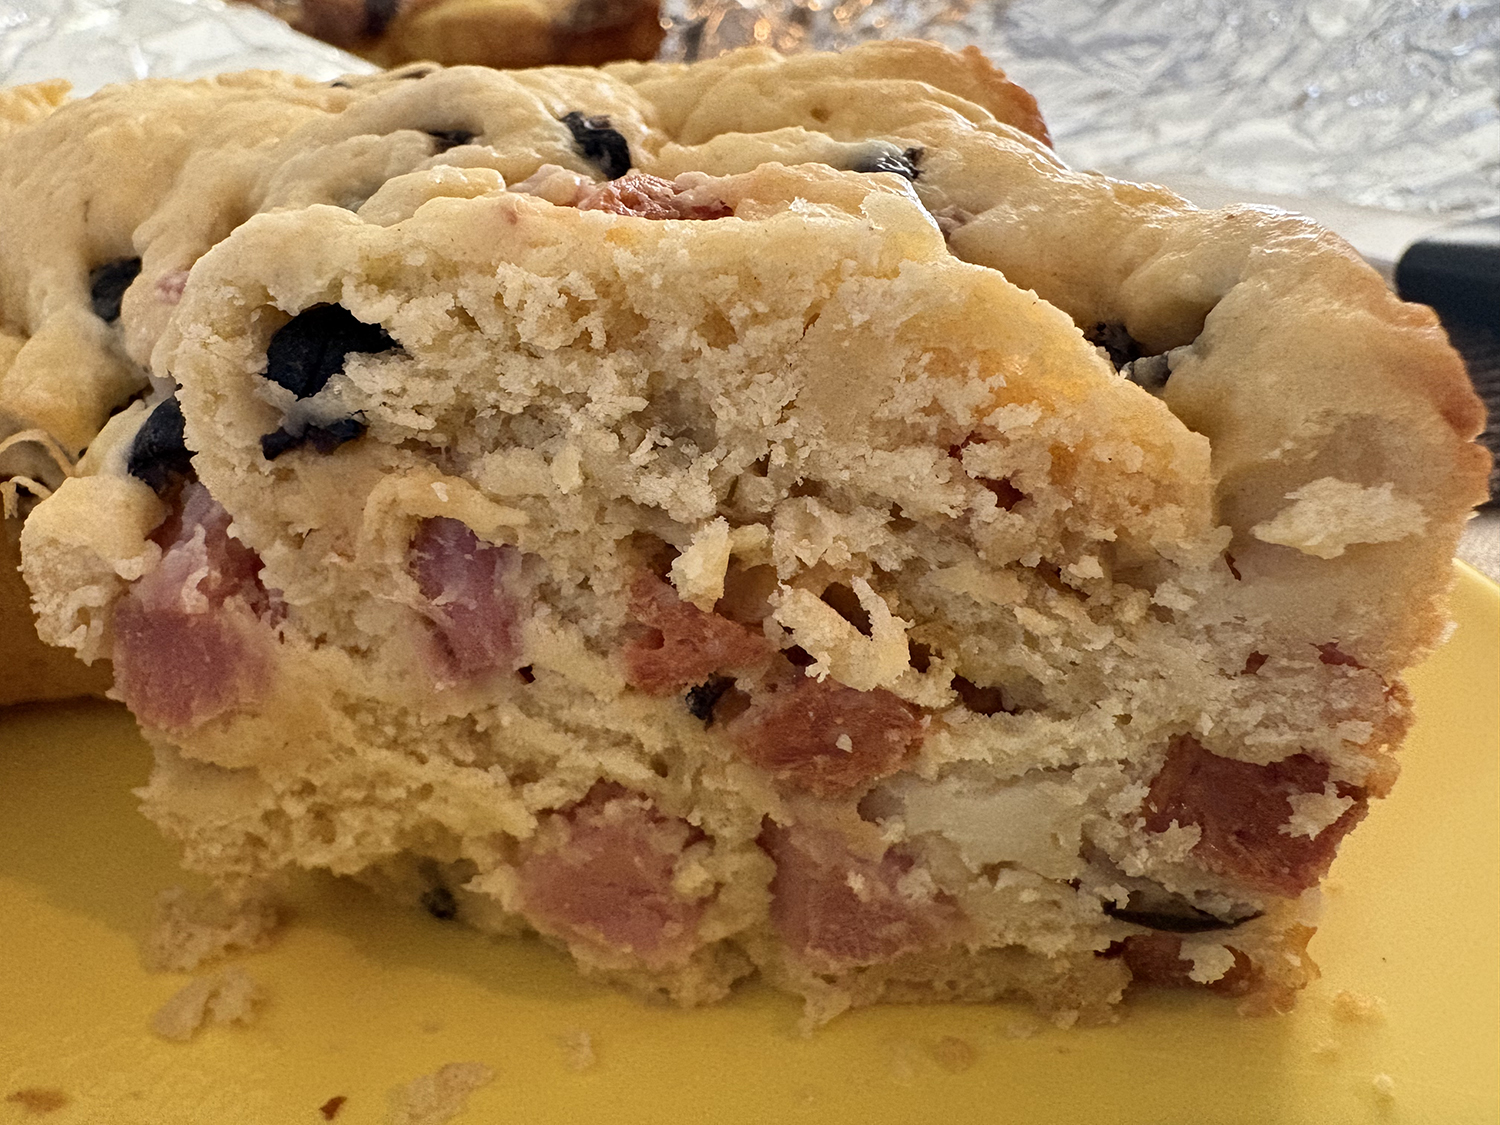
Pizza rustica, as I prefer to call it, is a rustic pie made with eggs, various meats such as ham, salami, pepperoni, or mortadella, and cheese—provolone being my choice. I also like to add black olives, simply because I love them, and they complement this dish beautifully.
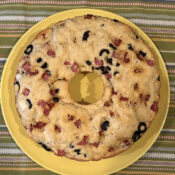
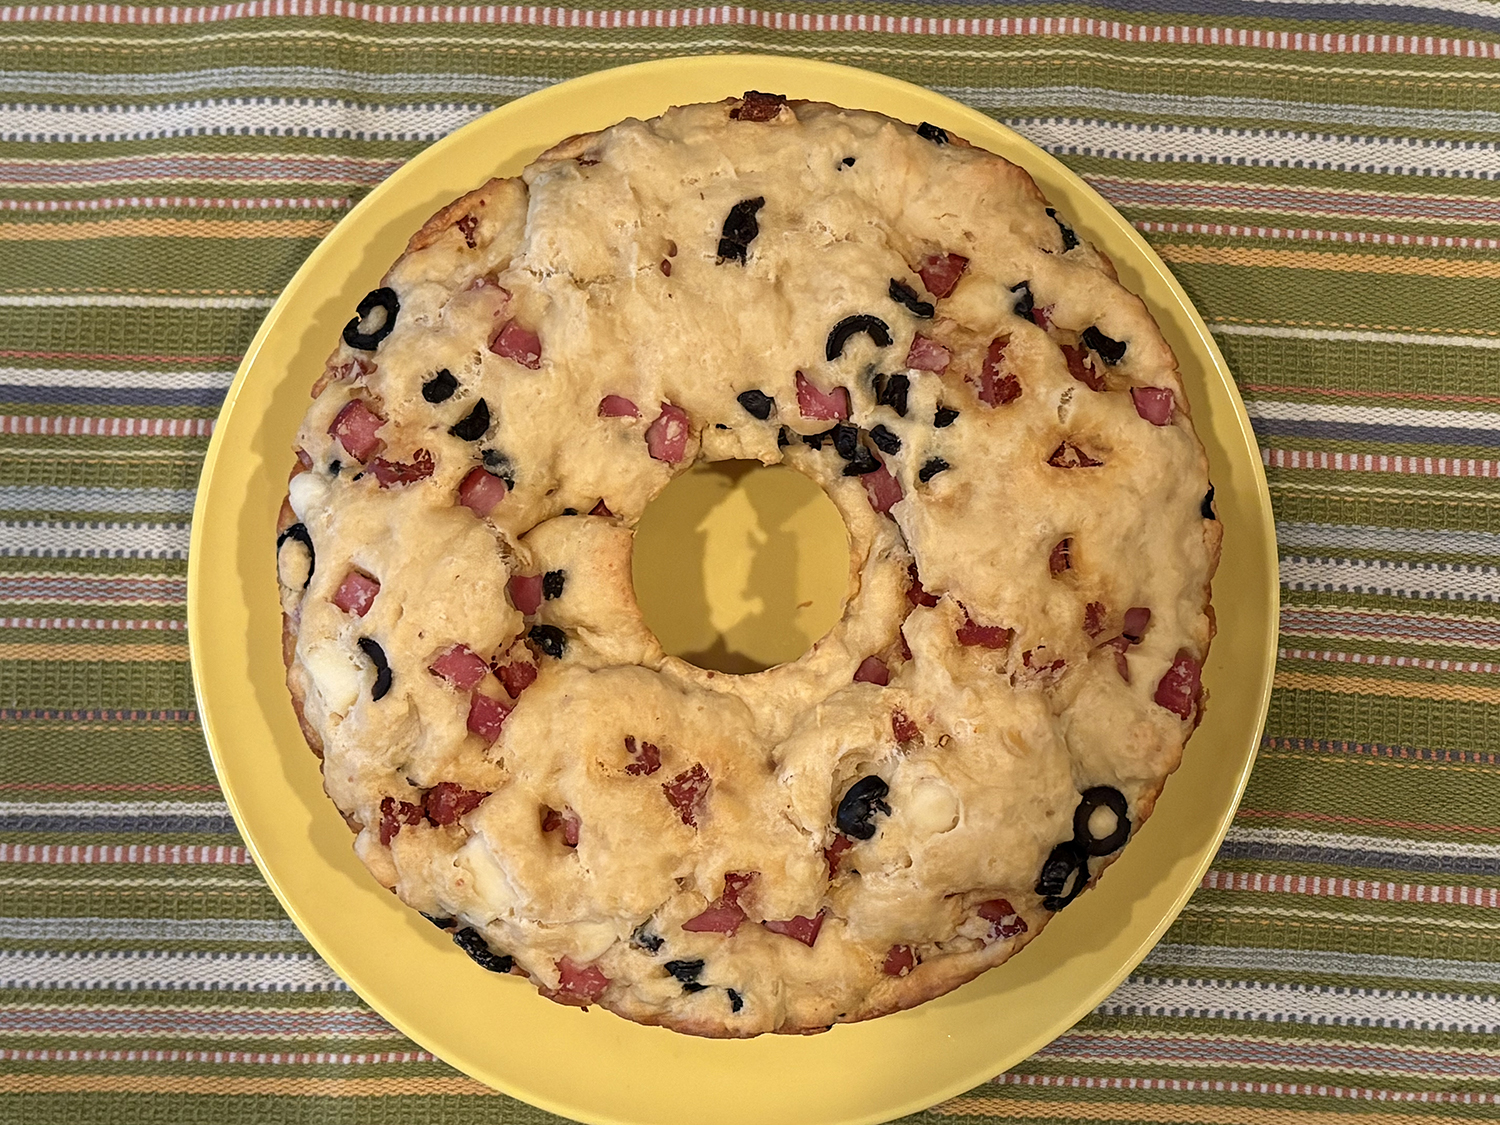
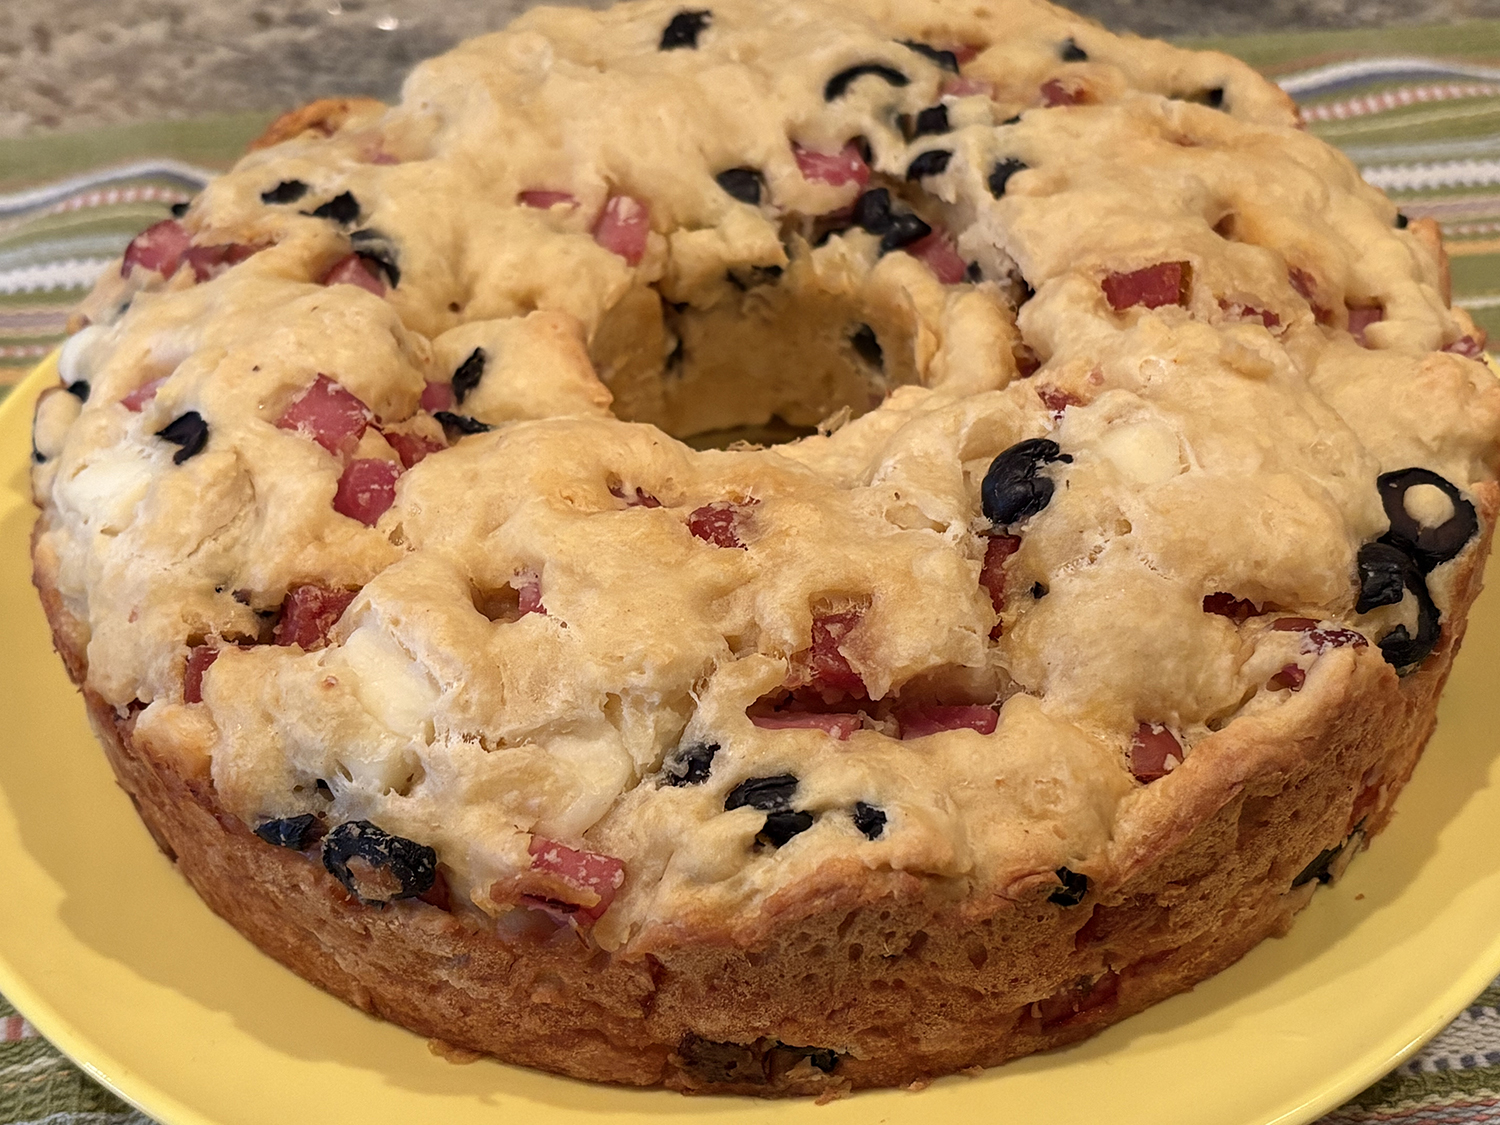
This year, I discovered an interesting variation called Ciambella Rustica, courtesy of Giovanni Siracusa. The concept and ingredients are basically the same, with the addition of flour and olive oil, which transforms it into more of a bread or savory cake. It can be baked in either a tube pan or a Bundt pan (cue My Big Fat Greek Wedding). I was intrigued and decided this was the recipe I would follow this year.
The process was wonderfully simple—everything mixed in one bowl, poured into the pan, and baked. The result had the same savory flavors as traditional pizza rustica, but with a more bread-like texture that was surprisingly complementary.
The beautiful part of traditions is the comfort of revisiting moments we love. Another wonderful part is allowing ourselves to update them—carrying the original meaning forward in a new and special way. This recipe does exactly that.
I realize I’m sharing this a bit late for Easter, but honestly, it’s a dish worth making any time of year. It’s far too delicious to enjoy just once.
To watch Giovanni Siracusa’s process and to get his recipe, click here.
The big debate at my family’s Thanksgiving dinner has never been about wanting a leg or a wing, white meat or dark meat, or should the potatoes be sweet mashed or twice baked. Rather, it’s always been about what dessert would you like to try and how big of a piece? The dessert table can quite honestly get to the point of insanity. A tasty and enjoyable insanity, but insanity, nonetheless.
Years ago, my Mom would make two homemade apple pies for Thanksgiving. One we would have for breakfast while we watched the Thanksgiving Day parade on the television, the other we would enjoy for dessert. There would also be the occasional coconut custard pie added to the mix. As I started to develop my passion for cooking and for all things pumpkin, it became my tradition to make the pumpkin pie for our dessert table. When my daughter, Julianna, learned how to make a pumpkin pie from scratch in her home economics class, she asked to take over the pumpkin pie duties. My brother, on the other hand, took over the apple pie responsibilities a while back, making not only the traditional lattice crust version that my Mom would make, but also an apple cider cream pie that is beyond amazing. Not only do we have pumpkin pie and two variations of apple pie represented, but there are also holiday cookies, candies and chocolate covered cherries thrown into the mix for the grandkids who are not fans of the traditional Thanksgiving desserts.
It has become an annual pre-holiday conversation, trying to figure out how we can scale this all back a bit. The argument is always that we don’t need all this dessert…but, it’s only one time of year and it all tastes so good. So, every year we have this dessert extravaganza that we all enjoy and appreciate, but honestly are only able to sample just a tiny bit of each. We are just coming off the biggest meal of the year, and now we are trying to enjoy little bits of these delicious baked goods to satisfy our sweet tooth and our curiosity. The coveted ‘sliver’ as my wife Daria would always say.
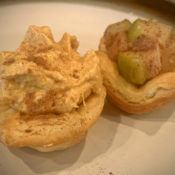
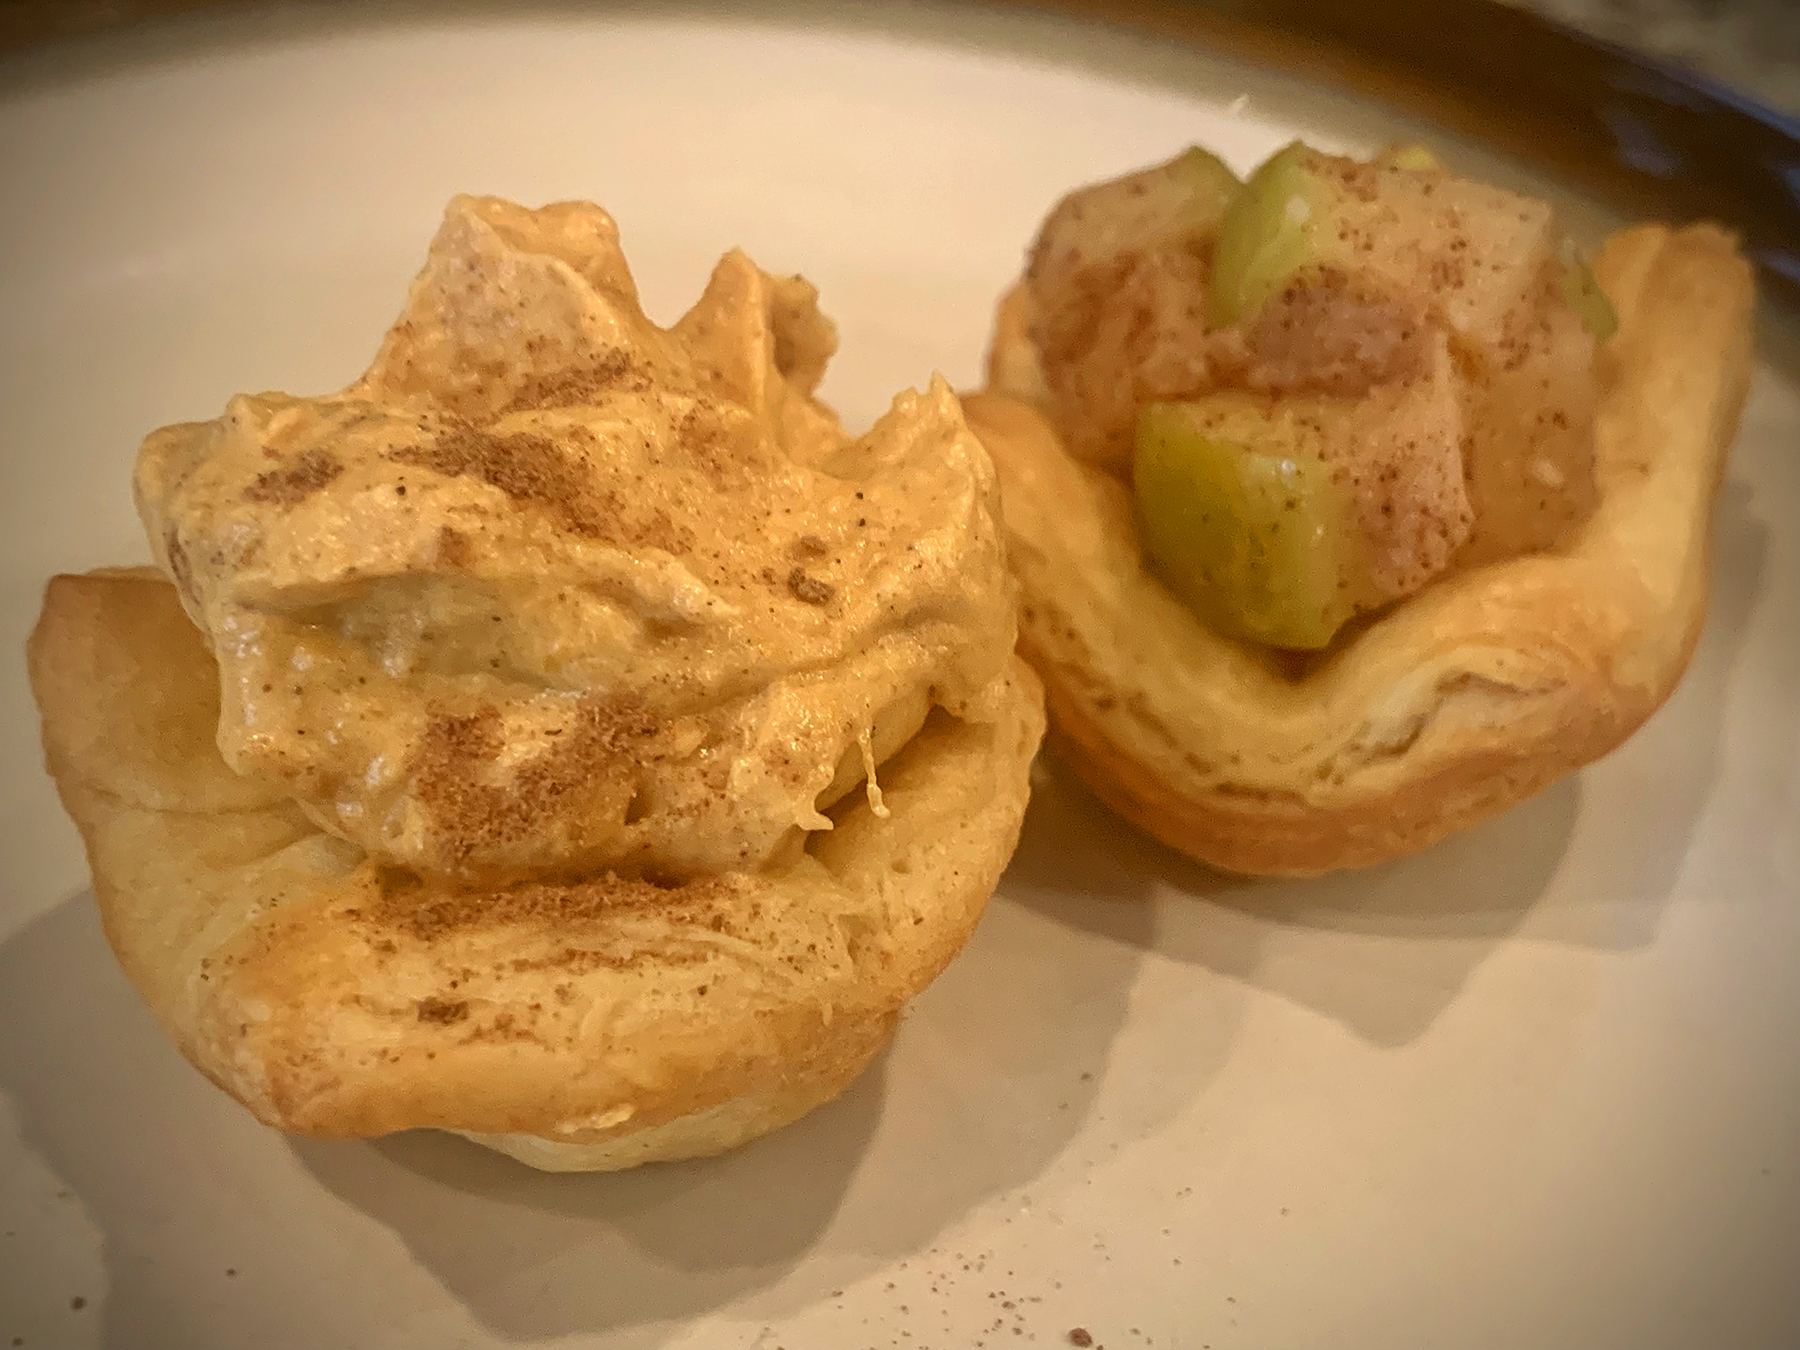
This past summer, during one of the many get togethers that my close friends and I enjoy, I had made a dessert using crescent rolls cut into 24 individual pieces and baked in a mini muffin tray. The individual pastry cups were topped with whipped mascarpone cheese and berries. The dessert was a big hit, not only for the combination of flavors but also for the simplicity of it being one bite. One piece may have been plenty, but if you wanted more you could take another single serving. No slivers, no samples. It was a nice way to enjoy dessert in a small portion. This, of course, got me thinking about applying this approach to Thanksgiving. With a little bit of research, and a test batch shared with a good friend of mine who has always been one of my favorite taste-testers, I came up with what I think will be the perfect compromise for my family’s Thanksgiving dessert table.
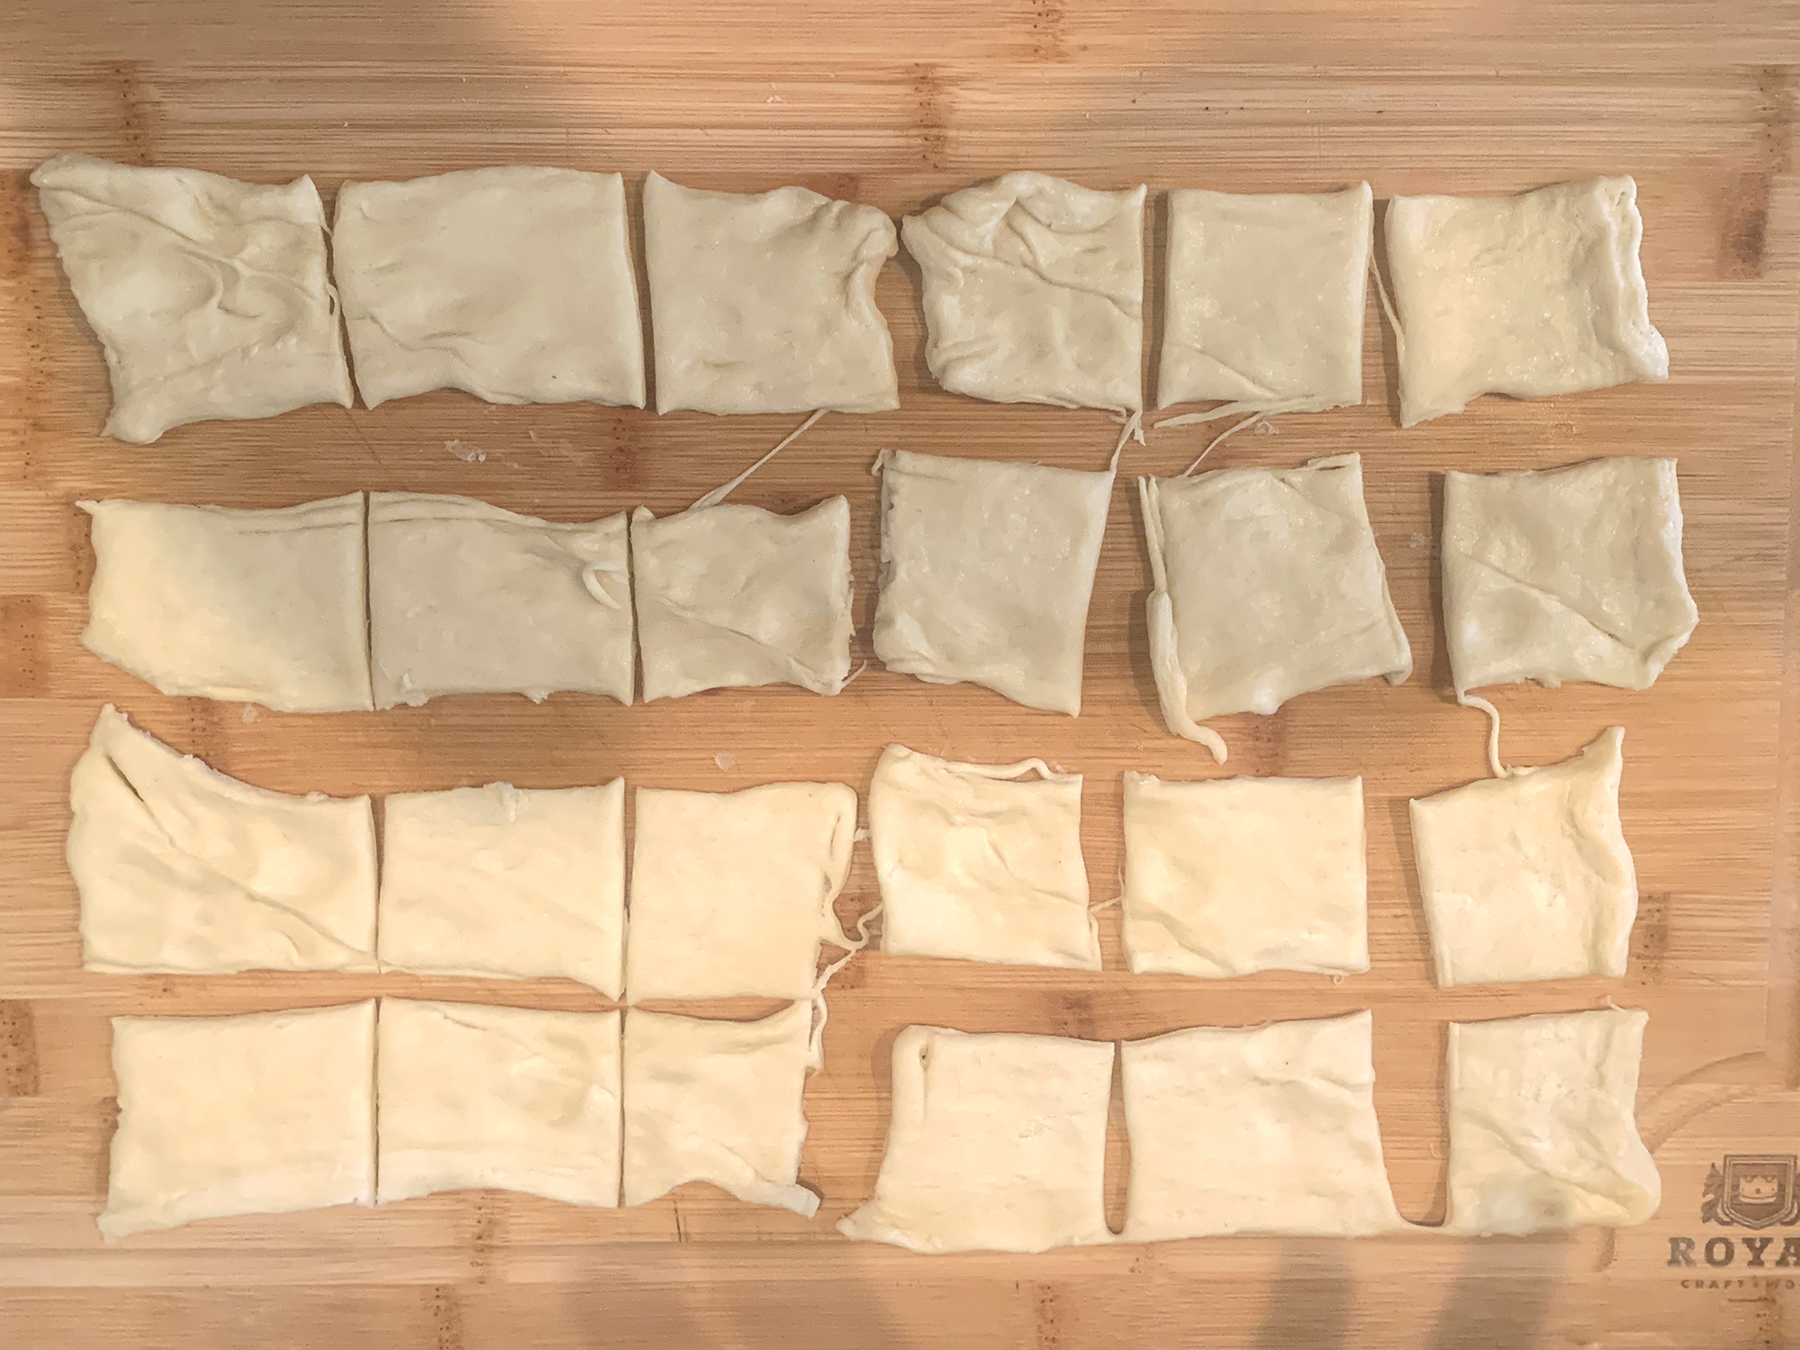
The recipe below will make 24 individual bite sized servings. You will need one container of crescent rolls for the crust. The dough will get rolled out into one sheet, then cut into 24 individual pieces. Grease a mini muffin tray and place each pastry square into a cup. Bake at 350 degrees for 10 minutes, or until the pastry starts to turn golden brown. Remove from oven and let cool for 10 minutes. The pastry cups taste best immediately after being baked and cooled, and should be filled just before serving. I would not recommend filling the pastry cups too far ahead of time, because they may get soggy. You can bake the pastry cups ahead of time and place them, unfilled, into a container and then refrigerate. You can then warm them up in the oven before adding any filling and serving them.
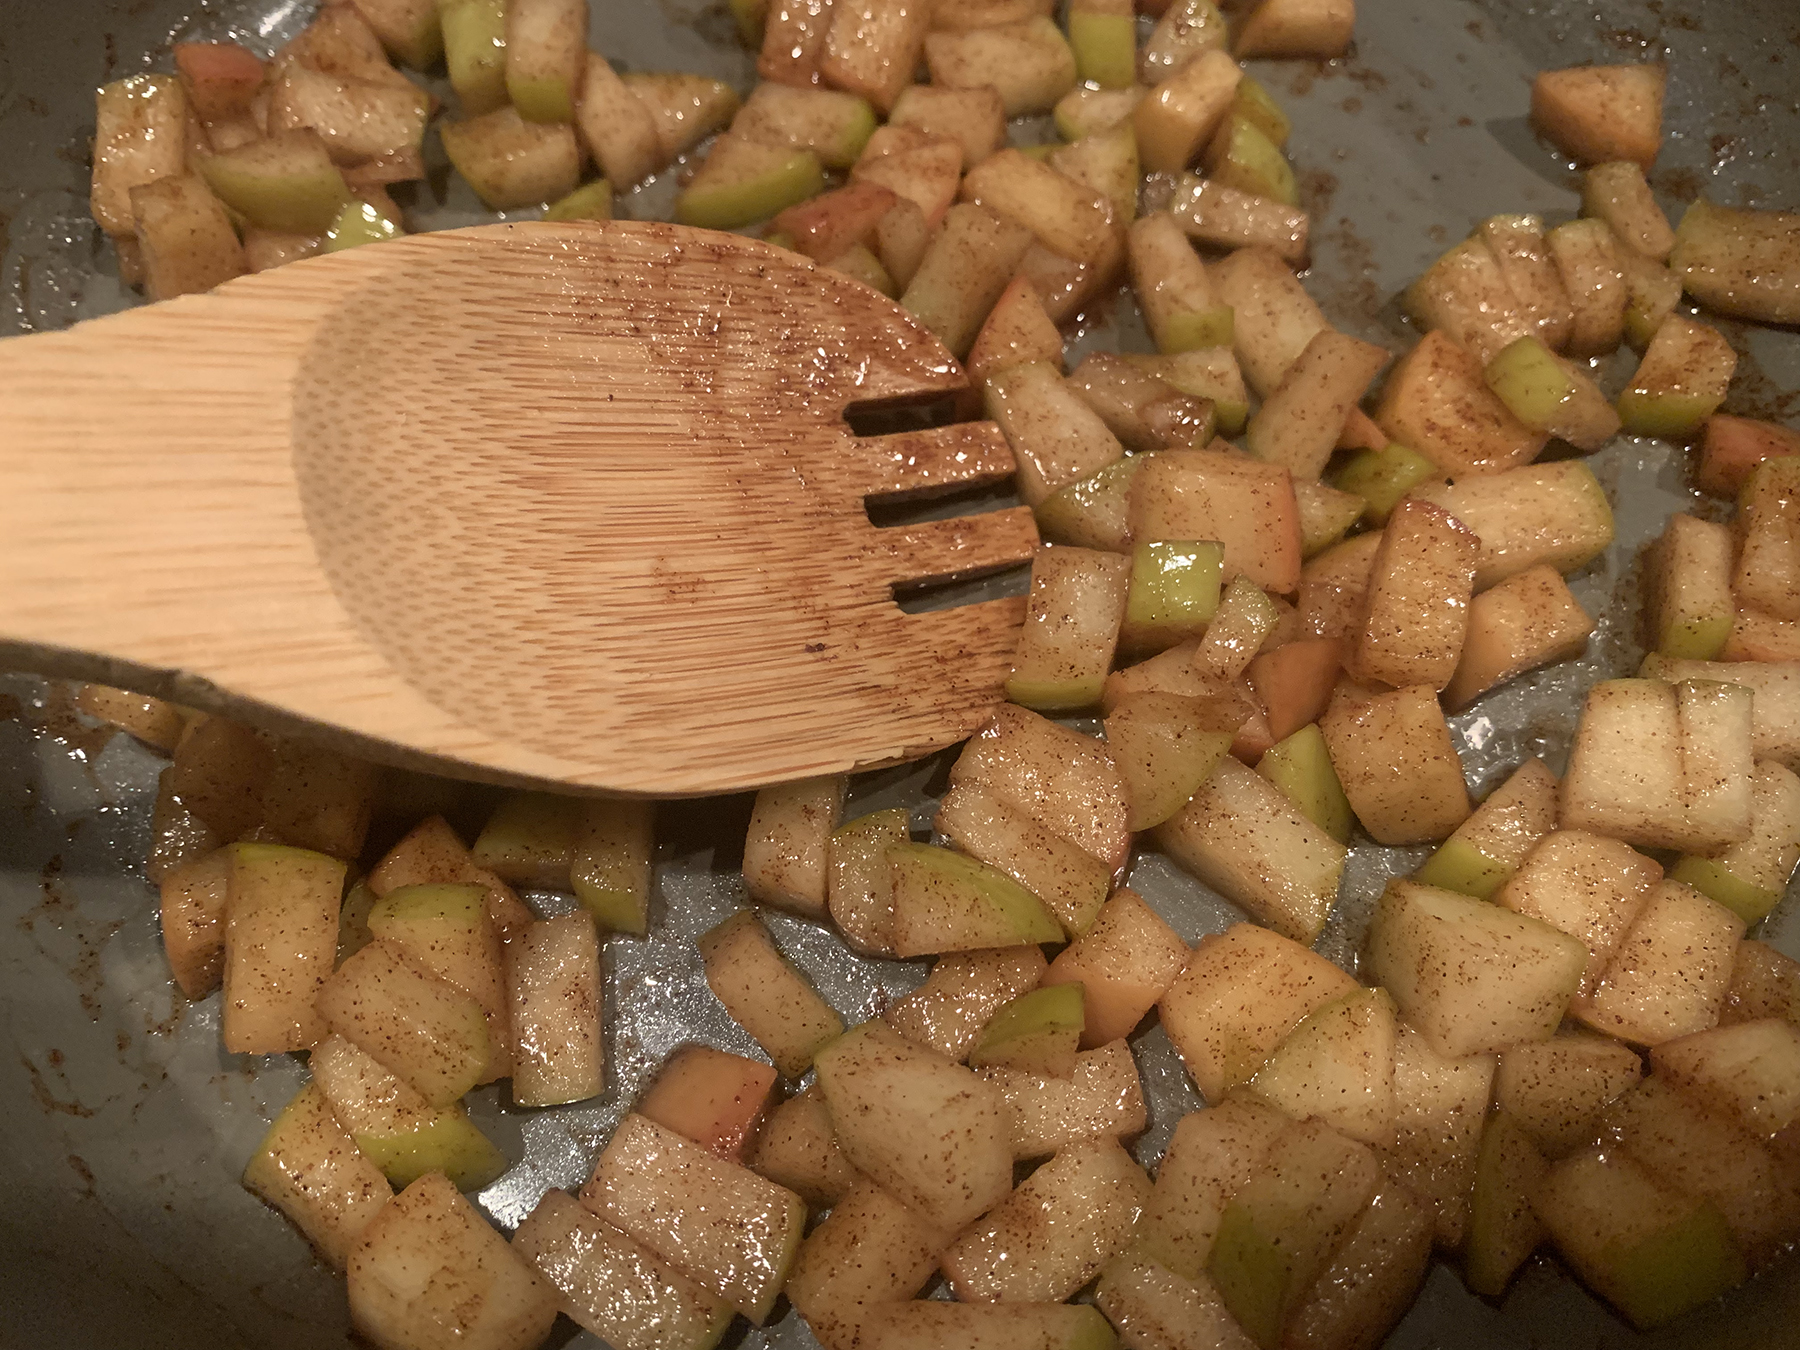
The apple pie filling sautéing in the pan.
The two pie fillings that I made are not only Thanksgiving approved, but they are also simple to make and very versatile. The measurements for each filling will make enough for 24 individual pastry cups of each, most likely with leftover filling that can be used in several ways.
The apple pie filling, inspired by a recipe that I found online, is made by cooking diced apple pieces tossed with cinnamon, sea salt, vanilla extract and maple syrup in butter on the stove top for 15 minutes. These spiced apples make for a great pie filling, and they also work well as an addition to yogurt and oatmeal, as a topping for pancakes, waffles or ice cream, or even just on their own as a snack.
The pumpkin pie filling is a no-bake filling that combines canned pumpkin with cinnamon, pumpkin pie spice, milk, vanilla pudding mix and whipped topping. The recipe for this pie filling will make more than enough needed. The leftover filling can be used in a no-bake graham cracker crust (chilled for 4 hours, if so), served as a dip alongside spiced wafers, or simply enjoyed on its own as a pumpkin spiced pudding. During my test run, I made 12 apple and 12 pumpkin, with plenty of extra leftover filling of both to enjoy.
Whether you choose either of these suggested pie fillings, or come up with your own individual dessert filling (coconut custard, chocolate or banana cream…just to name a few), this presentation will make dessert fun and manageable for everyone.
To serve, you could either assemble the pastry cups before presenting them ready to eat, or you could place the empty pastry cups and a dish of the fillings that you make on the table and allow your guests to make their own bite sized treats. Whatever method you choose, don’t forget the whipped cream topping!
3 apples, diced (suggested apples: Granny Smith, Gala, Pink Lady, Golden Delicious. A variety works very well) 2 tablespoons water 1 tablespoon butter 1 tablespoon maple syrup 1/2 teaspoon ground cinnamon 1/8 teaspoon fine sea salt 1/4 teaspoon pure vanilla extract
Cut apples into small, 1/2 inch cubes. Put apple pieces into skillet with 2 tablespoons water. Cover, cook over medium heat for 5 minutes, stirring occasionally until apples become slightly soft and water is absorbed. Add butter to the pan, stir until apples are evenly coated. Continue to cook for another 5 minutes, stirring occasionally, until apples are softened. Add maple syrup, cinnamon, salt and vanilla extract. Stir until well mixed. Continue to cook for another 5 minutes. Remove from heat. Serve warm or chilled!
No-Bake Pumpkin Pie Filling
1 15-ounce can pure pumpkin puree 1 3.4-ounce box instant vanilla pudding 1 teaspoon ground cinnamon 1 teaspoon pumpkin pie spice 1/4 cup milk 1 8-ounce container whipped topping
Using a hand mixer or stand mixer, combine the pumpkin puree, vanilla pudding mix, cinnamon, pumpkin pie spice and milk in a mixing bowl until well combined (you can follow the suggested mixing time on the pudding box). Fold in the whipped topping one tablespoon at a time, until you get the desired taste and texture. You can use as much whipped topping as you prefer, up to the entire 8 ounces. Chill for four hours before serving.
Saint Patrick’s Day, March 17th, is a day of celebration filled with parades, parties, and lots of fun, food and drink. Right on the heels of this Irish-inspired day of celebration is the Feast of Saint Joseph, which is celebrated on March 19th. Although this day may not be honored with parades, songs and green beer, it is celebrated with one of my all time favorite Italian pastries, Zeppole di San Giuseppe (Saint Joseph’s Cakes).
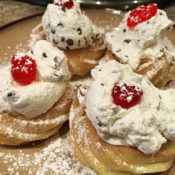
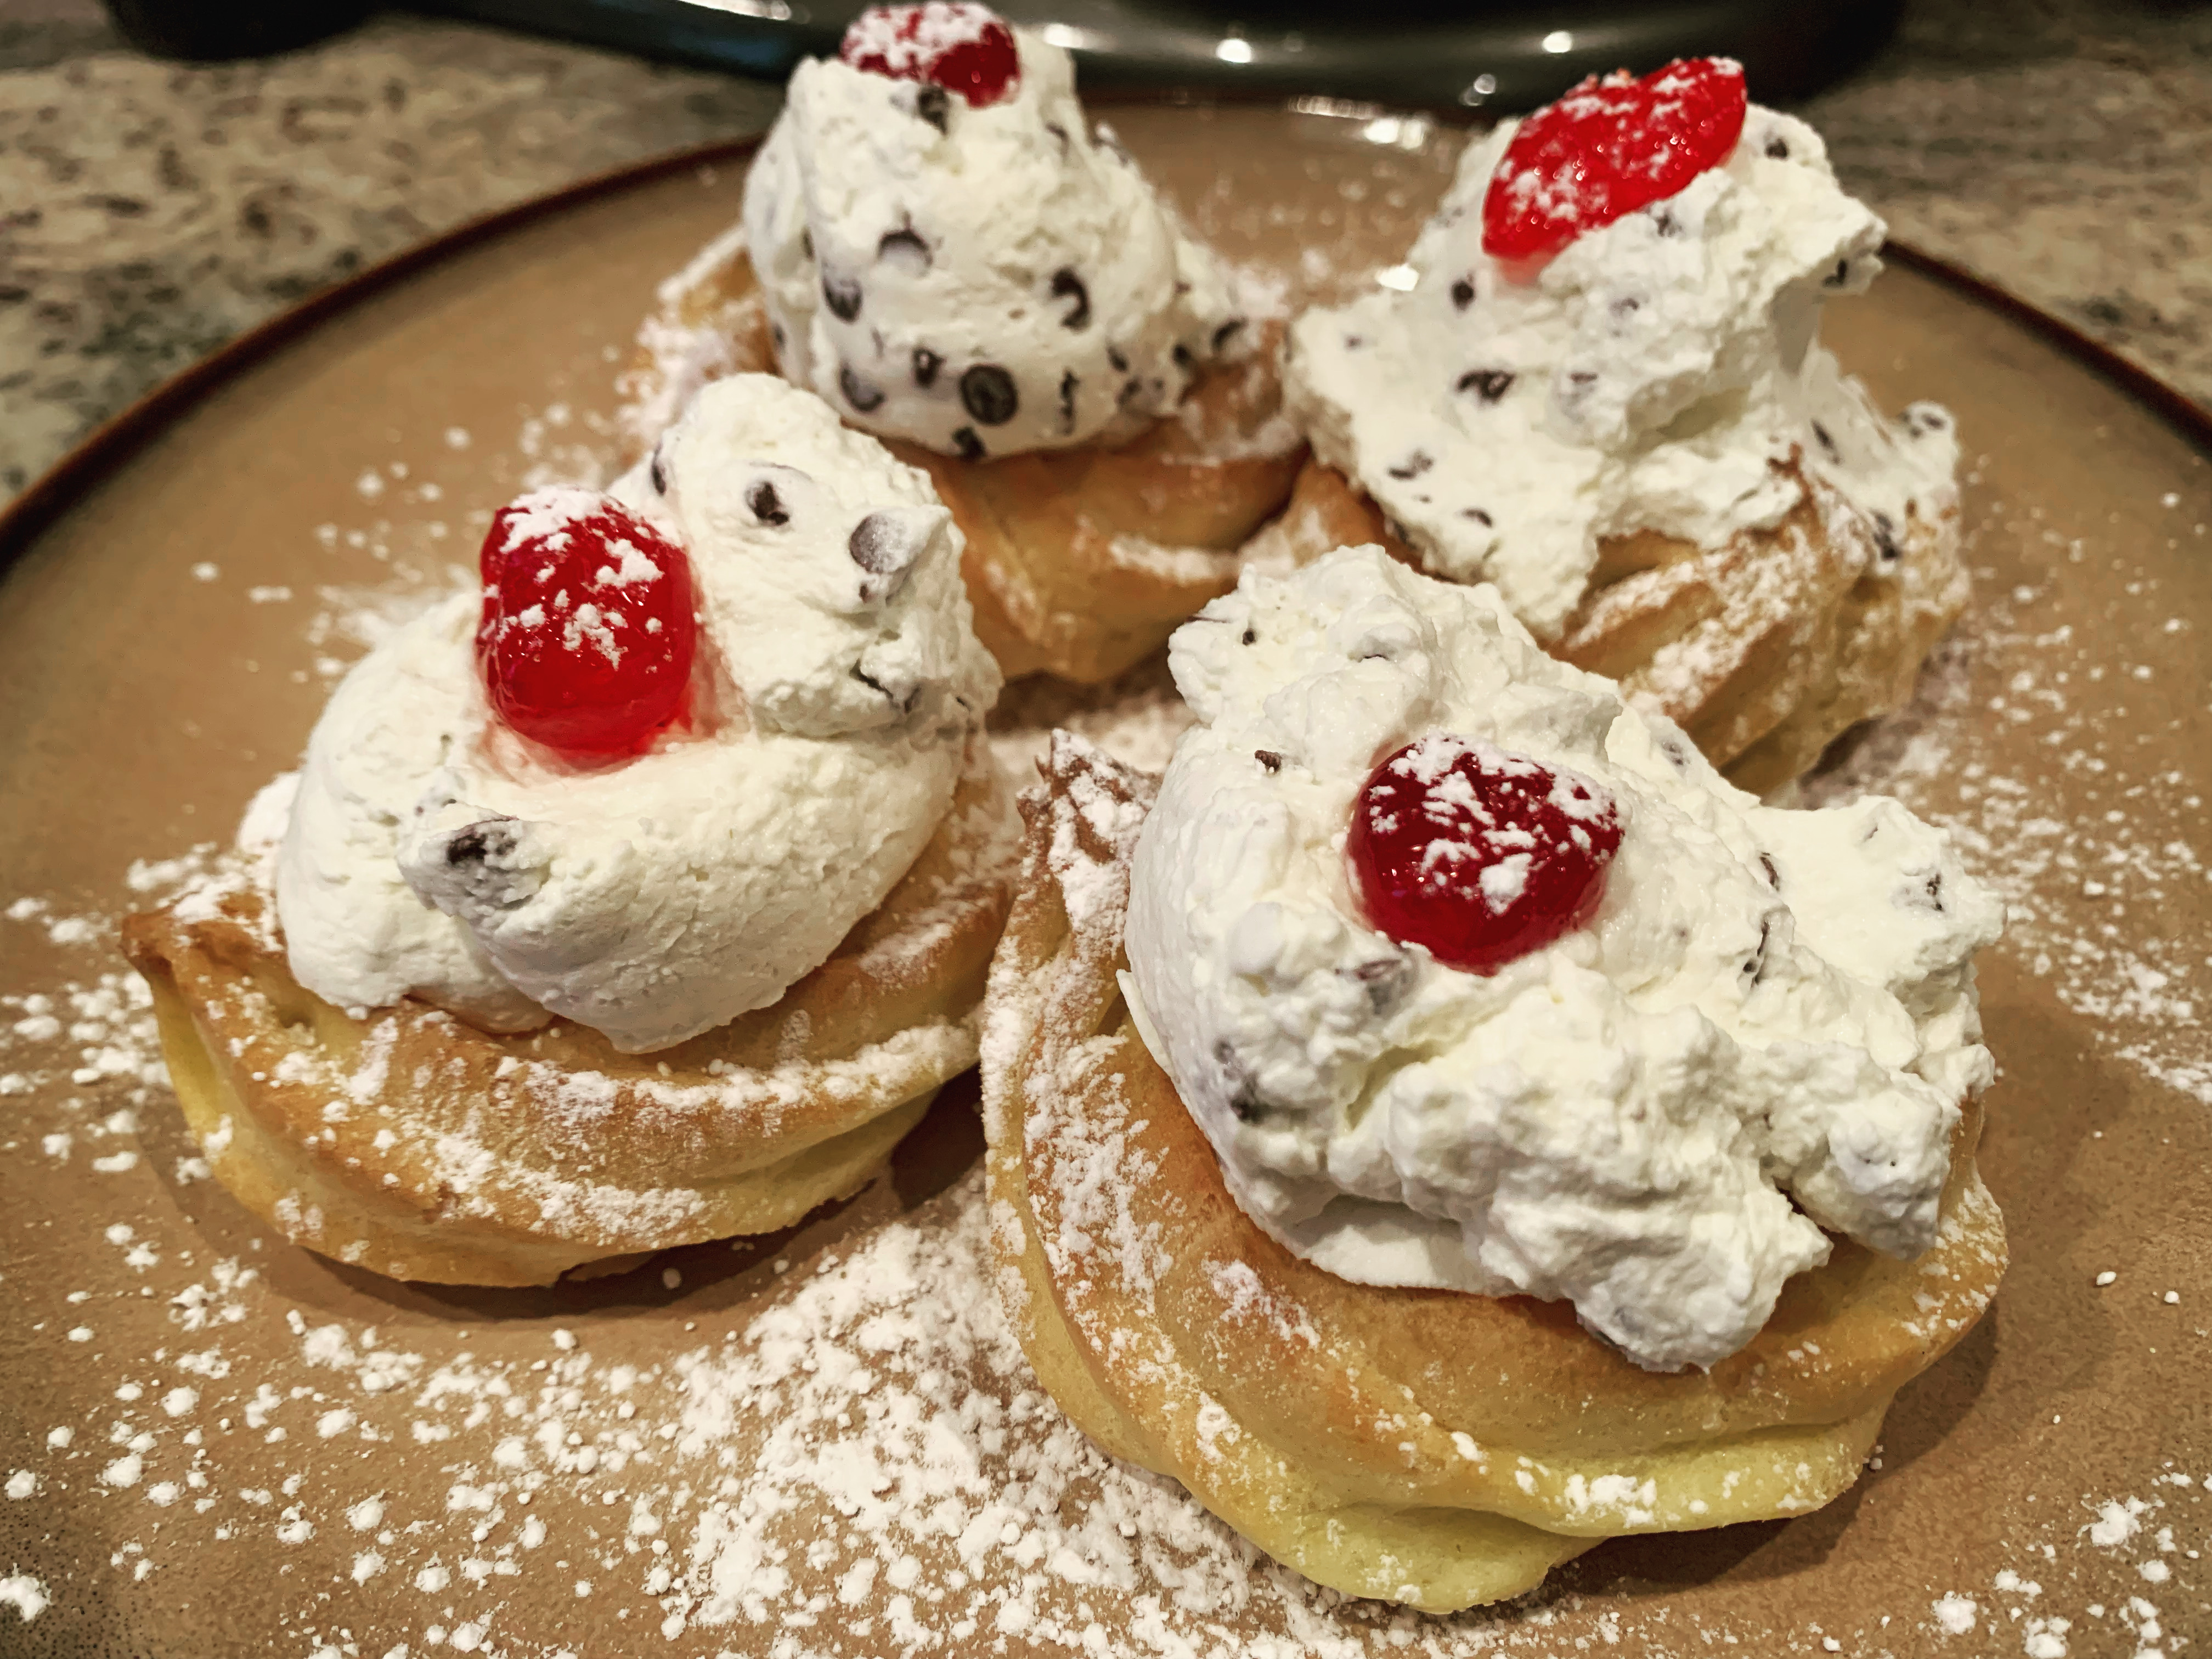
Zeppole is an Italian cream filled pastry, similar to a cream puff. The cream fillings most often used are chocolate, vanilla, or ricotta. The pastries are usually topped with a candied cherry, and you must not forget the dusting of powdered sugar to finish it off!
The recipe that I’m sharing with you today uses mascarpone cheese in place of the more traditional ricotta. I am a huge fan of mascarpone, which is a soft, spreadable Italian cream cheese. I often crave the creamy texture that is created when mascarpone is folded into home made whipped cream. With the addition of some powdered sugar and vanilla extract for flavoring, and mini chocolate chips for extra fun texture and sweetness, this version of an Italian cream filling can do no wrong.
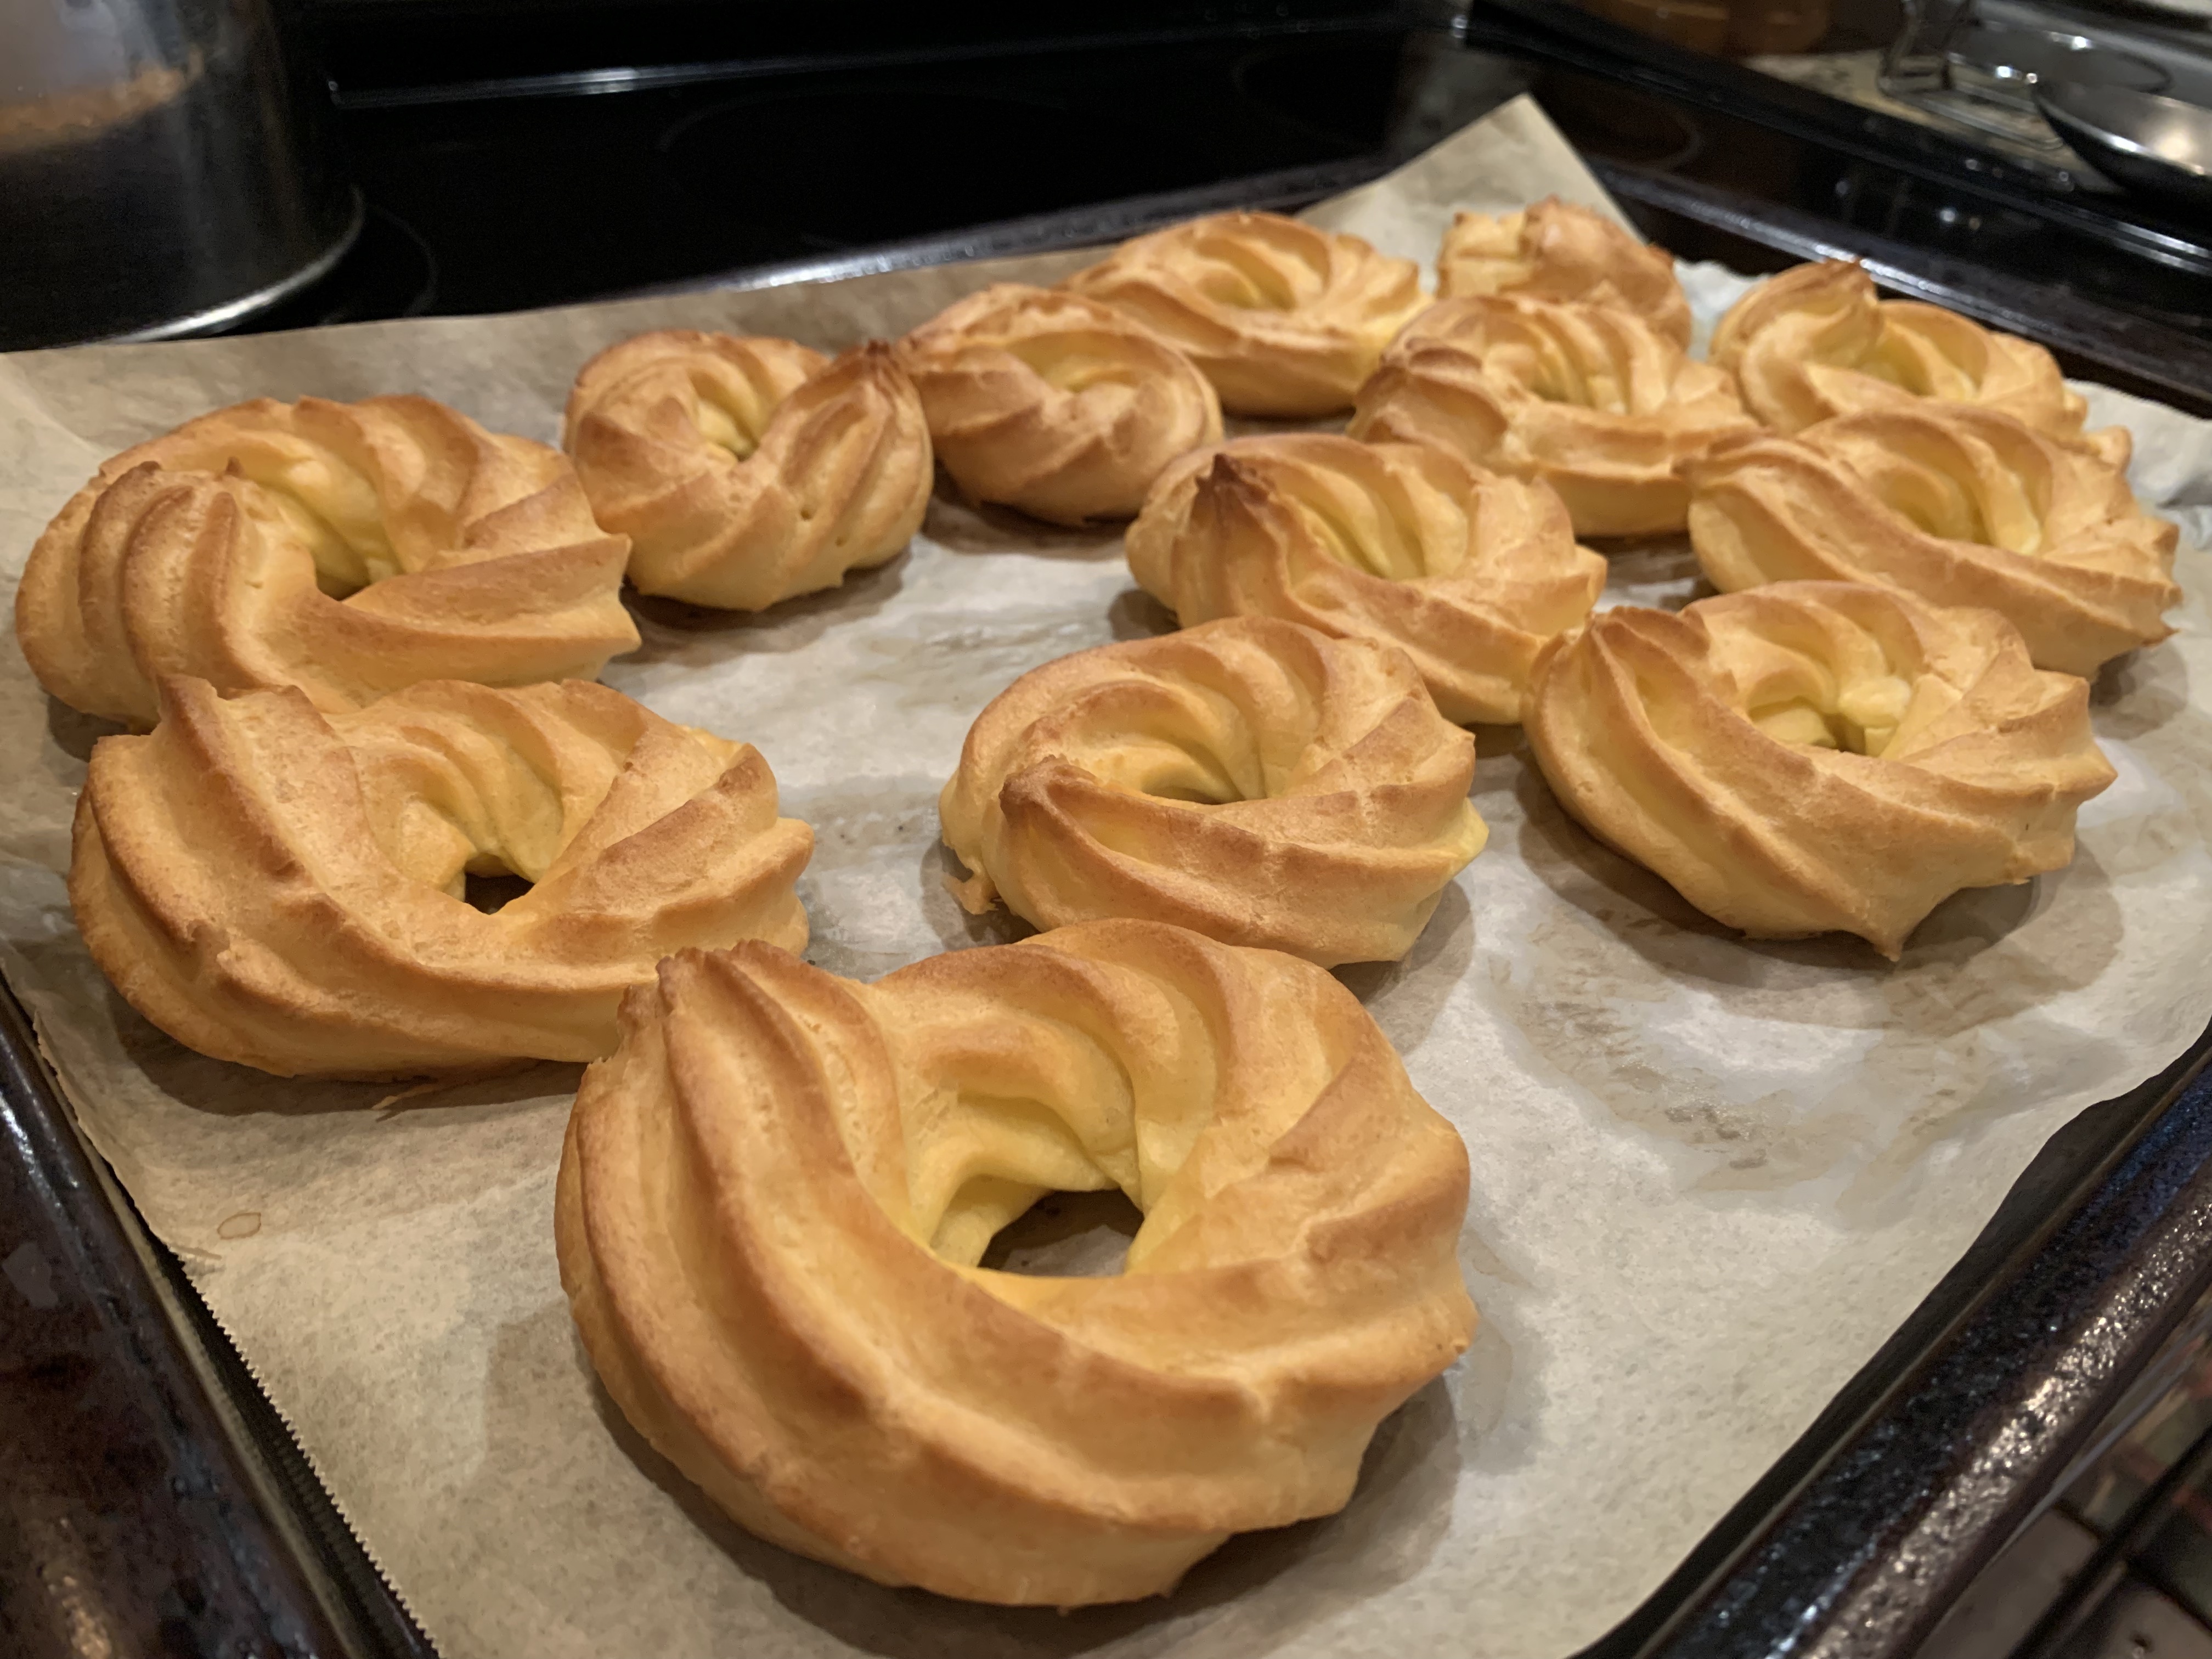
There are two methods that you can use to shape the pastry. You can pipe the pastry dough with a pastry bag, or you can simply use a tablespoon to scoop out individual dollops of pastry dough. You can make the puffed pastries and the cream filling ahead of time. The puffed pastries will keep well in an air-tight container for 1-2 days. You can also freeze them for a few months. They will defrost at room temperature in about 10 short minutes. The cream filling can also be made ahead of time and will stay well in the fridge for a few days. Just be sure to not assemble the zeppole until you are ready to serve them. You can add the cream with a spoon, spatula or a pastry bag if you have one.
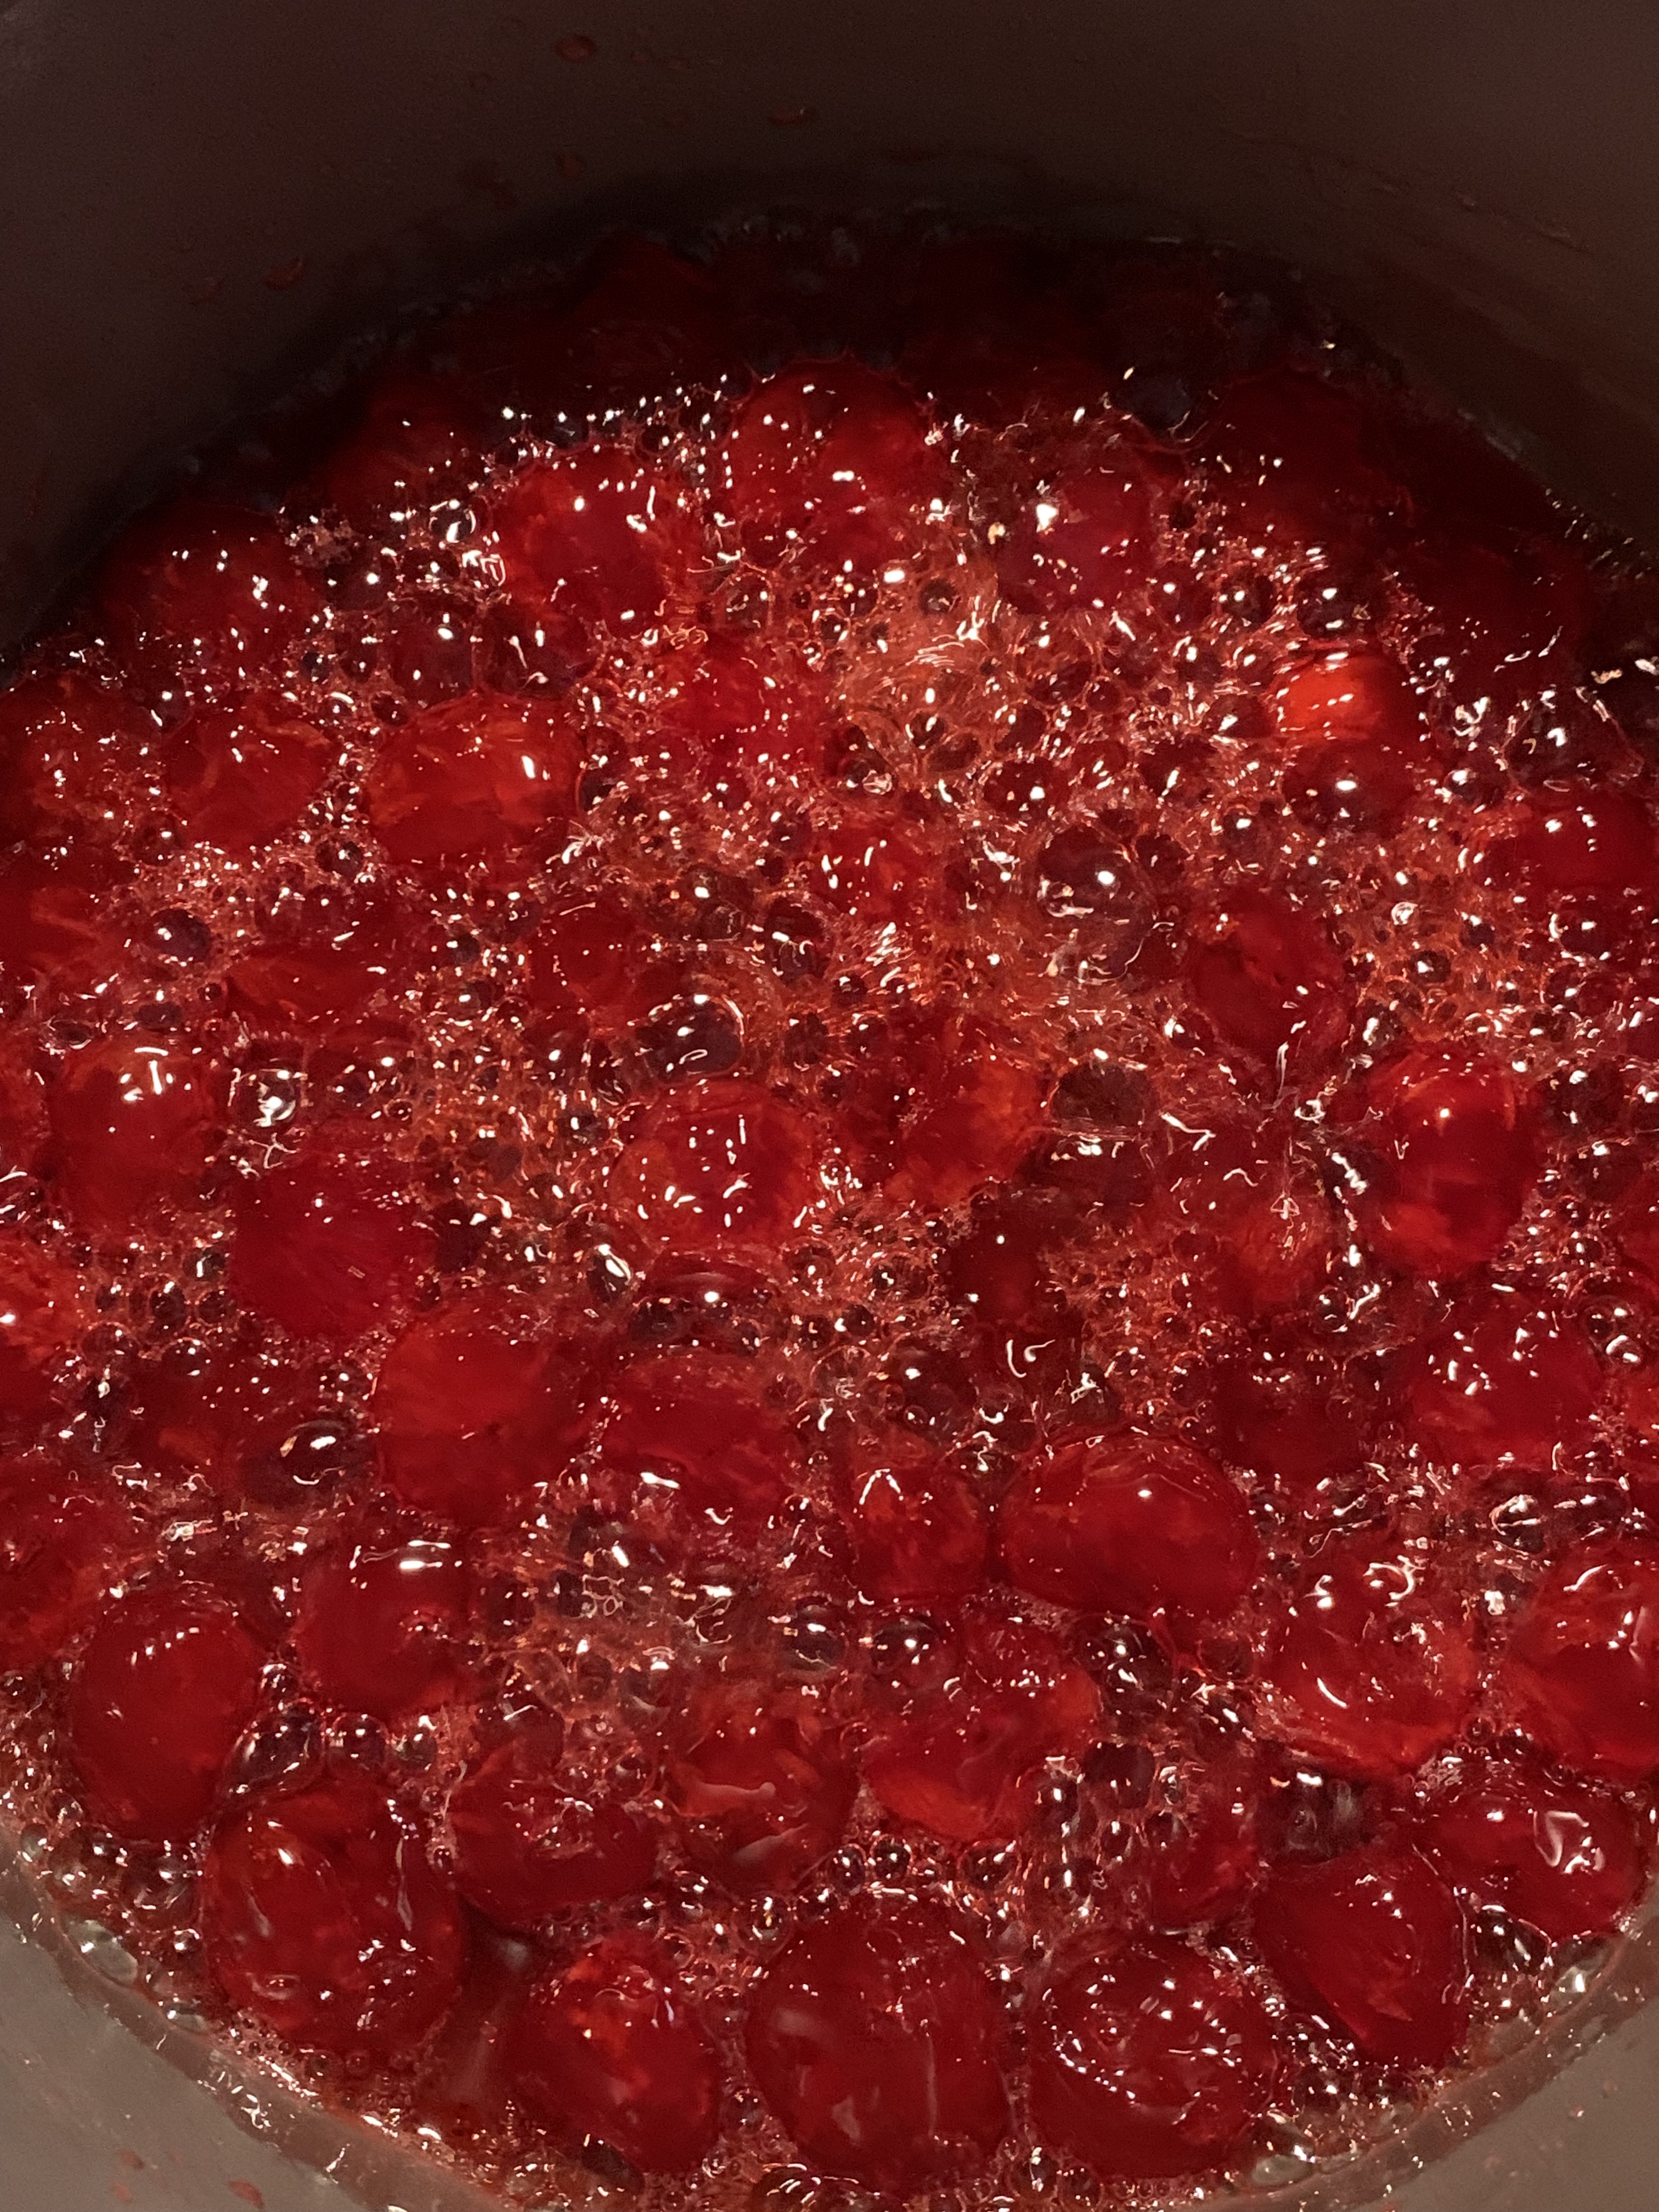
As I mentioned above, these cakes are often topped with a candied cherry. A maraschino cherry fresh out of the jar would also work, but there is something fun and elegant about the candied cherry. While candied cherries are easier to find during the holiday season, I do have a go-to recipe for home made candied cherries, which can be found at the bottom of this post. It’s a fairly simple recipe, which takes about an hour to prepare. But again, the cherry on top is just that….the cherry on top. It’s not necessary, and once you get a taste of this dessert (with or without the cherry), I’m sure you’ll agree that it is a timeless treat.
The pastries, baked for 20-25 minutes, ready to be filled.Maraschino cherries slowly boiling, ready to become candied cherries.
Zeppole di San Giuseppe (Saint Joseph’s Cakes)
Makes 1 Dozen Zeppole
For the pastry: 1/2 cup (or 8 tablespoons) butter 1 cup water 1 pinch salt 1 cup all purpose flour, sifted 4 eggs
Preheat oven to 400 degrees. Place the butter, water and salt into a sauce pan, bring to a rolling boil. Once the butter has melted, lower heat to medium. Stir in flour and beat vigorously until a dough ball is formed. Transfer the dough ball to a mixing bowl, let cool. Beat the eggs into the dough, one egg at a time, until all eggs have been fully incorporated.
Using a pastry bag with a star tip, pipe the dough onto a parchment covered baking sheet in a circular motion. You’re looking to make a donut shape about 3 to 4 inches wide. If you don’t have a pastry bag, you can drop the dough onto the baking sheet one tablespoon at a time (making a solid shaped pastry). You should get 12 individual donut shapes or dough balls. Bake until the dough puffs up and are golden brown on top. About 20-25 minutes. Remove from oven and let cool.
For the Italian cream filling: 2 cups (or 1 pint) heavy whipping cream 1/4 to 1/2 cup confectioner’s sugar (adjust the amount of sweetness to your liking) 1 teaspoon vanilla extract 8 ounces mascarpone cheese 1/2 cup miniature chocolate chips
Combine cream, powdered sugar and vanilla extract in a chilled mixing bowl (the bowl MUST be chilled). Using a hand mixer or a stand mixer, mix together until soft peaks start to form. Continue to mix, adding the mascarpone cheese a little at a time. Adding all of the mascarpone cheese at once will cause splashing. Continue to mix until stiff peaks form. Stir in the chocolate chips. Refrigerate in a container until ready to use.
To assemble: When ready to serve, use a spoon, spatula or a piping bag to fill the center of the donut shaped pastries with the whipped cream. Top with a candies cherry and powdered sugar. For the tablespoon-dropped pastries, cut the pastry in half and fill it with the cream.
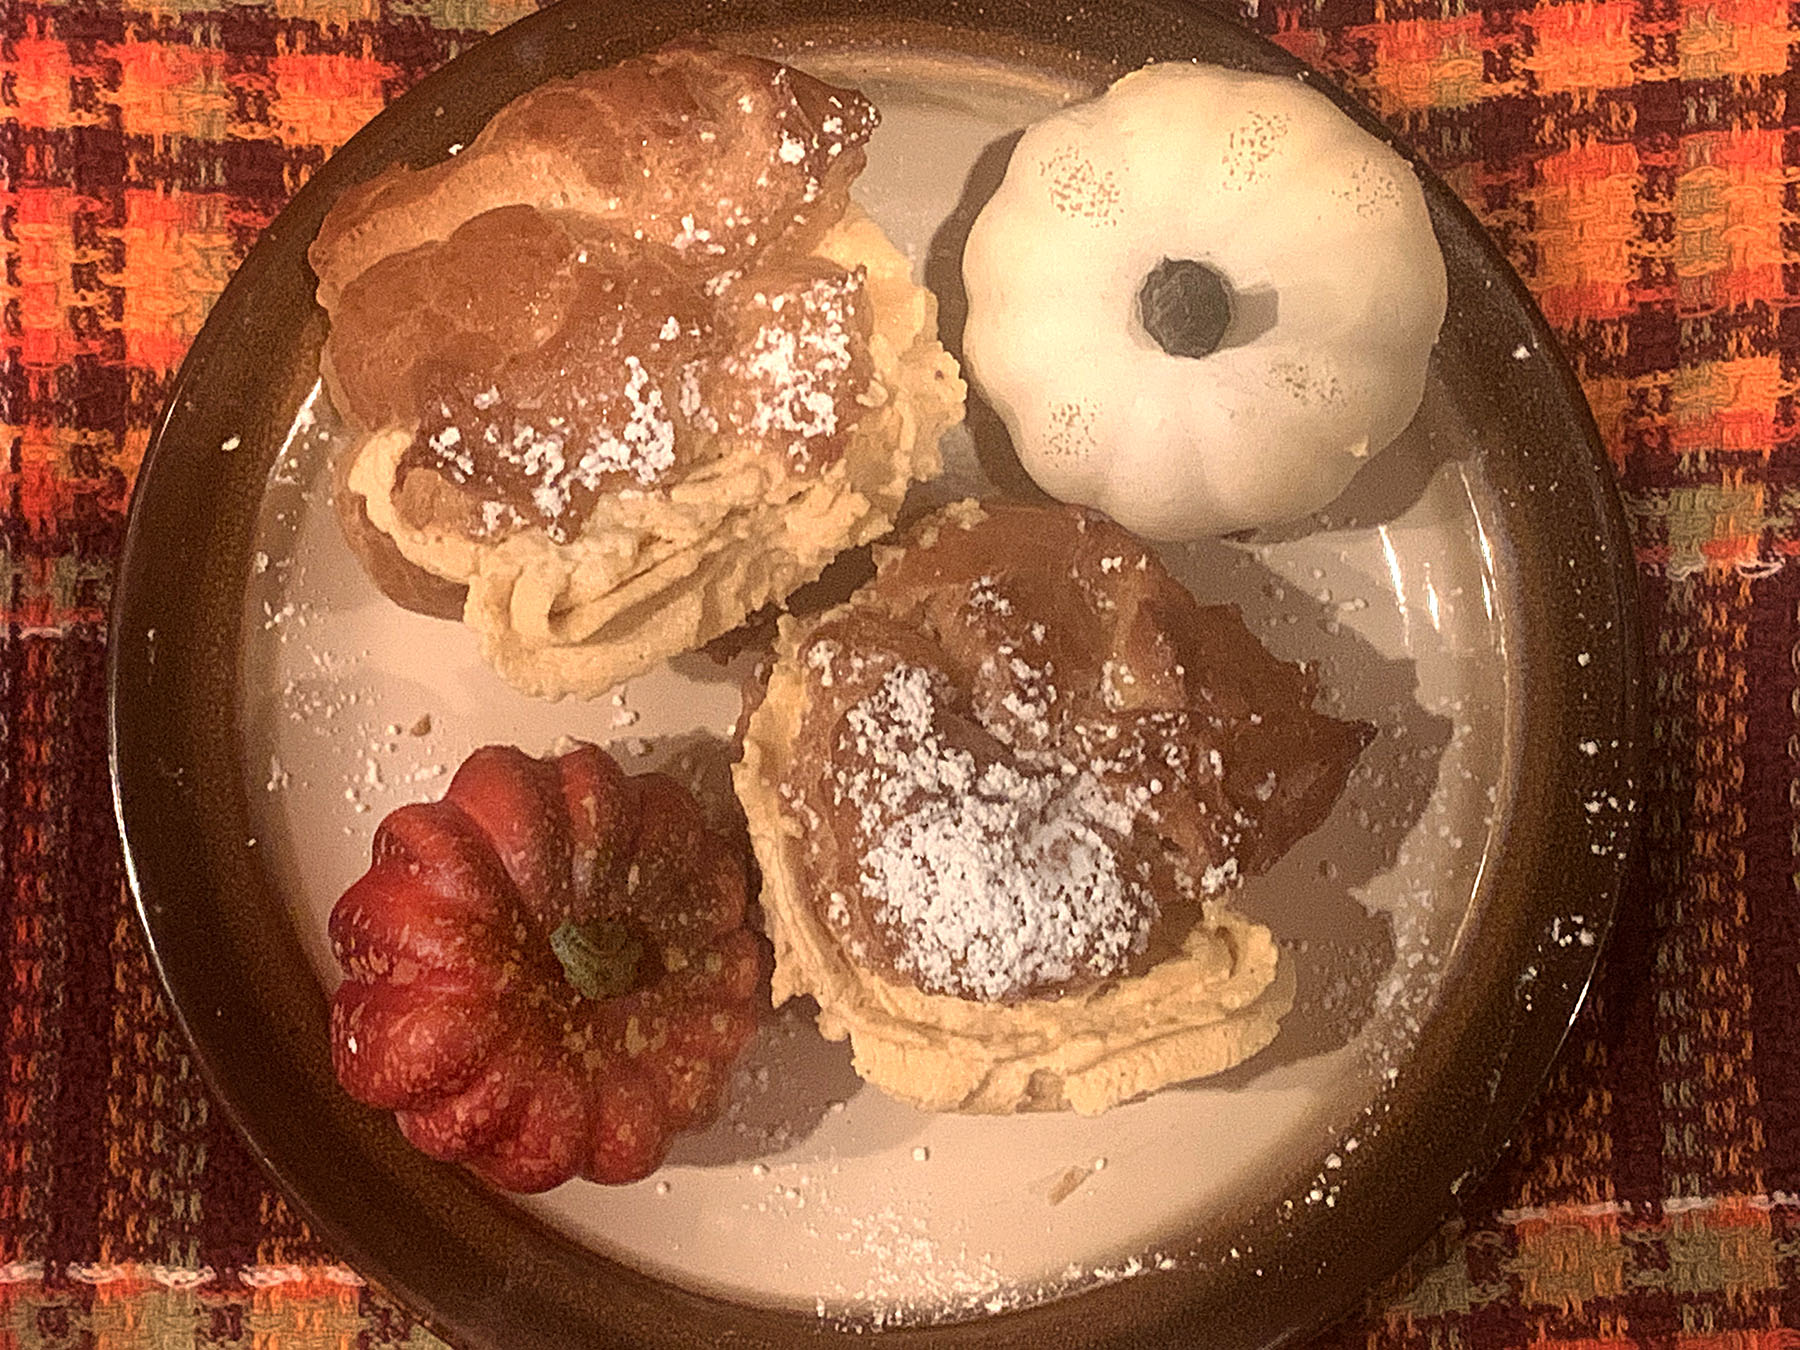
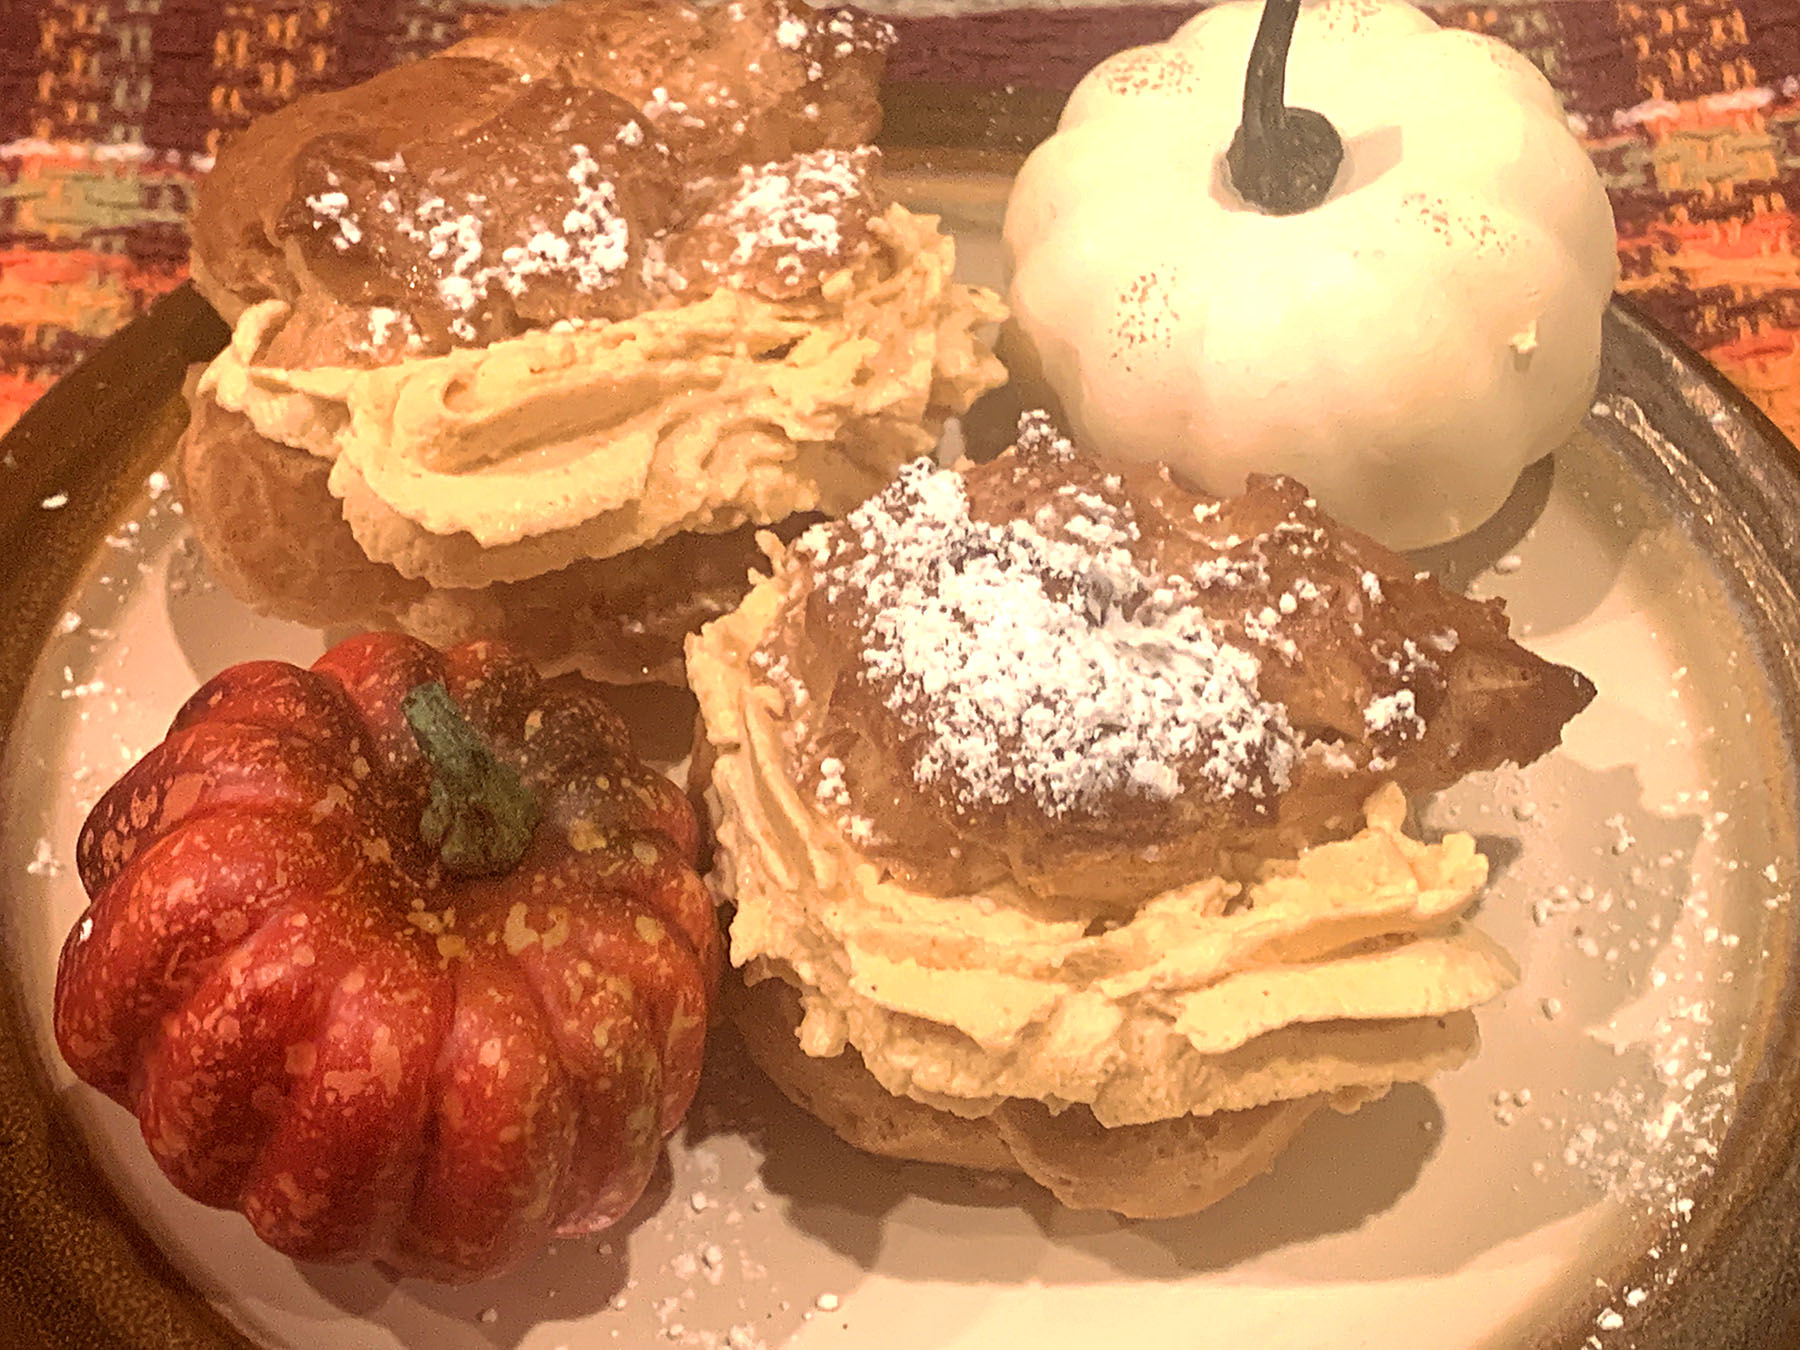
This recipe is a fun and easy take on what may be the most traditional autumn dessert of all, the pumpkin pie. These days there are a wide variety of pumpkin related desserts. Everything from traditional pumpkin pie, to pumpkin cheesecakes and pumpkin trifles, to pumpkin bread and biscotti. And of course you need a nice hot cup of pumpkin spiced coffee to accompany your dessert. This recipe brings the classic essence of pumpkin pie, but as a flavorful pumpkin spiced whipped cream tucked into a flaky puff pastry.
Before I get to sharing the ingredients, I thought I would explain the history behind this recipe. It started back in the early spring when I was having a conversation with a very good friend of mine about Saint Joseph’s Cakes. Not only are we both huge fans of this traditional early spiring dessert made of fried dough filled with custard (also known as zeppole), we are also huge fans of pumpkin anything. This led to us agreeing that there should be a pumpkin version of zeppole….and we should jokingly call it a Saint Peter Pumpkin Eater Cake.
Well….if you know me by know, you know that even the silliest food suggestion will often spark an idea for me that needs to be fulfilled. And here we now are, more than a half year later, with a recipe that I am very happy to share. Only I went with a more practical name.
You can make the puffed pastries and the whipped cream ahead of time. The puffed pastries will keep well in an air-tight container for 1-2 days. You can also freeze them for a few months. They will defrost at room temperature in about 10 short minutes. The whipped cream can also be made ahead of time and will stay well in the fridge for a few days. Just be sure to not assemble the cream puffs until you are ready to serve them. You can add the cream with a spoon, spatula or a piping bag if you have one.
Pumpkin Mascarpone Cream Puffs
Makes 1 Dozen Cream Puffs
For the pastry: 1/2 cup butter 1 cup water 1 pinch salt 1 cup all purpose flour, sifted 4 eggs
Preheat oven to 400 degrees. Place the butter, water and salt into a sauce pan, bring to a rolling boil. Once the butter has melted, lower heat to medium. Stir in flour and beat vigorously until a dough ball is formed. Transfer the dough ball to a mixing bowl, let cool. Beat the eggs into the dough, one egg at a time, until all eggs have been fully incorporated.
Using a pastry bag with a star tip, pipe the dough onto a parchment covered baking sheet in a circular motion. You’re looking to make a donut shape about 6 inches wide. If you don’t have a pastry bag, you can drop the dough onto the baking sheet one tablespoon at a time (making a solid shaped pastry). You should get 12 individual donut shapes or dough balls. Bake until the dough puffs up and are golden brown on top. About 20-25 minutes. Remove from oven and let cool.
For the whipped cream: 2 cups (or 1 pint) heavy whipping cream 1/2 cup confectioner’s sugar 1 teaspoon vanilla extract 1-1/2 teaspoon pumpkin pie spice dash cinnamon 1/4 cup mascarpone cheese 1/2 of a 15 ounce can of pumpkin puree
Combine cream, powdered sugar and vanilla extract in a chilled mixing bowl (the bowl MUST be chilled). Using a hand mixer or a stand mixer, mix together until soft peaks start to form. Continue to mix, adding the mascarpone cheese a little at a time. Adding all of the mascarpone cheese at once will cause splashing. Add the pumpkin pie spice and cinnamon and continue to mix until stiff peaks form. Fold in the pumpkin puree. You can adjust the sweetness and spice taste to your liking. Cover and refrigerate until ready to use
To assemble: When ready to serve, slice the puffed pastries open horizontally with a serrated knife. Use a spoon, spatula or a piping bag to fill the pastries with the whipped cream. Top with powdered sugar.