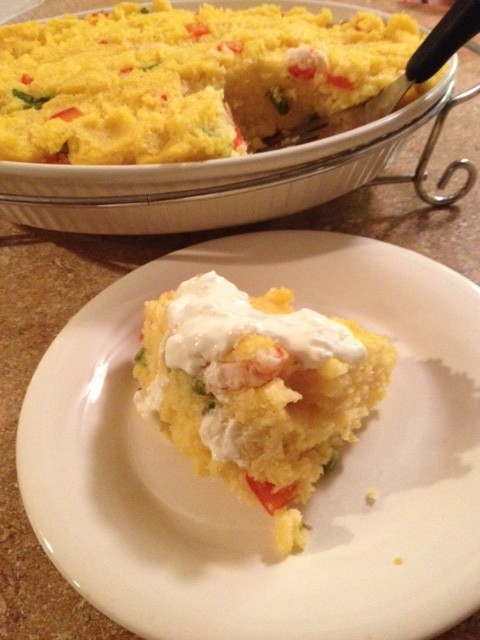
Baked Polenta with Shrimp, Asparagus and Peppers
I’ve been planning to put together a recipe that incorporates polenta for a while now. If you check back again in another month or so, I’m hoping to have a breakfast polenta dish to share. But for today, I’m talking about a baked polenta dish mixed with shrimp, asparagus and red bell pepper. It’s like an Italian version of shrimp and grits. Grits and polenta are both, after all, very similar porridge style dishes – grits being made from stone ground white corn and polenta from yellow corn. The preparation, for the most part, is fairly easy. Sauté the shrimp, asparagus and peppers in garlic, olive oil and the zest and juice of one lemon, then fold into prepared polenta and bake. But it’s the type of polenta that you use that will determine if this dish is just good or out of this world.
Which polenta to use?
There are two common forms of polenta. There’s the pre-made tubes, which I like to use sliced thin for grilling or baking, topped with sautéed veggies or maybe a nice slice of cheese and some tomatoes. Then there’s the traditional version made from boiled cornmeal, often mixed with a little butter and maybe some parmesan cheese to form a creamy porridge-like dish. Because I wanted to mix in some other ingredients, then bake it in a casserole dish, the traditional method was what I needed to make. If you’ve never made traditional polenta, it involves about 20-30 minutes of cooking and a lot of stirring. A LOT of stirring. Similar to risotto (the other Italian dish that requires dedicated stirring), the trick is to keep a constant stir going to maintain a nice, creamy consistency. At first, it seems like a lot of work. But as you get into it and develop a nice rhythm, it almost becomes like a well-calculated dance. You allow it to get away from you just enough, then you bring it back together and gently keep it moving, and then you repeat this form until the dance is done. The end result is always worth the effort.
While doing my research for this recipe, I found yet a third option for making polenta…instant polenta. The cooking method and preparation are very similar to the traditional style. You add the cornmeal mixture to boiling water, and you stir. Only it’s done in literally under 5 minutes. Now I’m not exactly sure what is done to the cornmeal to make it instant, but there were enough recipes available online from reputable chefs that used instant polenta. It’s gotta be good then, right?
Wrong. Gotta say, I was not happy with the instant stuff. Yes, it did take under 5 minutes to prepare. But you go from start to finish in such a quick time, that you really have no control over the polenta. There is no careful stirring, no playing, no dance. It goes from liquid to solid so quickly that I felt that it just got away from me. I didn’t even have time to properly season it as I normally would. I did make sure to add some extra seasoning when folding in the shrimp, asparagus and peppers, but would have preferred to add a little butter while cooking the polenta. And I saw no chance of doing that while using the instant, which left it very bland and dry on its own.
To help add a little extra flavor, I put together a quick lemon greek yogurt sauce to use as a topping. This gave it a well needed, flavorful punch (see recipe below).
The bottom line here is use the traditional method for a dish like this. It’s worth the time and effort, and you will be very happy with the end result!
Baked Polenta with Shrimp, Asparagus and Peppers
Ingredients:
12-15 raw jumbo shrimp, cleaned, shelled and devenined
1 small bundle (12-15 pieces) of asparagus, cut into 1″ pieces
1 red bell pepper, cut into small pieces
2 tbspn olive oil
1 clove garlic, minced
Juice plus zest of one lemon
Basic Polenta recipe
(courtesy of Giada DeLaurentiis)
6 cups water
2 teaspoons salt
1 3/4 cups yellow cornmeal
3 tablespoons unsalted butter
Directions:
In a large pan, heat oil and garlic over medium heat. Add asparagus and peppers, stir and cook until veggies are tender. Add the shrimp, continue to stir until all shrimp are pink. Add the lemon juice and zest, mix well. Remove from heat, cover to keep warm. Set aside.
Bring 6 cups of water to a boil in a heavy large saucepan. Add 2 teaspoons of salt. Gradually whisk in the cornmeal. Reduce the heat to low and cook until the mixture thickens and the cornmeal is tender, stirring often, about 15 minutes. Turn off the heat. Add the butter, and stir until melted.
Fold in the shrimp, asparagus and peppers. Pour the mixture into a lightly greased baking dish. Place the baking dish into a 350˚ oven, bake for 15-20 minutes. Slice, serve and enjoy!
Lemon Greek Yogurt Sauce
1 cup plain Greek yogurt
Juice plus zest of 1 lemon
2 tbspn olive oil
1/4 tspn salt
Optional:
1/4 tspn chopped parsley
2 tbspn crumbled feta
Combine all ingredients in a bowl. Cover and refrigerate until ready to use.