Home » Dessert » Recent Articles:

Fresh Ricotta!

February 11, 2012 Dessert, Menu 1 Comment

Of the few guilty pleasures that I have in life, cheese would have to be one of my favorites. And the one cheese that I most enjoy to indulge in is ricotta. Whether its used as a filling in a pasta dish or a rolantini, or as a key ingredient in an Easter cheese pie or cannoli, there is no denying that sweet, creamy ricotta is decadent, and sinfully delicious. Imagine my surprise when I found out how easy it is to make your own, homemade ricotta…and you don’t even need to milk you own cow to do so!

Unlike traditional cheese making, ricotta is the product of leftover milk from the production of other cheeses. Actually meaning “recooked”, ricotta comes together when you produce curds from heating and stirring up the leftover milk whey along with an acidic liquid (usually vinegar or lemon juice), then strained through cheesecloth and chilled.

Even if you are not producing your own cheeses at home, you can still make your own ricotta by following this simple recipe below that I found on Epicurious.com. All you need is whole milk, heavy cream, lemon juice, salt, cheese cloth and a few hours, and you will have the most delicious, creamy ricotta ever imagined. It can be used in any recipe that calls for ricotta. I’ve already made a few batches for family and friends, and they all agreed that the fresh ricotta is amazing. Even my friend’s 2 year old daughter, who is a ricotta connoisseur, gave my ricotta a thumbs-up. The only trick to using homemade is that because there are no preservatives, there is not much of a shelf life…only about 3-4 days to be exact. So you want to make sure that you have a purpose in mind when making homemade ricotta.

HOMEMADE RICOTTA
makes about 1 lb fresh ricotta
2 quarts whole milk
1 cup heavy cream
1/2 tspn salt
4 tbspn lemon juice

In a large pot, slowly bring the milk, cream and salt to a rolling boil over moderate heat. Be sure to stir occasionally to prevent scorching. Add lemon juice, then reduce heat to low and simmer, stirring constantly, until the mixture curdles.

Pour the mixture into a sieve, or colander, lined with cheese cloth and let drain for just a few minutes. Once liquid is drained, cover and chill ricotta. Use within a few days.

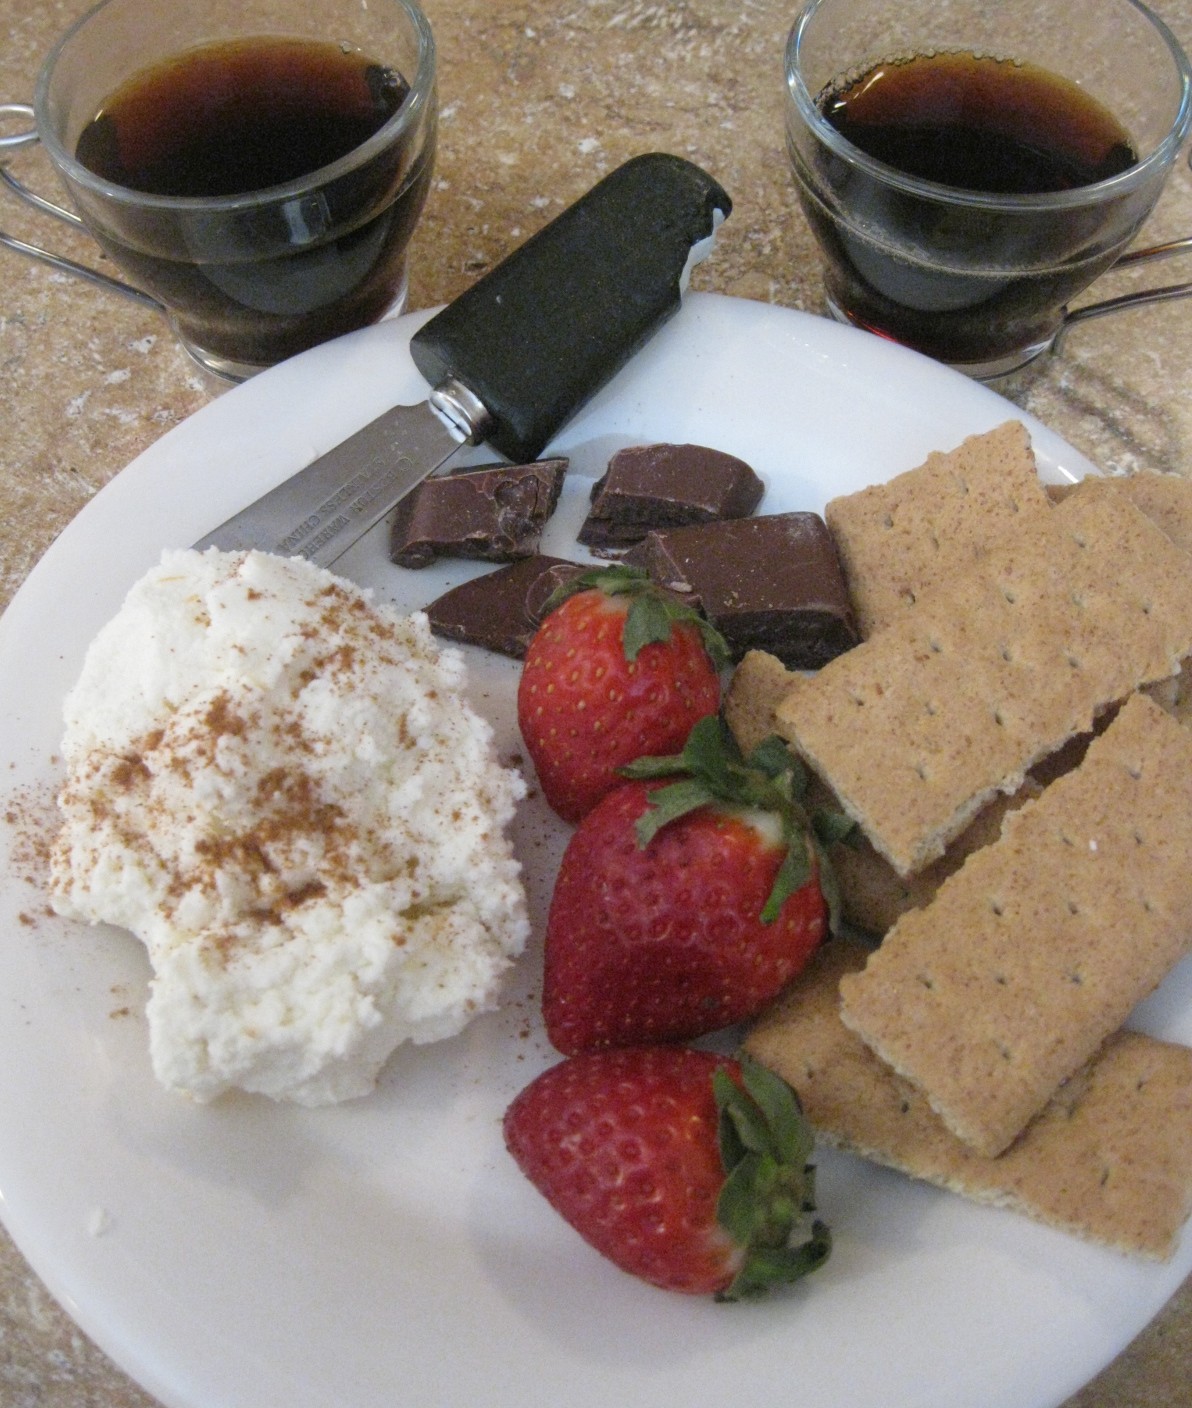
Now that I’ve (hopefully) convinced you to give homemade ricotta a try, allow me share a quick and delicious recipe that will make for an unforgettable Valentine’s Day dessert. We’re going to make two ricotta dips, one with almond flavoring and one with nutella. Simply cut up some fresh fruit (strawberries, raspberries, blueberries and bananas work well), plate it with the ricotta, some chocolate pieces and cinnamon graham crackers. Spread a bit of the ricotta onto the cracker, top with sliced fruit or chocolate. Try drizzling the almond flavored ricotta with a little honey and a sprinkle of cinnamon. It’s better than just about any cannoli out there!

ALMOND HONEY RICOTTA 
Start by stirring in 1/2 teaspoon almond extract, 1 teaspoon vanilla extract and 1 tspn confectioner’s sugar into home made ricotta. Adjust measurements according to taste.

 NUTELLA RICOTTA
Stir in 1 tspn nutella into ricotta. Add to cracker, top with fresh fruit. Heaven.

Share

Gluten-Free Snickerdoodle Cookies

We’re heading into the home-stretch of the holiday madness. But there is still some time to get your cookie-baking on! And thanks to my fellow foodie, Emma Caperelli Loerky, we have a great recipe for Gluten-free Snickerdoodle Cookies! These look just like the snickerdoodle cookies that my Grandmother used to make, so I am sure that Emma’s recipe is sure to please!

GLUTEN-FREE SNICKERDOODLE COOKIES
By Emma Caperelli Loerky 

While deciding which recipe I should share with you all next, I realized that not only has it been about 3 months since my last post (how did that happen?!), but it has also been quite some time since I shared a gluten-free recipe with you. So, I suppose it is only fair that my next recipe be GF. Which, by the way, is very convenient since I just baked up a fresh batch of gluten-free Snickerdoodle cookies for my husband.

I adapted this recipe from here: http://www.bakerella.com/snickerdoodle-duo/. I have not tried making the cupcakes gluten-free…yet. I promise to report back if/when I get the chance. In the meantime, you will be happy to know that these cookies turned out great and are super easy to prepare – which is a good thing because I have a feeling my husband is going to be requesting them often.

Makes approximately 20 cookies

Ingredients
1 1/2 cups gluten-free flour mix 

1/2 teaspoon xanthan gum (Note: Check to see if your flour mix includes xanthan and/or guar gum. If so, omit the xanthan gum)

1 teaspoon cream of tartar

1/2 teaspoon baking soda

1/4 teaspoon salt

4 tablespoons unsalted butter, room temperature

1/4 cup shortening

3/4 cup sugar

1 egg, room temperature

1/4 cup sugar

2 tablespoons cinnamon

Directions
Preheat oven to 375 degrees.

Line baking sheet with parchment paper.

In a medium bowl, sift together gluten-free flour, xanthan gum (if using), cream of tartar, baking soda and salt. Or, if you’re like me, place all the dry ingredients in the bowl and whisk together well.

In a mixer fitted with a paddle attachment, cream butter, shortening, and sugar on medium speed for about 2 minutes.

Add the egg and mix until combined.

Add the flour mixture and beat until combined.

Mix sugar and cinnamon in a small bowl.

Use a small 1 1/4 inch ice-cream scoop to form balls and roll it in the cinnamon-sugar until it is coated. If you do not have a small ice-cream scoop, simply use a tablespoon to scoop the dough and gently roll it in the cinnamon-sugar until it is coated and formed in a ball. Place the balls at least 3 inches apart on the prepared sheet to allow room for the cookies to spread. These cookies spread A LOT during baking so be sure to leave ample room.

Bake for about 10 minutes or until the cookies begin to crack.

Remove and let cool on a wire rack.

Share

Chocolate Cherry Bread

December 4, 2011 Dessert, Menu No Comments

This weekend we spent the day with some of our oldest and best friends at their new house. It was the perfect opportunity to try out a recipe that I came across as part of their housewarming gift – chocolate cherry bread. As I’ve said many times before on this blog, I am not a baker. However, I have been wanting to dabble in bread baking for a while and this recipe was one that sounded like a unique winner. The cherry and chocolate add just the perfect amount of sweetness and tartness, without going overboard. I would say that it is a perfect breakfast or dessert bread, topped with just a bit of butter.  It’s also a very simple recipe to follow, and it easy to make…as long as you have a Kitchen Aid mixer and dough hook. And I’m glad to say that it got thumbs up from everone who tasted it. Glad you enjoyed it, Jackie and Dan…and all the best in your new house!

CHOCOLATE CHERRY BREAD
Originally printed in the cook book Ratio, by Michael Ruhlman

20 ounces bread flour (approx. 4 cups)
12 ounces water
2 tspn salt
1 tspn active yeast
3 ounces semisweet chocolate, coarsely chopped
1/4 cup dried cherries

Preheat oven to 450˚ approximately 45 minutes before you are ready to bake the bread.

Place flour in mixing bowl. Add water and salt. Add yeast over the surface of the water to let it dissolve. Using the paddle attachment, mix on medium speed to combine all ingredients. Switch over to the dough hook and blend on medium speed, until dough is smooth and elastic (about 10 minutes). About mid-way through mixing, add the chocolate and cherries.

Remove bowl from machine, cover with plastic wrap and let rise to twice its size. Push a finger into the dough. It should give some resistance, but not bounce back. If it springs back, let it rise longer.

Turn dough on a floured surface and knead to expel  excess gas and redistribute yeast. Shape into a ball, cover with a towel, let sit for 15 minutes.

Shape dough by pushing it back and forth in a circular motion on floured surface into shape of a round, smooth ball. Cover the dough with a towel and let it rise for about an hour. When ready to bake, slice an ‘X’ into the top of the loaf to help it expand. Bake at 450˚ for 10 minutes. Lower the temperate to 375˚ and bake for another 45 minutes.

Wrapping courtesy of my wife!

Share

Giving Thanks with Pumpkin Crisp and Preston & Steve

November 20, 2011 Dessert, Menu 2 Comments

Thanksgiving dinner. The granddaddy of all traditional holiday meals! Whether it’s the escarole soup, the homemade stuffing, cranberry sauce, one of the dozens of side dishes, or the turkey itself, there is some part of this meal that holds a special spot in everyone’s heart. Of course, the Thanksgiving meal would not be complete without the final act – the dessert. And in my mind there is no better Thanksgiving dessert than the traditional and classic pumpkin pie. I’ve tried many different pumpkin desserts, from pumpkin cheesecakes and pumpkin cream rolls to pumpkin ice cream and pumpkin trifle. But it’s the good, old fashion pumpkin pie that I prefer on T-day with a nice hot cup of coffee for dessert.

This year however, my wife (who again, is the baker of the household), found an interesting alternative to traditional pumpkin pie at myrecipes.com. It’s a pumpkin crisp, and I can not wait to dig into it after the big meal! What’s nice about this dessert is that it doesn’t stray far from traditional pumpkin pie, both in taste and texture. Actually, the filling itself is almost identical to pumpkin pie. What makes this dessert different and special is the  crispy and buttery topping. Think upside down pumpkin pie! It’s a subtle change from the norm, but the taste is outta this world. ‘Melts in your mouth’ is an understatement You’ll want to serve this warm or at room temperature. Goes great with a scoop of vanilla ice cream!

Happy Thanksgiving!

PUMPKIN CRISP
(Originally posted at myrecipes.com)

1 (15 oz) can pumpkin
1 c. of evaporated milk
1 c. sugar
1 tsp vanilla extract
1/2 tsp. ground cinnamon
1 (18.5 oz) pkg butter-flavored yellow cake mix
1 c. melted butter

Optional:
1 c. chopped pecans
Ground nutmeg
Whipped cream
Vanilla ice cream

Preheat oven to 350F.  Stir together the first five ingredients. Pour into a lightly greased 13×9 inch baking dish.  Sprinkle cake mix evenly over pumpkin mixture (if you wish to add pecans, sprinkle them evenly over cake mix).  Drizzle melted butter over cake mix. Bake at 350F for 60 – 65 minutes or until golden brown**.  Remove from oven and let stand for 10 minutes before serving.  Serve warm or at room temperature.  IF desired, serve with whipped cream, sprinkle of nutmeg or vanilla ice cream.

** If baking ahead of time, I baked for about 55 min then re-heat again for another 10 min before serving.

THE PRESTON AND STEVE CAMP OUT FOR HUNGER

Many of us are blessed to have a beautiful meal to share with family and friends on Thanksgiving day. Yet there are still so many who are in need of food and support, not only on Thanksgiving but all year round. Thanks to the Preston and Steve Show (Philadelphia’s top rated morning radio show), we all have an opportunity to help give to those less fortunate. Every year just after Thanksgiving, the P&S show launch their Camp Out for Hunger Campaign. By teaming with Philabundance, the Delaware Valley’s largest hunger relief foundation, the P&S show set up camp for an entire week at the Metroplex Shopping Center in Plymouth Meeting, Pa. This camp out (which is turning into more of a huge, celebrated event each year), is the perfect opportunity to not only meet some of your favorite local radio, television and sports celebrities, but to also donate in any way that you can to help those less fortunate. The P&S show will be collecting food and monetary donations throughout the entire week of November 28-December 2. You can also donate various ways through Acme Markets, either by making an online purchase or  placing items in the P&S drop-boxes located in various Acme supermarkets.

For more information on how to help with this very special and important cause, please visit this link.

Share

Archives

powered by
Socialbar