NEW – Thanksgiving Desserts: Pumpkin Layer Cake & Gluten-Free Pumpkin, Sweet Potato & Coconut Pie
It’s that special time of year again, when we gather with family and friends to give thanks, prepare for the upcoming holiday season and celebrate with an amazing meal. Over the past two years, I have shared a few suggestions for Thanksgiving side dishes, desserts and drinks (you can visit my previous posts by clicking here and here). Because my mom is the one in charge of our holiday feast, my suggested recipes are slim and unfortunately I have offered all that I can (for now!). Luckily, my friend Emma has once again offered to share with us a few of her favorite Thanksgiving recipes. Thank you, Emma, for sharing. And thanks to all of you for for continuing to check out Cucina Domenico. May you and yours have a blessed, happy and healthy Thanksgiving!
Ciao!
BROWN BUTTER PUMPKIN LAYER CAKE
 There are two things that set this cake apart from other cakes I’ve made in the past – the brown butter both in the batter and in the frosting, and the sweet yet salty nut topping. Let me just say that browning the butter takes this cake from good to excellent, and I don’t think I’ll ever make buttercream icing again without browning the butter first. It was amazing! That being said, I followed the recipe exactly except for using canned pumpkin purée instead of making my own, doubling both the frosting and the topping and I also weighed the flour instead of using a measuring cup. Based on the reviews I read, I thought that doing so would ensure that the cake wouldn’t be too dense. I had fantastic results and I definitely think you should do the same. While I didn’t use all of the frosting or the topping, I used much more than 1 batch would’ve provided. Believe me, you will find something to use the leftover frosting on if you don’t eat it all as is (like we did). Next time I make this, I may make cupcakes out of it to make sharing easier.
Ingredients:
For the cake
1 1/2 cups pumpkin purée
9 oz. (or 2 cups) unbleached all-purpose flour; more for the pans
3/4 cup unsalted butter; more for pans
1 1/2 tsp baking soda
1 1/2 tsp ground cinnamon
1 tsp ground ginger
3/4 tsp table salt
1/4 tsp ground cloves
1 1/2 cups granulated sugar
2/3 cup firmly packed light brown sugar
2 large eggs
1/3 cup buttermilk
For the topping (I am writing this as the recipe stated but I doubled it)
1 1/2 tbs unsalted butter
2/3 cup pecans
1/2 cup unsalted, raw, hulled pepitas (pumpkin seeds)
2 tbs firmly packed light brown sugar
1/4 tsp table salt
1 1/2 tbs chopped crystallized ginger
For the frosting (I am writing this as the recipe stated but I doubled it)
1/2 cup unsalted butter
8 oz cream cheese, at room temperature
1/4 cup firmly packed light brown sugar
1 1/4 cups confectioners’ sugar
Directions:
Make the cake
Position a rack in the center of the oven and heat the over to 350 degrees F.
Melt the butter in a heavy-duty 1-quart saucepan over medium heat. Cook, swirling the pan occasionally until the butter turns a nutty golden-brown, about 4 minutes. Pour into a small bowl and let stand until cool but not set, about 15 minutes.
In a medium bowl, whisk the flour, baking soda, cinnamon, ginger, salt, and cloves. In a large bowl, whisk 1-1/2 cups of the pumpkin purée with the granulated sugar, brown sugar, eggs, and buttermilk until very well blended. With a rubber spatula, stir in the flour mixture until just combined. Gently whisk in the brown butter until completely incorporated. Divide the batter evenly between the prepared pans.
Bake the cakes until a tester inserted in the center comes out clean, about 28 minutes. Let the cakes cool in the pans for 10 minutes. Turn the cakes out onto racks, remove the pan bottoms or parchment, and cool completely.
Make the topping
Melt the butter in a heavy-duty 12-inch nonstick skillet over medium heat. Add the pecans and pepitas and cook until the pecans brown slightly and the pepitas begin to pop, about 2 minutes. Sprinkle in the brown sugar and salt and stir until the sugar melts and the nuts are glazed, about 2 minutes. Stir in the ginger. Remove from the heat and let the mixture cool in the skillet.
Make the frosting
Melt the butter in a heavy-duty 1-quart saucepan over medium heat. Cook, swirling the pan occasionally until the butter turns a nutty golden-brown, about 4 minutes. Pour into a small bowl and let stand until the solids settle at the bottom of the bowl, about 5 minutes. Carefully transfer the bowl to the freezer and chill until just firm, about 18 minutes. Using a spoon, carefully scrape the butter from bowl, leaving the browned solids at the bottom; discard the solids.
Using an electric mixer, beat the butter, cream cheese, and brown sugar on medium-high speed until light in color and the brown sugar has dissolved, 2 minutes. Gradually beat in the confectioners’ sugar and continue beating until fluffy, 1 to 2 minutes.
Assemble the cake
Put one cake layer on a cake plate. Spread 1/2 cup of the frosting on the layer. Sprinkle 1/2 cup of the nut mixture over the frosting and top with the second layer. Frost the top and sides of the cake with the remaining frosting. Arrange the remaining topping in a ring 1-1/2 inches in from the edge of the cake and serve.
GLUTEN-FREE PUMPKIN, SWEET POTATO & COCONUT PIE

 When I first saw this recipe I thought it looked like a lot of flavors going on at one time, too many in fact. But when I read the recipe and noticed that the coconut came in the form of coconut milk, and that it didn’t call for any other form of milk, I knew I had to try this. Since my husband can’t have milk products, I have struggled to find a decent pumpkin pie recipe for him. They always seem to lack something either in the consistency or the flavor. This pie was perfect. It has a nice texture and the flavors work well together. It tastes like a pumpkin pie with a nice subtle hint of coconut. My son, who says he dislikes coconut and can eat gluten, asked for seconds. And my husband loved it as well.
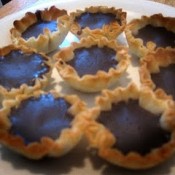
As far as the crust goes, I like to make my own using King Arthur Flour’s Gluten-Free Multi-Purpose Flour blend. I’ve had the best results with this product but you can use any brand you like. And when rolling out the dough, I have found it easier to roll it out between two pieces of plastic wrap. That way I don’t have to use any additional flour which helps in keeping it from getting too dry. This technique has worked the best for me when making a gluten-free pie crust. Also, in order to create the leafy trim around the crust, I made two separate batches of pie crust and I used a pie crust leaf shaped cutter.
Three things about this recipe that I’d like to point out. First, I used a ricer for the potatoes. I actually had to force them through several times and I was concerned that there wasn’t going to be enough filling because of all of the potatoes that were left behind. In the end, there was plenty of filling. And second, because of the long cooking time, you will definitely have to cover the crust with foil or a pie shield about an hour into cooking. And third, it is very important to refrigerate the crust before baking, so please don’t skip that part!
Gluten-Free Pie Crust
Adapted from King Arthur Flour
Ingredients:
1 1/4 cups King Arthur Flour Gluten-Free Multi-Purpose Flour
1 tbs sugar
1/2 tsp xanthan gum
1/2 tsp salt
6 tbs cold butter
1 large egg
2 tsp lemon juice or vinegar
Directions:
Lightly grease a pie pan
Whisk together the flour, sugar, xanthan gum, and salt.
Cut the cold butter into pats, then work the pats into the flour mixture until it’s crumbly, with some larger, pea-sized chunks of butter remaining.
Whisk the egg and vinegar or lemon juice together until very foamy. Mix into the dry ingredients. Stir until the mixture holds together, adding 1 to 3 additional tablespoons of cold water if necessary.
Shape into a ball and chill for an hour, or up to overnight.
Allow the dough to rest at room temperature for 10 to 15 minutes before rolling.
Roll the dough out between two pieces of plastic wrap and invert into the prepared pie pan.
Wrap loosely with plastic wrap and place the unbaked pie crust in the refrigerator for at least a half hour before baking.
Filling
Adapted for Fine Cooking
Ingredients:
1-1/4 lb. sweet potatoes, peeled and cut into 1-inch chunks
1 small cinnamon stick, broken into pieces
3 whole cloves
1 small star anise, crumbled
1-inch piece fresh ginger, peeled and cut into 1/4-inch slices
15-oz. can pure solid-pack pumpkin (not pumpkin pie filling)
1 large egg, lightly beaten
1 large egg yolk, lightly beaten
2 Tbs. unsalted butter, melted and cooled
1/2 cup granulated sugar
1/2 cup packed light brown sugar
2 Tbs. multi-purpose gluten-free flour
3/4 tsp. table salt
1/2 cup well-stirred canned coconut milk (not coconut cream)
3/4 cup cold whipping cream, whipped to soft peaks with 1-1/2 Tbs. granulated sugar
Directions:
In a medium saucepan, combine the sweet potatoes, cinnamon stick pieces, cloves, star anise, and ginger slices with enough water to just cover the contents. Bring to a boil over high heat. Reduce the heat and simmer uncovered until the sweet potatoes are very tender when pierced with a fork or skewer, about 10 minutes. Drain the potatoes, reserving the boiling liquid. Return the potatoes to the pot over low heat and toss to dry them a bit. Discard the cinnamon, cloves, and star anise. Force the warm potatoes through a ricer, a food mill, or a sieve. Boil the liquid if needed, until reduced to 1/4 cup. Let the sweet potato mash and the liquid cool.
Position an oven rack in the lower half of the oven; heat the oven to 350°F. In a large bowl, whisk together the pumpkin and sweet potato purée. Whisk in the egg, egg yolk, melted butter, and reserved spiced liquid. In a separate bowl, stir together the granulated and brown sugars with a wire whisk until any large lumps of brown sugar are gone. Sift the gluten-free flour and salt over the sugars; stir to blend. Add the sugar-flour mixture to the pumpkin and stir well until no pockets of sugar are visible. Blend in the coconut milk.
Scrape the filling into the chilled pie shell; smooth the top. Brush the pie crust with an egg beaten with 1 tbs water and sprinkle with turbinado sugar (optional) and bake for 1-3/4 to 2 hours, turning the pie several times so it bakes evenly. The point of a thin-bladed knife should come out clean when inserted into the center of the filling, and the edges of the surface will be unevenly cracked. If the edges of the pastry darken too much before the filling is cooked, cover them with a pie shield or strips of aluminum foil. Transfer the pie to a wire rack and let cool completely before serving.