Sausage and Escarole Bites
This recipe was inspired by an episode that I recently watched of The Essence of Emeril. The original recipe, Swiss Chard Boules Stuffed with Lemon Barley Risotto, was made of a pancetta, barley and risotto filling, wrapped with swiss chard leaves (click here for the original recipe). I was intrigued by the recipe and started to think how I could put my own spin on it. Being snowed in for a two day weekend left me the perfect opportunity to experiment. I decided on ground sausage stuffed with provolone cheese for the filling. I went with escarole leaves for the outer wrapping. I blanched the leaves in chicken broth for a few minutes, enough time to make the leaves soft and pliable enough to wrap around the cooked sausage stuffing. I placed the wrapped sausage in a baking dish, added a little bit of the broth to the dish for extra flavor, then baked them for about 20 minutes. Gotta say, I was very happy with the end result! As expected, the sausage and provolone were perfect together. The fresh, crisp taste of the escarole was a nice compliment and the additional chicken broth added great flavor. I definitely plan to use this recipe again and suggest it as a party appetizer.
SAUSAGE AND ESCAROLE BITES
1/2lb sausage (hot or sweet), removed from casing
chunk of sharp provolone cheese, broken up into 12 small, sugar-cube size pieces
1 bunch of escarole (you’ll need 12 nice size leaves), thoroughly washed
1 chicken bouillon cube
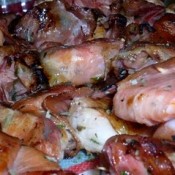
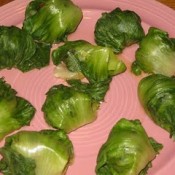
Remove sausage from casing. Grab a small bunch at a time, enough to roll to the size of a meatball. Place a piece of provolone cheese onto the sausage, then roll into a small ball. You should end up with 12 sausage balls filled with cheese. Fry the sausage balls in vegetable oil in a frying pan, turning often so that all sides are done and inside is thoroughly cooked. Remove sausage from pan, set aside to let cool.
Fill a large pot with water, add a chicken bouillon cube; bring to boil. Add 12 escarole leaves, blanching for about 3-4 minutes until just soft and pliable. Remove leaves from broth. One by one, place the sausage onto the bottom edge of 1 of the escarole leaves and roll the ball in the leaf, tucking edges in and rotating the ball so that the sausage is evenly covered and the edges of the leaf are smooth. Place them in a baking dish, add 1/4 cup of broth to the dish and cover with foil. Place baking dish in the oven at 350º for about 15-20 minutes. Remove from oven, place on a dish and serve.
Makes 12 pieces.