Home » Appetizer » Recent Articles:

NEW – Top This: Olive Salad

June 4, 2010 Appetizer, Menu 3 Comments

Marinated toppings and salads/spreads are a big thing in my house. When it comes to sandwiches, burgers, scrambled eggs or any other dish that would go well with a condiment, my wife and I are usually reaching for a jar of roasted red peppers, hot cherry peppers or bruschetta topping instead of ketchup, mustard and relish. There’s something about the combination of fresh vegetables mixed with olive oil, herbs and the tang of vinegar to really add a nice punch to a dish.

Roasted red peppers are, of course, the standby. They’re fairly easy to make, and nothing beats the taste and texture of home made. Whether you’re roasting your own or buying them jarred, they work well with just about anything, from pasta salad to a topping on a veal chop. For as good and versatile as they are, the most recent go-to jarred pepper in our house is Mancini’s Fried Peppers with Sweet Onion. Unlike roasted reds, they’re a little less on the tang and just a bit more on the heat. We’ve been buying these two jars at a time as of late!

One of my big late summer/early fall traditions as of late is marinating and jarring eggplant. It’s my way of keeping some old world traditions alive for my kids to enjoy and appreciate. Based on the response that I received from my post last year, it’s got me thinking that maybe I should make a few more jars this year…just in time for holiday gifts! To read more about my jarring process and serving suggestions, click here for the link to my marinated eggplant article.


Another great topping that we often use is bruschetta topping (made with chopped plum tomatoes, onions, fresh herbs, garlic and olive oil – think of it as Italian salsa). The traditional way to serve it is as a topping on a piece of toasted French or Italian bread rubbed with fresh garlic. However, the flavors and ingredients work so well together that I’ll often use it as a topping on white pizza, chicken or mixed with pasta.

Olives are, of course, a great appetizer side. They work well in salads, antipasto, as ingredients to main dishes, or on their own. They’re also an endless source of entertainment for my kids. Seriously, who hasn’t put olives on their fingers when they were young?!?! Although they only come in two colors – black (fully ripe) and green (unripe) – there’s a wide variety of pepared olives to choose from: traditional black and green (in small, medium or large), manzanilla (Spanish green olives, often stuffed with pimientos), kalamata (Greek black olives, brine cured), and gaeta (Italian black olives, salt cured and soaked in oil) just to name a few. My daughter, Julianna, has been eating green olives stuffed with gorgonzola cheese since she was 1-1/2, and her younger sister Ava is following suit right behind her!

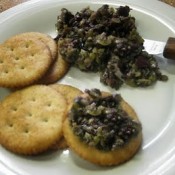
This week, I’m going to combine the best of both worlds and make an olive salad/spread. I’m using three types of olives (medium black, medium green and kalamata), mixing it with some fresh garlic, oregano and basil (fresh or dried will work), crushed red pepper, vinegar, extra virgin olive oil and a little bit of grated parmesan cheese for an extra kick. Serves well as a bruschetta-style topping, mixed with pasta, or on your favorite pizza or sandwich.

Now, if you’re not a big fan of olives to begin with, this dish probably won’t change your mind on them. But if you are an olive lover, give this dish a try. I’m sure you’ll like it. And have fun with it…add your own favorite variety of olive, or try spicing it up by adding some peppers!

Ciao!


OLIVE SALAD

1 cup medium black olives, pitted
1 cup medium green olives, pitted (with or without pimientos)
1 cup kalamata olives, pitted
3 tspns red wine vinegar
2 cloves garlic, smashed*
1 tspn fresh oregano, chopped (or 2 tspns dried oregano)
1 tspn fresh basil, chopped (or 2 tspns dried basil)
1/4 tspn red pepper flakes
1 tblspn grated parmesan cheese
1/4 cup extra virgin olive oil (you can add more olive oil to desired amount)

Place all ingredients in a food processor, adding olive oil last. Pulse to chop until desired texture (I recommend chopped instead of smooth texture).
Place in a jar or bowl, cover and let refrigerate for at least an hour prior to serving.

*To smash garlic, place clove(s) on a chopping board, lay the flat side of a chef’s knife on the clove (sharp side facing away from you) then strike the knife with the heel of your palm, crushing the clove beneath the knife. The papery skin will slip right off the crushed cloves which can then be minced very fine or used in the recipe as it is. Not only does smashing garlic simplify the peeling and chopping process, it also releases the flavors of the garlic.

Share

Mother’s Day Dinner: Asian Potstickers

May 7, 2010 Appetizer, Menu 1 Comment

Spring has sprung and it’s time once again to celebrate and honor all of our Moms! Last year I shared a breakfast recipe for Apple Cinnamon French Toast. This year, I’m going to share a recipe that you can make for a nice Mother’s Day lunch or dinner – Asian Potstickers, also known as Asian Dumplings.

I grew up in a very traditional household. My dad went to work and my mom took care of the house. When I was a kid, she handled all of the meals. So our tradition on Mother’s Day was Chinese food for dinner. As we got older, and my brother and I both became interested in cooking, we put aside the wonton, lo mein and fried rice for our own home made meals and grill-outs. A few years back, my wife and I bought bamboo steamer baskets as part of my mom’s Mother’s Day gift. I thought it would be fun and nostalgic to once again have Chinese food for dinner. We all sat in her kitchen and made home made dumplings together and put the steamer baskets to use right away. Not only was it fun to be in the kitchen with my mom for that day, we also had a great meal that brought back old memories…even if it didn’t come in a white cardboard box.

Happy Mother’s Day!

ASIAN POTSTICKERS

Potstickers are made with wonton wraps* and a filling that can be a mixture of scallions, garlic, ginger, shredded vegetables and your choice of minced meat (chicken, beef, pork, shrimp, etc.). I found this recipe online for Minced Chicken Potstickers. Perdue Short Cuts works great for this – it’s pre-cooked and one package makes for the perfect amount. You can make the potstickers by either steaming them in a basket or steamer, pan frying them in a pan or a wok, or baking them in an oven on an oven stone (they may stick to a regular oven dish or baking sheet).

*Wonton wraps are square shape and can be found in the vegetarian area of the produce section in your grocery store. They come in a package that resembles pre-sliced cheese. You can also use dumpling wraps (if available), which are a bit larger and are round in shape. You would fold the dumplin wraps in half, rather than folding them into a purse shape.

2 tablespoons chicken broth
1 tablespoon reduced-sodium soy sauce
1 tablespoon cornstarch , plus extra for dusting
1 tablespoon sesame oil
3 tablespoons minced scallions
1 tablespoon minced garlic
1/2 tablespoon minced ginger
1 package Perdue Short Cuts, finely chopped
1/2 teaspoon salt
1/8 teaspoon freshly ground pepper
40 wonton wraps

In a small bowl, combine chicken broth, soy sauce, and cornstarch until smooth; set aside.

In a large skillet, heat sesame oil over medium heat. Add scallions, garlic, and ginger; cook, stirring, about 1 minute. Stir in cornstarch mixture; cook, stirring constantly, about 1 minute (mixture will be thick). Stir in chicken, salt and pepper until well combined; let cool.

Lightly dust a baking sheet with cornstarch. Place 1 teaspoon filling in the center of each wonton wrap. Brush edges of wrap with water; bring each set of opposite corners up over the filling so that they create a purse shape; pinch the edges together to seal. Place dumpling on baking sheet; repeat with remaining wonton wraps and filling.

To Steam in Steamer Basket:
Fill a large pot with 1 inch of water and bring to a simmer. Spray a steaming basket insert with nonstick cooking spray. Place eight to 10 dumplings in basket (they should not be touching). Set basket in pot and cover tightly; steam until dough is cooked, six to seven minutes. Repeat, steaming the remaining dumplings. Serve immediately with dipping sauce.

To Pan-Fry:
Pre-heat wok or large frying pan until a bead of water dances and evaporates in the pan. Add two tablespoons of peanut oil into the wok/frying pan. Sesame or peanut oil are preferred for their authentic Chinese flavors. Sesame oil will tend to smoke a bit more than peanut oil at high heat. Heat the oil for about a minute. (You might see bubbles starting to form.) Fry the pot stickers until they are golden brown on the bottom, for about 3 minutes each. Add about 1/2 cup of water and place a cover on the pan. This will allow the pot stickers to steam and cook all the way through. Steam until all the water is gone – you’ll start to hear crackling sounds – and the pot stickers again begin to brown. If you like them well browned, gently lift and turn them with a spatula to brown the sides.
Remove from the heat and serve.

To Bake:
Place potstickers on large round baking stone; lightly spray with oil. Repeat with remaining wontons. Bake 12-15 minutes or until edges of potstickers are golden brown; remove from oven and serve.

Dipping Sauce
1/4 cup soy sauce
3 tablespoons white vinegar
2 teaspoons Asian sesame oil
1 clove garlic, minced
2 teaspoons minced ginger
1 green onion, finely chopped
Combine all ingredients in a bowl. Whisk or stir well

Share

Salmon Cakes with Ponzu Dipping Sauce

April 17, 2010 Appetizer, Entrees, Menu 1 Comment

This recipe was influenced by my good friend Lisa, who passed it along as an appetizer suggestion. It is a nice alternative to the traditional crab cake or fish cake. There’s hardly any additional filling, so you’re getting nice chunks of salmon in each bite. You can use fresh salmon, cooked and finely chopped (as Lisa did), or you can use canned salmon (which I chose to do).

Now, here’s the thing on canned salmon. It’s made from top quality salmon, and is only flavored with a pinch of salt. So it’s very nutritional. You’ll notice a couple of varieties. First, you have a choice of traditional (the big cans), or boneless and skinless (the smaller cans). Traditional cans are packed with the skin and tiny, delicate bones. Both the skin and bones are edible…seriously! The salmon is pressure cooked in the cans, so the bones become so soft, they can smushed into the meat with a fork. The bones are also rich in calcium and magnesium. The smaller cans have the skin and bones removed, so the meat resembles the texture of chunk white tuna. The smaller cans cost more, but I prefer no bones or skin in my canned salmon. Next you have a choice of pink or red (sockeye) salmon. The pink is lighter and milder, while the red is more intense in flavor and color. Both work well in all dishes.

I spoke about ponzu sauces a few posts back (click here for previous article). For this version, I’m using low sodium soy sauce as a base, and flavoring it with brown sugar, minced green onions, grated ginger and lime juice.

Thanks, Lisa, for this great recipe suggestion!

SALMON CAKES WITH PONZU DIPPING SAUCE

Salmon Cakes
3 (5 oz.) cans salmon
3/4 c. bread crumbs
1/2 tbsp. lemon juice
1/4 c. finely chopped onion
Pepper to taste
2 tablespoons butter

*Note – the mixture worked well for me without using any eggs as a binding agent. However, you can use an egg to help bind the mixture if you wish.

Mix all ingredients together. Form mini cakes by rolling the batter into meatball-shaped balls and patting down into small cakes. Heat butter in a frying pan. Pan fry 2 to 3 minutes on each side, adding more butter if necessary. Makes 10-12 cakes.

Ponzu Sauce Recipe
1/4 cup of soy sauce
Juice of 1 lime

1-1/2 tsp of brown sugar

1 tbs of minced green onions

1/2 tbs of grated ginger

Mix all ingredients together.

Share

Stuffed Artichokes

February 24, 2010 Appetizer, Entrees, Menu 1 Comment

This past weekend we hosted a nice family dinner for my mom’s birthday. I decided to serve a special dish that my mom always enjoyed, stuffed artichokes. My grandmother would make them and send them over to my house a few times a year when I was younger. It has to be at least 25 years since we’ve had them last, so I knew that they would make for a special birthday dish. I searched out a bunch of recipes and found a great one on italianchef.com. The recipe was simple enough to follow, and contained the perfect combination of flavors. What made this dish even more special was that it was almost the exact same recipe that my great grandmother (my mom’s grandmother) would use. It was the perfect birthday treat.

There are many more great, authentic recipes at italianchef.com, I highly recommend you check it out! I also placed a link under the Recommendation section. Special thanks to Chef Paolo Torre for allowing me to share his recipe.

STUFFED ARTICHOKES
(click here for link to original post)

Serves 4

1 cup bread crumbs
½ cup grated Pecorino-Romano Cheese
1 tablespoon parsley, chopped
¼ teaspoon garlic powder
salt & freshly ground pepper to taste
6 tablespoons olive oil
4 artichokes
2 cloves of garlic, sliced

1. Combine bread crumbs, Pecorino-Romano Cheese, parsley, garlic powder, salt, pepper, and 2 tablespoons of the olive oil in a medium bowl. Mix together well.

2. Cut stems off artichokes, flush with bottom. Cut pointy leaves off the top of the artichokes. Spread leaves of each artichoke out and push stuffing in between them. (I also scooped out and discarded the hard, purple leaves in the center of the artichoke prior to stuffing).

3. In a pot just large enough to fit the artichokes, add the sliced garlic cloves, 2 tablespoons of the olive oil and the artichokes. Drizzle the remaining 2 tablespoons of olive oil over the top of the artichokes.

4. Turn heat on to medium and cook until sizzling about 1-2 minutes.  Add water to reach half way up the sides of the artichokes.

5. Cover and cook until the artichokes are tender and a leaf is easily pulled out, about 45 minutes.  If liquid is evaporating too quickly add a little more water.

6. Transfer to a serving platter, drizzle a little of the liquid from the pot over the artichokes and serve.

Share

Archives

powered by
Socialbar