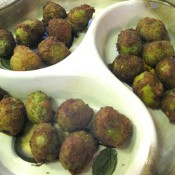
Home » Appetizer » Recent Articles:

Fresh Basil-Mint Pesto

September 17, 2012 Appetizer 1 Comment

Even though it may be a bit late in the season to talk about using fresh herbs from your garden (my herb plants starting going south a few weeks back), it’s never a bad time to keep this quick tip in mind next time you are making fresh pesto. By simply cutting the amount of fresh basil in half, and replacing the other half with fresh mint – in other words, using equal parts basil and pesto – you end up with a tasty and vibrant alternative to an already fresh home made sauce. Whether you are serving it on pasta, chicken, salmon, baked potato, or as a vegetable dip, the fresh mint pesto will be sure to please!


Fresh Basil-Mint Pesto
Adapted from simplyrecipes.com

1 cup fresh basil leaves, packed
1 cup fresh mint leaves, packed
1/2 cup freshly grated Parmesan-Reggiano or Romano cheese
1/2 cup extra virgin olive oil
1/3 cup pine nuts or walnuts
3 medium sized garlic cloves, minced
Salt and freshly ground black pepper to taste

Combine the basil and mint with the pine nuts, pulse a few times in a food processor. (If you are using walnuts instead of pine nuts and they are not already chopped, pulse them a few times first, before adding the basil.) Add the garlic, pulse a few times more.

Slowly add the olive oil in a constant stream while the food processor is on. Stop to scrape down the sides of the food processor with a rubber spatula. Add the grated cheese and pulse again until blended. Add a pinch of salt and freshly ground black pepper to taste.

Use immediately, or refrigerate in a sealed container for up to a week.
Makes 1 cup.

Share

Escarole and Beans

September 10, 2012 Appetizer, Menu No Comments

Traditional side dishes are often my favorite part of a big Italian meal. The simplicity of sauteed greens (such as swiss chard, broccoli rabe or mustard greens) are always the perfect balance to the main course. Today I am sharing with you one of my favorites, sauteed escarole with beans.

Escarole is a mild green that is often used in soups – escarole and bean soup being one of the more common Italian soups. In my version, the escarole and beans are heated separately, then combined to make a delicious, creamy side that is perfect for serving with crusty Italian bread. You can add cooked sausage, bacon or ham to this dish for additional flavor.


ESCAROLE AND BEANS

1 large head Escarole, thoroughly cleaned and chopped
2 tbspn olive oil
2 cloves garlic, minced
1 16 oz can cannellini or garbanzo beans, undrained
salt and pepper to taste

In a large skillet, heat one tbspn olive oil. Add garlic. When fragrant, add chopped escarole, tossing well until all leaves are coated. Stir for about 10 minutes, or until tender. Remove from skillet, season with salt and pepper. Place in a covered bowl and set aside.

Rinse skillet for reuse. Heat remaining tbsn olive oil, again adding garlic when oil is heated. Add the beans and their juices. Stir and simmer until a creamy sauce develops, about 10 minutes. Add escarole to the pan, toss and simmer for a few more minutes.

Serve on a platter with crusty Italian bread.

Share

Stuffed Olives

May 29, 2012 Appetizer, Menu No Comments


I always enjoy finding items on a menu that were once considered everyday survival food to our ancestors. Polenta, for example, was once nothing more than peasant food, because it was affordable and could be made in abundance. Nowadays, you can find polenta offered as a special appetizer at a fancy Italian restaurant.

Another food item from yesteryear that is making its way into the hearts of modern food lovers is stuffed olives. Now, by no means were stuffed olives considered peasant food. They have always been a delicacy that were enjoyed during the holidays. For some older generations, the labor of slicing and stuffing has lost its luster, but they continue with the tradition.  My Aunt Marie still makes them for special occasions, its just that after years of precisely slicing the olives, the thrill is gone. On the flip side, to this day my Mom still raves about the stuffed olives that my Aunt Tina made for a New Years Eve party back in 1970! I always knew that someday I would like to give this recipe a try. After recently enjoying stuffed olives at Le Virtu in South Philadelphia (one of their signature appetizers), I knew it was time to step up and give it a go and to continue with this delicious tradition.

The biggest trick to preparing the olives is using a sharp paring knife. You want to spiral cut the olives from top to bottom in one even slice, as if you were peeling an apple. If your knife is dull, you risk breaking the olive. So be sure that your knife is nice and sharp to ensure a clean and easy slice. You also want to use large green pitted olives. The larger, the better  because it gives you more flexibility to slice and more room for stuffing. Once all of your olives are sliced, it’s time to fill them with your prepared stuffing. Traditional stuffings for olives usually consist of a meat filling, such as sausage, pork or lamb. You can also stuff the olives with feta, bleu or provolone cheese and serve them as is. Of course, you can get as creative or exotic as you want! For this recipe, I am using a crab meat filling. Since this was the first time that I made these, I made sure to have enough filling mixture…which turned out to be too much filling anyway. If you decide to use this filling, I suggest still making the amount listed below and putting the rest to use as a stuffing in chicken, tilapia or beefsteak tomatoes.

STUFFED OLIVES

1 8oz jar large green pitted olives
1 cup breadcrumbs
2 large eggs, beaten
2 cups vegetable oil

Filling
1/4 cup chopped onions
1/4 cup chopped celery
2 tbsp. butter
2 tbsp. white wine
Juice of 1 lemon
8 oz. canned crabmeat
1/3 cup seasoned breadcrumbs

Heat butter in a pan until melted. Add onions and celery; heat until soft. Add crab meat, wine and lemon juice; stir. Add 1/3 cup breadcrumbs; stir. When warmed, remove from heat, place crab meat filling in a bowl; set aside.

Using a sharp paring knife, spiral cut the olives in one clean cut from top to bottom. To stuff the olives, simply grab about a half teaspoon of filling, shape it into a ball, and wrap a sliced olive around it. You’ll then be able to judge exactly how much filling is required to stuff an olive. Once all of the olives are sliced, you ‘ll want to bread them by dipping them in the beaten eggs and rolling them in 1 cup of breadcrumbs.

Next you’ll want to heat up the vegetable oil in a small sauce pan. Once heated, you’ll want to carefully place the olives into the oil, about 3 or 4 olives at a time. Let them cook for about a minute, or until the breadcrumbs are browned. Carefully remove with a slotted spoon and let dry on a paper towel covered dish. You can serve them either warm or at room temperature!

Share

Italian-style Quesadillas

Whether you are enjoying a traditional Mexican meal at home or at a family-friendly restaurant, you are sure to find quesadillas on the table at some point. The popular and tasty dish, made up of a flour or  corn tortilla stuffed with cheeses, vegetables, meats and beans is perfect dish to either share as an appetizer with friends, or (as in my case) enjoyed on its own as a main course. This week, to help celebrate Cinco de Mayo, I am going to put an Italian spin on this Mexican favorite.

First, let’s start off with the filling. Instead of the traditional quesadilla filling, I will be using some of my favorite go-to Italian vegetables. You will need:

1 green zucchini, chopped
1 yellow squash, chopped
1 medium eggplant, chopped
1 small jar artichoke hearts
1 red bell pepper, chopped
2 cloves garlic, minced
1 teaspoon Italian seasoning
salt and pepper (to taste)

Mix all of the above in a bowl. Add some olive oil and stir together until well-mixed. Refrigerate for 30-60 minutes to allow all of the flavors to come together. Pour in a baking dish, bake at 350˚ for about 20 minutes. Remove from oven, set aside.

If you want to add some meat to the filling, traditional chicken or shrimp would work well. Or for a little more Italian spice, try adding some cooked ground sausage!

Next, we’re going to add some cheese. While quesadillas usually use cheddar, colby or monterey jack cheese, we’re going with shredded mozzarella and some parmesan.

Assembling the Italian quesadillas is the same as the traditional version. You start by heating up a pan over medium heat, lightly coated with butter or oil. Place a tortilla shell into the pan, let heat for about 15 seconds. Add some of the filling to one half of the tortilla, topped with the cheeses and some fresh herbs (fresh chopped basil is my choice here!). Fold the shell in half to make a half moon shape. Carefully flip the quesadilla so that it even cooks on both sides. Remove from pan, cut into three equal triangles. You may need to add more butter or oil to the pan before each additional quesadilla. Serve with a side of marinara sauce or bruschetta for dipping (in place of traditional salsa).

Share

Recent Comments

Archives

powered by
Socialbar