Home » Entrees » Recent Articles:

Foiled! Tips and Recipes for Grilling Foil-Wrapped Packs

Quick-hit videos and recipes for foil-wrapped packs have recently taken social media by storm. Just this past week alone, I’ve watched at least three new recipe videos for foil-packed meals on the grill…and this was after I made a delicious foil wrapped lobster tail, baby potatoes and corn on the cob meal on the grill for my birthday last weekend!

Foil-wrapped packs are assembled by placing a single-serving of ingredients onto large sheets of aluminum foil. The foil sheets are then folded up into sealed packets, then cooked either on the grill or in the oven. There are many benefits to preparing foil pack recipes, especially if you are preparing the foil packs on the grill. Because all of the ingredients are contained (including your main dish, sides, herbs and spices), you do not have to put any effort into brushing, seasoning, stirring or flipping anything during the cooking process. All of the ingredients get the work done on their own! The foil packs also make for a fun presentation when serving them to your friends or guests, so it cuts back on post-dinner clean up. Since everything is contained within the foil packs, there is also less chance of flare-ups caused by drippings.

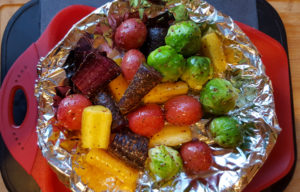
Seasoned vegetables, ready for the grill.

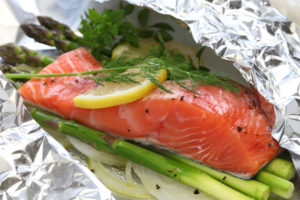
fresh salmon with asparagus in foil paper, ready for cooking.

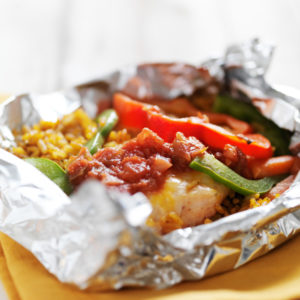
Baked mexican chicken fajitas with spanish rice.

The recipes that you could make in a foil-wrapped pack are virtually endless. At the end of this article, there are links to some of the foil-wrapped recipes that I have made. I also have links to articles from tablespoon.com and foodnetwork.com, offering up 75 different foil-wrapped recipes. From appetizers, vegetables, seafood, pasta and fajitas, to roasted garlic, mussels, meatballs, popcorn and chocolate marshmallow banana boats….the list is just amazing! Again, many of these recipes could also be made in the oven, so the fun does not have to stop when grilling season comes to an end. But don’t worry, we have plenty of grilling time ahead of us!

A few things that you should keep in mind when preparing foil-wrapped packs:

• Be sure to use heavy aluminum foil (non-stick is preferred), or double up on the sheets if you are using thinner foil. You do not want any of your food to poke through or rip the foil at any time.

• If some of your ingredients naturally take longer to cook than others, you should prepare the items that take longer prior to adding them to the foil pack. A perfect example is potatoes. Even when cut down to small pieces, potatoes could take a while on the grill. If you are adding them to a pack with chicken, the potatoes should have enough time to cook on the grill. However, if you are adding potatoes to a pack with fish, the fish will cook much quicker than the potatoes. You will be better off preparing the potatoes ahead of time, then adding the cooked (or semi-cooked) potatoes to the pack.

• Always be very careful when removing the cooked foil packs from the grill, and especially when you unfold the cooked packs. The cooked food will be hot, and steam will be released when the packs are opened. Depending on the meal that you have made, there may also be hot oil in the pack that can burn you. Take your time removing and opening the packs, and be sure to use oven mitts.

• Most of all, be creative and have fun!


Recipe suggestions:


Grilled Tilapia Tacos

Grilled S’mores Sandwiches

Lobster Tail Foil Pack

Pack it Up! Pack it In! 15 Foil Meals for the Grill

50 Things to Grill in Foil


Images courtesy of istock.com

Share

Honey-Butter Salt and Pepper Wings

February 16, 2017 Appetizer, Entrees, Menu No Comments

I was never a huge fan of easy pickin’ foods that are slathered with sauce. Whenever I grill ribs or chicken, I always opt for a nice dry rub as opposed to brushing it with barbecue sauce. Because of this, chicken wings are not usually on my radar. And when they are, I am very particular on how they are prepared. I don’t like them breaded, I don’t like them fatty and I don’t like them floating in a sauce bath. This past Superbowl weekend, I decided it was time to give it go and figure out how to prepare wings to my liking.

The last time that I had enjoyed wings, they were prepared with just a salt and pepper rub on them, and they were finger-licking good. The salt and pepper blend was baked perfectly into the juicy chicken meat, making the plate of tiny wings and drumsticks truly addicting. This was the recipe that I decided I was going to start with for my game-day party plate.

Te recipe that I used was very simple: 1 teaspoon of salt and 1 teaspoon of pepper, combined, for each pound of wings (which is approximately a dozen wings). Making the adjustments for a larger batch would be simple using the ratio of 1:1:1 (meaning 1 teaspoon salt and 1 teaspoon pepper per 1 pound of wings). The challenge that I had was how to properly cook them. Frying is the traditional method used to cook the perfect crispy and meaty wing, rendering off any of the unnecessary fat. But my preference is almost always baking over frying. However, baking wings often leaves the skin a bit fatty, which is one of my wing no-nos. In order to achieve the desired crispness, you really have to crank your oven temperature up to at least 425˚. While the higher temperature will help achieve the desired texture, the high-heated fat will start to splatter, which will lead to a smoky oven. Not fun if you have a smoke alarm close to your kitchen quarters.

This is where celebrity chef Alton Brown’s admirable food and science knowledge comes in to play.

Alton’s method is to steam the wings prior to baking them. As Alton says, “the trick is to steam them first to render out a lot of the fat. Then you cool them to tighten the skin.” This step, which does involve a little bit of labor, will help cut back heavily on oven splatter, since much of the fat has been rendered off. The end result is a beautiful crispy and flavorful wing, without a smoke-filled kitchen when you remove the tray from the oven!

As I mentioned earlier, I am not a big fan of wings that are slathered in sauce. But I also did not want serve wings that were too dry. Because my wife and kids do not like hot or spicy food, I opted to make a sweet honey-butter sauce that I would quickly toss over the wings. This quick sauce was just enough to coat the wings, and was a great complement to the salt and pepper rub. Just enough of a sweet coating without over-saturating the wings.

Below is the step-by-step process to my wings. Again, you can use the ratio method of 1:1:1 for the salt and pepper rub. The honey and butter measurements for the coating can be increased per pound as well.  The ingredients are simply a starting point. Additional spices can be added to the rub, and hot sauce can be added to the honey-butter coating to your liking.


Honey-Butter Salt and Pepper Wings

Makes approximately one dozen wings.

1 pound party chicken wings
1 teaspoon salt
1 teaspoon pepper
2 tablespoons butter
1 tablespoon honey
(optional – fresh chopped parsley for garnish)


Step 1: Steaming the Wings

This is Alton Brown’s method for steaming the wings. This step helps render the chicken fat, which will reduce the amount of splatter and oven smoke while baking. You can eliminate this step if you do not have a steamer basket, but there will be some oven smoke and splatter made while baking.

For Alton Brown’s complete Buffalo Wing recipe, click here

Load a 6-quart saucepan with a steamer basket and 1 inch of water in the bottom, over high heat, cover and bring to a boil.

Place the wings into the steamer basket, cover, reduce the heat to medium and steam for 10 minutes. Remove the wings from the basket and carefully pat dry. Lay the wings out on a cooling rack set in a half sheet pan lined with paper towels and refrigerate for one hour. You can do the wings in batches if you can’t fit them all into the steamer basket at once.


Step 2: Coating and Baking the Wings

Preheat the oven to 425˚. Combine the salt and pepper. Once the wings have completely cooled and dried, coat the wings on both sides with the salt and pepper rub. Either place the wings on a small rack sitting in a baking dish (my preference for even cooking), or place the wings on a baking sheet lined with parchment paper.

Bake the wings on the middle rack of your oven for 20 minutes. Flip the wings and bake for another 20 minutes, or until golden brown.


Step 3: The Honey-Butter Coating

While the wings are in the final 20 minutes of baking, you can prepare the honey-butter coating. Melt the butter in a sauce pan. Add the honey, stir well and continue to heat until warm and thoroughly combined.

*Note – you can add hot sauce or spices to your liking to add heat to the honey-butter coating.

Once the wings are done, toss them with the honey-butter coating. Sprinkle the wings with some fresh chopped parsley, serve and enjoy!


Share

Pancetta and Beans with Spinach

December 13, 2016 Entrees, Menu No Comments

With the cold winter weather rolling in, now’s the time to start planning some good, old fashioned, stick-to-your-ribs kind of meals. The dish that I’m sharing with you today is one of my all time favorites. The simple, yet classic ingredients make for a wonderfully tasty and hearty comfort dish. Old-school Italian soul food at its best!


Pancetta and Beans with Spinach

4 oz pancetta, diced
1 small onion, diced
1 14.5 oz stewed tomatoes, drained
1 15 oz can cannellini or garbanzo beans (I use a mixture of both)
1 bag spinach
olive oil (if needed)
1/4 to 1/2 cup chicken broth (if needed)
salt and pepper

Sauté pancetta in a large pan over medium heat until crispy and fat is rendered, about 7-10 minutes. Remove pancetta and set aside.

Add onion to rendered fat in the pan, sauté until soft and translucent (you can add some olive oil if needed). Add tomatoes and beans, stir together, cook until heated.

Add the spinach, stir together. You can add 1/4 to 1/2 cup of chick broth if needed, to help cook down the spinach.

Once the spinach is cooked down, add the pancetta back to the pan. Stir together, season with salt and pepper to taste.

Serve and enjoy with a loaf of crispy Italian bread!


pancetta_beans2

Share

Crock-Pot Pulled Pork

December 2, 2016 Entrees, Menu No Comments

Cooking a pork shoulder in a Crock-Pot or a slow cooker is a popular and easy method used for making pulled pork. While my personal favorite method is to slow cook it on the grill (you can find my recipe for grilled pulled pork by clicking here), I have tried a few different versions in the Crock-Pot as well. This version that I’m sharing with you today is my favorite Crock-Pot version. The pork shoulder gets rubbed down with a mixture of garlic powder, oregano, red pepper flakes and kosher salt prior to cooking, so barbecue sauce is not needed. Instead, I simply add two jars of pork gravy, which makes for a juicy, tender and delicious pot of pulled pork!


Crock-Pot Pulled Pork

1 large Vidalia onion, cut into 1/2-inch slices
1 (5- to 6-lb.) boneless pork shoulder roast
1 tablespoon garlic powder
1 tablespoon oregano
1/2 teaspoon crushed red pepper
1 teaspoon kosher salt
1 (10 1/2-oz.) can condensed chicken broth
2 12-oz jars pork gravy
1-2 tablespoons olive oil

Lightly coat the bottom of a 6-qt Crock-Pot with olive oil. Make 1-2″ deep slits around various parts of the pork shoulder. Rub the garlic powder, oregano, kosher salt and crushed red pepper all over the pork shoulder. Be sure to get the spices into the slits as well. Place onions in the pot, then place roast on top of onions. Pour broth over roast. Cover and cook (HIGH 6 to 7 hours, or LOW 8 to 10 hours) or until meat shreds easily with a fork.

Carefully transfer the pork to a cutting board. Remove and discard onions from the broth (you can reserve the onions to use as a topping, if you like). Add the two jars of pork gravy to the broth in the pot. Let the pork cool for 10 minutes, then shred with 2 forks, removing any large pieces of fat. Add the shredded pork back to the pot. Serve and enjoy!

pulledpork2016

Share

Recent Comments

Archives

powered by
Socialbar