The BYOB Post: Brewing Your Own Beer!

This is not a step-by-step tutorial, but rather a recap of my first experience helping to make a batch of home brew.
If I were to be keeping a bucket list, I would have recently been able to cross off one of my top list items…and it actually involved a bucket! I spent a recent Saturday afternoon with my friend Carl, helping him brew a batch of Irish Red ale. Carl is an enthusiastic and well seasoned home brewer, and has been after me for a while to help with brewing up a batch. As you may already know, I have developed a deep appreciation over the years for well-crafted beers, so an opportunity like this is one that I just could not pass up.
Obviously, one day of assisting does not qualify me to pass along brewing wisdom, which is why I am not posting detailed steps in this post. The kits that you can purchase come with pretty specific instructions, and there are countless websites and videos that can offer you extra assistance. You can also refer to the following link for easy to follow step-by-step instructions: www.wahomebrewers.org
So let me share with you a VERY abbreviated version of my ‘inaugural’ beer brewing day….
The process of brewing beer is a lot like brewing a big pot of tea. The first step is placing your select grains into a cheesecloth-type sack that will steep in a big pot of boiling water. This step brings out all of the colors and flavor of your selected grains. What you are starting to make at this point is called a ‘wort’, which essentially is the the beer without the alcohol.
You will then spend the next hour or so adding your selected malts and hops, while bringing the mixture up to a boil and carefully stirring to make sure that none of it boils over. There are other elements that could be added to help with clarification and protein coagulation, such as Irish moss.
Once all ingredients are added to the wort and it has reached its required boiling time, it’s time to chill down the wort to a proper temperature so that you can add the yeast (the yeast is activated by the sugar, which creates the alcohol). You pour the wort along with additional water into a sanitized 5 gallon bucket, which acts as your fermentor. Bacteria is yeast’s worst enemy, so sanitizing your equipment is crucial!
At this point, a hydrometer can be used to measure the sugars in your wort, which will give you an idea on how much alcohol will be in your beer. By doing a little basic math, you will get an idea on your alcohol volume.
Next you add your yeast to the wort, put the lid and stopper on the fermentor bucket and give it a few good shakes to kick-start the yeast into activation mode (this is where the yeast starts to eat up the sugar and create the alcohol). You add an airlock to the fermentor, which will let you know that the yeast is doing its work, and you let it sit for a few weeks. You now have an early stage batch of beer!
By this point in the game, my assistance was no longer needed. Carl had taken over and handled the second fermentation phase a few weeks later, followed up with the racking and bottling phase. You can refer to the link mentioned above for a better description of these final phases.
When all was said and done, we each ended up with a TREMENDOUS case of Irish Red Ale ( a batch of home brew will produce two cases). This made for an enjoyable and easy drinking beer with a smooth body and a pleasant aroma, and would easily be considered a true session beer. Because this was my first attempt at home brewing, I decided to appropriately christen it ‘Inaugural Irish Red Ale’.

WHAT I REALLY LEARNED
Because I was more of the helping hand, I spent more time photographing and taking notes than I did stirring and steeping. But I do have a few good tips to share, if you are interested in attempting to home brew…
1. Team up with a friend (preferably one who may have some experience in home brewing). There’s actually a lot of waiting around for water to boil, so having a friend to hang out with helps fill up a lot of your time. There’s also a fair amount of lab-type equipment involved. If you have a friend who already brews, this will save you the cost of buying your own equipment. It will also help you avoid making mistakes that your experienced friend will know how to avoid!
2. Be sure to get your wives/girlfriends out of the house. You will be taking over the kitchen for a good few hours, and boiling brew will make for a bready/yeasty aroma (not unlike a frat house). I personally found the smell to be comforting…but chances are the ladies will think different.
3. Prepare a good meal for the day. Before we were left to play, Chrissy (Carl’s wife) made sure that we were set with a nice pot of home-cooked chili, some crusty bread and good cheese. Take advantage of the “waiting for the pot of water to boil” down-time by enjoying a nice hearty lunch with your buddy!
4. Save those pop-top bottles. Recycling your old bottles is easy and cost-effective. You can purchase various bottle cleaning products online or at a brewing supply store. A quick soak in warm soapy water and a few minutes of scrubbing with a scouring pad will help remove the old labels.
5. Share the wealth! As I mentioned earlier, a batch of home brew will make 5 gallons, or two cases of beer, for a reasonable cost of about $30-40 depending on what kind of beer you are making. What better form of a friendly gesture is there than to share your home creation with your family and friends? And if the batch is good, the compliments and kudos will make you proud.*
*Before I get any flack…this case went fairly quickly to those who I knew would appreciate it most. I am certain that I will be attempting another brew with Carl sometime in the near future, and I will be happy to share what I can next round!
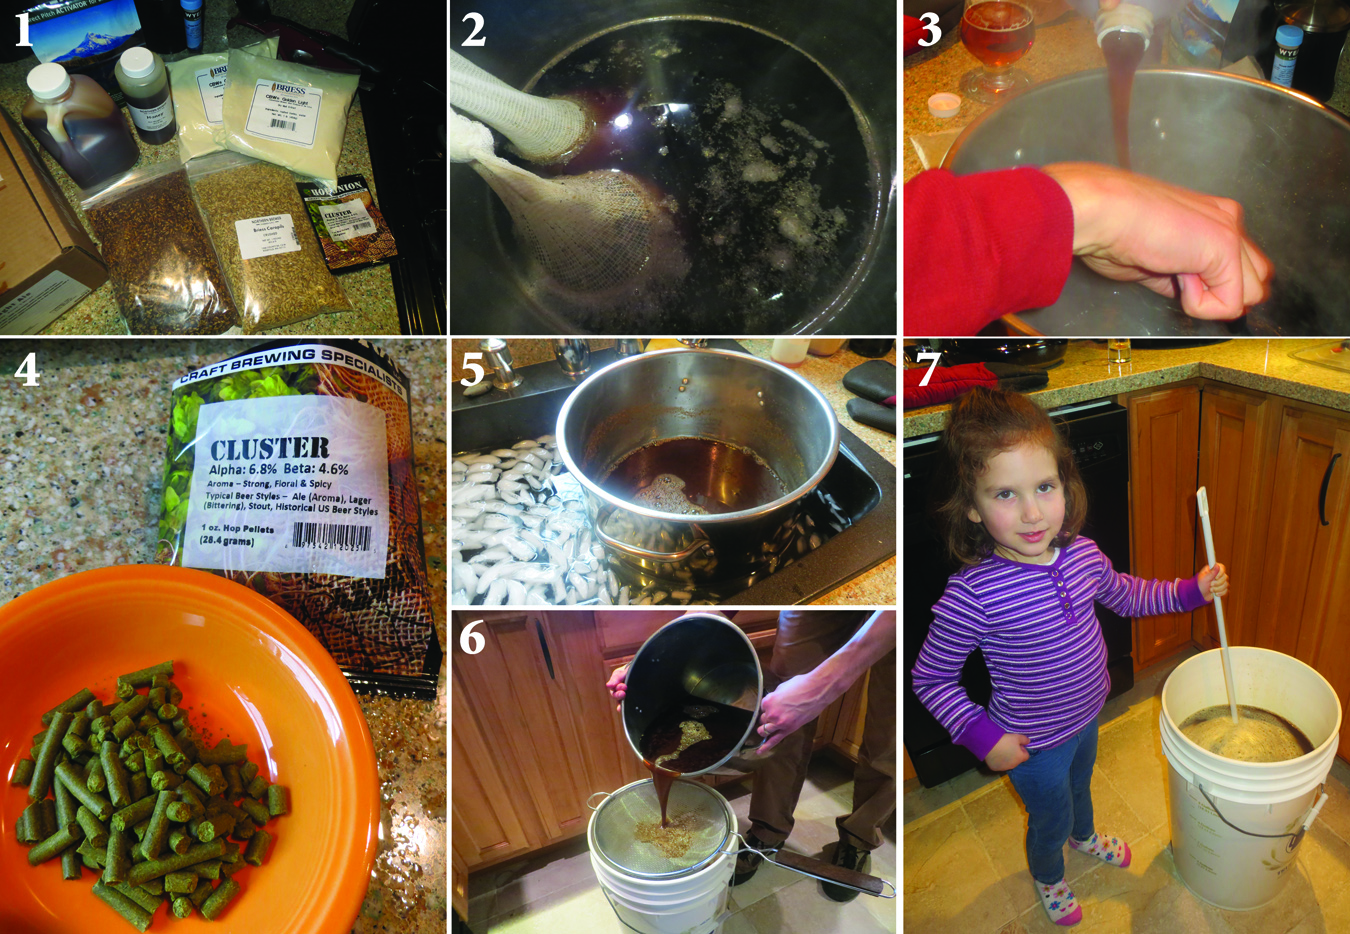
Below are some photos that I took while Carl and I…ok, mostly Carl….were preparing our batch. 1) The ingredients; 2) the first stir of the boiling brew; 3) adding the malts; 4) the hops; 5) the big chill; 6) straining the wort into the fermentor bucket; and 7) Ava giving the wort one final stir. Just to clarify, photo #7 of our little assistant handling the stirring and mixing duties was taken prior to the yeast being added to the wort. In other words, there is NO ALCOHOL involved at any point during this portion of the process.