Home » • The Mamma Meets the Cucina » Recent Articles:

Veggie Contest Results

So the votes have been tallied, and while I came out on top on the Cucina Domenico poll, the total votes once again went to the one and only Una Mamma Italiana. Very impressive, Una Mamma…you should be proud! What I found most interesting about both of our dishes is that they are a good representation of who we are and what we’re trying to accomplish with our respective blogs. My dish, the Peperonata, was more of an old world, rustic style meal that could be found in just about any Italian household here on the east coast. Una Mamma’s Zucchini Fritters put a sleek and modern spin on a simple garden vegetable, which has a very west coast trendy vibe. So yes, I’m taking the high road on this loss, and chalking the votes up – on both blogs – to regional preference. Maybe this battle showed what each of our readers likes about our particular style? (Stay with me on this one, people….a 14/1 loss is not THAT easy to deal with…OUCH!). In all seriousness, we both encourage you to try both of our recipes and enjoy them. I am very much looking forward to cooking up the Zucchini Fritters in the near future. Once again, congratulations Una Mamma! And until next time….


Share

The Mamma Meets The Cucina: The Veggie Challenge!


VEGGIE CHALLENGE!!!!!

Well, another Mamma Meets the Cucina battle was long overdue. This time they’re dueling with veggies.

Cast your vote at the bottom of the page for your favorite side dish! You can also cast your votes on the Una Mamma blog. And be sure to ‘like’ the Cucina Domenico group page on Face Book! Salud!

FROM THE MAMMA…

Zucchini is one of my favorite veggies – especially this time of year.  I can remember my Grandma Rose picking the zucchini from her backyard garden, stuffing the flowers with ricotta and baking them. It was such a special treat that I loved when I was a kid. I figured that in an attempt to mimic my Grandma’s recipe I could risk shaming the family, so I opted for fritters instead!

Fritters are a fun and easy way to incorporate veggies into a diet – especially for picky little ones.  It’s fun for kids to mix up a batter and watch them fry up.  I made my daughter part of the whole process and she loved the final result twice as much because of it!  Presented with a small slice of fresh lemon and parsley, these become a simple yet elegant side dish.  They’re like a good pair of jeans – you can dress ’em up or dress ’em down and they always look great.

ZUCCHINI FRITTERS

2 medium zucchini, trimmed & grated
1/2 small onion, trimmed & grated
1/2 cup grated Romano cheese
1/3 cup flour
1/2 cup chopped fresh parsley
2 eggs, beaten
e.v.o.o. for frying

Before combining all the ingredients, pat the grated onion and zucchini dry with a paper towel.  This will remove any excess moisture that might make the batter too wet.  Then combine all the remaining ingredients (except for the e.v.o.o.) with a spoon. Season with salt and pepper.

Drop spoonfuls of the batter into a skillet coated with a couple TBSP of e.v.o.o.  Flatten them slightly and cook until golden brown on each side. (about 2-3 minutes per side over medium heat)

Drain on a paper towel lined plate and serve hot or warm.

(The great thing about these fritters is they are great party appetizers since you can easily make up a whole batch and reheat them in a warm oven on a cookie sheet.)


FROM THE CUCINA…

Peperonata, in my opinion, is the perfect Italian vegetable dish. The classic combination of onions, garlic and peppers sautéed in olive oil makes for the beautiful fragrance. The potatoes and tomatoes help give a nice, hearty texture to the dish. And the splash of white balsamic adds the delicious, slightly sweet, slightly tart finish. Whether you’re serving it as a side dish, as an appetizer or as a meal itself, the hearty and rustic peperonata is a stick-to-your-ribs kind of meal that you will enjoy time and time again.

Many of the recipes that I have found use either fresh tomatoes or canned crushed tomatoes, with the addition of some water or broth to keep the peperonata from drying out. I actually prefer to use canned stewed tomatoes and their juices. The stewed tomatoes are already seasoned, they are soft enough where they will meld nicely with the softened peppers and the remaining ingredients, and the juice is plenty to keep this dish thick but moist (you don’t want a soupy consistency). Be sure to use a variety of bell peppers. The variety of pepper colors make for a very appealing presentation. And don’t forget the crusty bread for dipping and scooping!

PEPERONATA

1/4 cup EVOO
 1 small onion, chopped
4 cloves garlic, minced
8 bell peppers (two green, two red, two orange and two yellow), seeded and sliced into strips
2 14.5 oz. cans of stewed tomatoes and their juices
4-5 medium russet potatoes, peeled and sliced
1 tblspn Italian seasoning
Salt and Pepper to taste
2 tblspn white balsamic vinegar

In a large pot saute the onions in olive oil on medium-high heat, and when it is completely softened, and before it starts browning, add the garlic. Saute for an additional couple of minutes, then add the peppers, lower the heat to medium-low and stir well. Partially cover with a lid and let them soften up, about 10 minutes.

When the peppers have settled into the pan, add the stewed tomatoes and the potatoes. Season the mixture with salt and pepper to taste and the Italian seasoning, stir well over medium-low heat. Add the white balsamic, stir again, cover, cook on medium-low for about 1-1/2 hours or until potatoes are cooked to preference, stirring occasionally. Serve on a platter with crusty or toasted Italian bread.


Share

Cooking with Beer

Over the past few years, I have started to develop a taste and understanding for quality beers. Along with it has come the appreciation of pairing a good beer with food. Just as you would choose which wine to serve with you meal, a nice beer selection can often help accentuate the flavors of just about any dish. It’s not uncommon for me to now consider what beer to order or serve before selecting or preparing my main course. Needless to say, I was very excited when my sister-in-law (a.k.a. my SIL) gave me a cookbook full of beer-based recipes. We’re talking way more than just a hot dog beer boil here, people. Just as you would select the proper oil or vinegar as a liquid base, the style of beer that you use can help bring out a sweet maltiness to a sauce or a hoppy essence to a marinade. I’ll be sure to share some recipes with you as I experiment with this book. Thank you SIL!

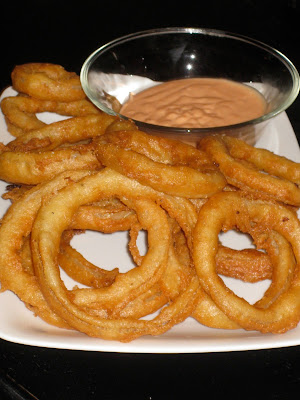
This week, my good friend Emma shares with us her own beer-infused recipe…Gluten-Free Beer Battered Onion Rings! Just the combination of beer and home-made onion rings alone is enough to make my mouth water. But to put the two together? Genius!!!

Also featured this week is a delectable recipe from the one and only Una Mamma Italiana, as she shares with us her recipe for Italian Herb Beer Bread. Be sure to check out the Una Mamma Italiana blog for this and many more creative and tasty dishes.

Mangia and enjoy!

GLUTEN-FREE BEER BATTERED ONION RINGS


By Emma Caperelli Loerky

A few weeks ago my husband celebrated his birthday. When I asked him how he’d like to spend his day, he immediately spewed off a dinner and dessert menu. The menu consisted of filet mignon, sauteed mushrooms, Caesar salad, onion rings, and for dessert he asked for a key lime pie. Since my husband has Celiac disease, I knew I’d need to make some adjustments, but I felt that all of the things on the menu seemed pretty doable. I had a recipe for Caesar dressing that I had been wanting to try (no dairy and no raw egg), gluten-free croutons couldn’t be that hard (they weren’t and they were delicious!), I’ve made mushrooms countless times, and my husband is in charge of grilling the steaks. Even the pie, without the dairy and gluten, didn’t faze me. But the thought of making onion rings made me cringe.

You see, a few months ago I attempted to make gluten-free onion rings without success. They were greasy and gritty and I was in no rush to try my hand at making them again. However, being someone who adores onion rings, I completely understood how they would make this pretty basic dinner seem special, so I decided to try again. Am I glad I did! My experience making them this time was so much better than the last and the results were spectacular. Aside from the onion rings at my favorite BBQ joint, these were the best I’ve had. No lie.

The key is to have everything set up and ready to go. You want to make sure you have your oven preheated to 200 degrees (to keep the cooked onion rings warm while you are frying up the rest), a wire rack lined with paper towels close by, as well as a cookie sheet to transfer the freshly fried rings to the oven on. Oh, and lets not forget the batter and the onions themselves. It needs to be sort of an assembly line. Once that is accomplished, you want to make sure that you have your oil at the perfect temperature. If your oil isn’t hot enough, they will end up greasy and inedible. If it is too hot, they will burn QUICKLY. Even at the right temperature, these cook very fast, so you don’t want to let them out of your sight for very long. The time it takes you to transfer the rings to the oven is about all I would allow myself to be away from the frying pan. I used a cooking/candy thermometer to make sure that my oil was at the perfect frying temperature (365 degrees).

I almost forgot to mention the dipping sauce, which complimented the onion rings perfectly. In a nutshell – MAKE IT! Do yourself a favor though, double the recipe. I certainly will next time. 

Both recipes are adapted from http://www.glutenfreecookingschool.com/archives/lazy-mans-beer-battered-onion-rings/

Ingredients
1 Large Vidalia onion (or other sweet onion)
Approximately 2 cups soy milk
2 tbsp lemon juice
**Note: If you aren’t lactose intolerant, omit the soy milk and lemons and use buttermilk.

1 1/2 cups brown rice flour
1 tsp salt
about
1/8 tsp black pepper
1 tbsp canola oil
2 eggs, lightly beaten
3/4 cup Redbridge Beer **(This is the amount the original recipe calls for, however, I had to add at least and additional 1/4 cup, possibly 1/2 cup more in order to get the right consistency. Unfortunately, I didn’t measure exactly how much I added. Start off with the recommended amount and slowly add more beer until it’s a nice thick consistency, similar to a pancake batter.)
Vegetable oil (for frying)

Directions
Mix together the lemon juice and soy milk and let stand while you slice the onions into rings about 1/2 inch wide. Soak the onions in the soy milk mixture (or buttermilk) for about an hour in the fridge. Make the beer batter by mixing all remaining ingredients, adding as much beer as described above. Let the batter rest in the fridge while the onions soak.

After about an hour, heat enough vegetable oil to coat a large frying pan (or cast iron skillet) by about 1 inch. The temperature should read 365 degrees on a thermometer. Drain the onions in a colander while waiting for the oil to come to temperature. When the oil is ready, dip the onion rings, one at a time, into the batter and gently lower them into the hot oil. Do not overcrowd the pan. After approximately 3 minutes, flip the rings and cook on the other side for about another 3 minutes. They should be a light golden color when finished. Transfer the rings to a wire rack lined with paper towels to drain the excess oil and sprinkle with additional salt while they are still hot. Repeat with the remaining onions, keeping the cooked onion rings warm in the oven.

Creamy Wasabi Dipping Sauce

Ingredients
1/4 cup mayonnaise
1/4 cup sour cream or plain yogurt (I couldn’t find plain soy yogurt, so I just used 1/2 cup mayonnaise)
2 heaping tsp ketchup
1 heaping tsp tomato paste
1 tsp Wasabi paste (I used a bit more)
Dash of Tabasco sauce (This was a last minute addition made my me but can be omitted)
Salt, black pepper, and cayenne pepper to taste

Mix all ingredients together thoroughly and enjoy.


ITALIAN HERB BEER BREAD  


By Una Mamma Italiana


Most simple Italian recipes stem from the poor regions of Italy, where they cooked with whatever foods grew regionally. I’m talking about authentic Peasant Food, which happens to be my FAVORITE way to eat Italian. Don’t get me wrong, I can appreciate gourmet Italian fare, but I grew up on the simple flavors of Italian cooking straight from the garden. This is one of those recipes.


Ingredients

3 cups flour

1 Tbsp baking Powder

2 tsp garlic powder

1 tsp sugar

1 tbsp Italian Seasoning

2 tsp salt

12 z. beer


Directions

Mix all dry ingredients. Add the beer and stir (dough will be slightly wet, like a biscuit dough). Place dough in a well oiled loaf pan. Brush the top with Extra Virgin Olive Oil. Bake at 350 degrees for 45 minutes. Once it comes out of the oven, brush the top with e.v.o.o. again and sprinkle with sea salt. Let cool for 10 minutes, then slice.

BONUS RECIPE!!!

As coincidence may have it, Una Mamma has also posted a tasty Onion Ring recipe this week on her blog. Since I was FINALLY able to put an end to her ongoing food challenge victories, I thought it would only be appropriate that I share with you the link to her Italian Fried Onion Rings as well. Enjoy!
Share

Meatball Competition: The Meatball Ring & Meatball Stromboli

Any self-respecting Italian has seen the movie, “Big Night,” in which an Italian family tries to succeed at the restaurant business in America. Well, there is one particular scene in which the chef accuses a dining customer of being a ‘criminal’ for wrongly assuming that spaghetti just comes with meatballs. Astonished at the fact that spaghetti is served on its own, she asks why on earth this is. The waiter kindly responds, with a confused disposition,

“Sometimes spaghetti just likes to be alone!”
(click here to watch the hilarious video footage of the scene)

It is a classic scene that depicts the epitome of Italian pride in cooking! But upon pondering the humor in this ordeal, Una Mamma and I got to thinking,

“What about the meatball? Does the meatball ever like to be alone?”

And thus, this meatball challenge was born. We decided to explore unique ways to serve the meatball on its own – without its commonly paired up partner – spaghetti – or any pasta, for that matter.


And so, here you have two dishes that involve meatballs in two similar, yet very different ways. Which one looks better? YOU decide. Don’t forget to vote in the poll on the sidebar of this or the Una Mamma Italiana blog!


THE MEATBALL RING

By Una Mamma Italiana


Here, (out West, that is) we have more than just sunshine and the Pacific – we have a fabulous restaurant chain, “The California Pizza Kitchen!” Now, I’m sure many of you Easterners have tried this place, but have you ever ordered their pizza salad? I grew up eating at this place. While my brother & I ordered greasy pepperoni, or barbeque chicken pizza, my mom (the constant dieter) would order this pizza salad. This, my friends, is the dish that inspired The Meatball Ring.

CPK would often serve a specialty salad atop a blindy baked (cooked with no toppings) pizza crust. It was like getting some bread on the side of your salad, but it made for a very unique presentation. I thought, why not incorporate meatballs into this.

My mind whirled around stuffed crust pizzas – why not stuff the crust with meatballs? But that looked a bit ridiculous in my head. Then I thought about wrapping the meatballs, instead of hiding them in the crust. (Think pigs in a blanket). Eureka. That – with a little bit of help from my best friend (google), brought the meatball ring to life. And there are SO many directions you can go with this.

I used croissant dough, but I am pretty sure that pizza dough, rolled out thin enough, would work just fine (maybe even better).

I laid out the dough on a circular pizza pan, leaving the triangular tips around the edge in the shape of a ring. I rolled a meatball under each point of dough until I had a star-like pizza crust. I baked it according to package directions.

Then, I let it cool, and topped it with a fresh salad. it was such a fun way of serving up a big salad to a crown. Then with every scoop of salad, each person can pull apart one of the triangles holding meatball. Not a bad idea, right?

But then my mind went a-whirling again. Why not use this meatball ring as a way to serve up ANYTHING at all. My next thought was antipasto. PERFECT. The gorgeous layout of Italian meats, cheeses, olives, artichokes,and whatever else you like on your antipasto platter would look beautiful served atop this meatball ring. And once it’s cooled, it holds together like a gem!

Needless to say, this was my Superbowl party recipe! I will surely post a picture of the antipasto version a.s.a.p. – but use your imagination. What would you top this meatball ring with?


MEATBALL STROMBOLI

By Dominic Condo


To me, there is no other dish as traditional and tasty as a plate of pasta topped with two or three meatballs. Even when Sunday dinners are presented family style, the full serving plate of meatballs almost serves as the centerpiece of the table. Classic. Comforting.

But I also love me a good meatball sandwich! Served up in a nice roll, topped with Parmesan and maybe a little mozzarella, toasted up in the oven grinder-style…it’s crispy hot goodness in every bite! If you’ve read my previous posts, you know that one of our go-to foods when getting together with friends is homemade Stromboli. Using meatball as Stromboli filling is always high on our request list. The consistency of a meatball sandwich combined with the taste of delicious homemade pizza dough. How could you go wrong?

The recipe itself is fairly simple – roll out your dough, top with meatballs, add some cheese, roll up, bake and serve. It’s during the actual assembly when the love and craftsmanship comes into play.

Let’s break it down….

A. you want to make sure that you roll out your dough thin enough to fold, but not too thin where it will break. There’s a lot more texture in this filling as opposed to a pepperoni or ham Stromboli, so you need enough dough to keep everything contained.

B. you want to squash up your meatballs so they fill up more space and are not to lumpy. You’ll want to let the meatballs cool before doing this step for two reasons:
1 – it’s easier to work with the meatballs when slightly cooled
2 – if the meat is still hot, it will start to warm up the dough and make it harder to work with.

C. do not go overboard when adding your gravy/sauce.The key to a meatball Stromboli is the gravy….you don’t want it to be dry. A nice little drizzle of sauce on top of the crushed meatball is plenty. Too much sauce will make the dough soggy and hard to work with. And just as I mentioned about working with the meatballs cooled, you don’t want the gravy to be too hot. Otherwise it will make the dough difficult to work with, You can always serve up a bowl of gravy/sauce on the side for dipping.

D. try using a combination of provolone and mozzarella cheese. Both melt well, and the combination gives you an equal balance of mozzarella creaminess and provolone sharpness. This is one of the many cooking tricks that my cousin Michael taught me many years ago!

You can follow my example photo on how to roll a Stromboli (although the example photo is of a pepperoni stromboli, the same rolling method applies to the meatball stromboli). Add a few slits on the top of the dough to avoid air bubbles. Give it a quick hit with cooking spray, top with a bit of Italian seasoning. Bake uncovered at 375º for about 20-25 minutes or until crust is golden brown. Remove from oven and let it sit for 5 minutes to cool. Otherwise the insides will run out if you slice it too soon.

Slice, Serve and Enjoy!


Share

Recent Comments

Archives

powered by
Socialbar