Home » Menu » Recent Articles:

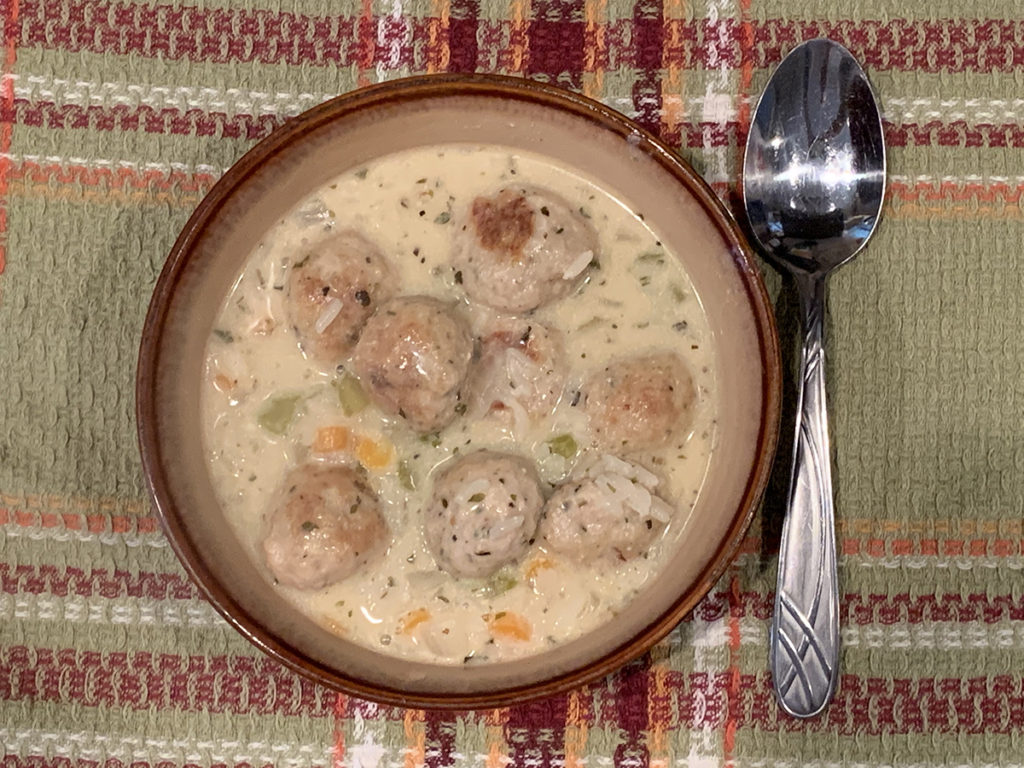
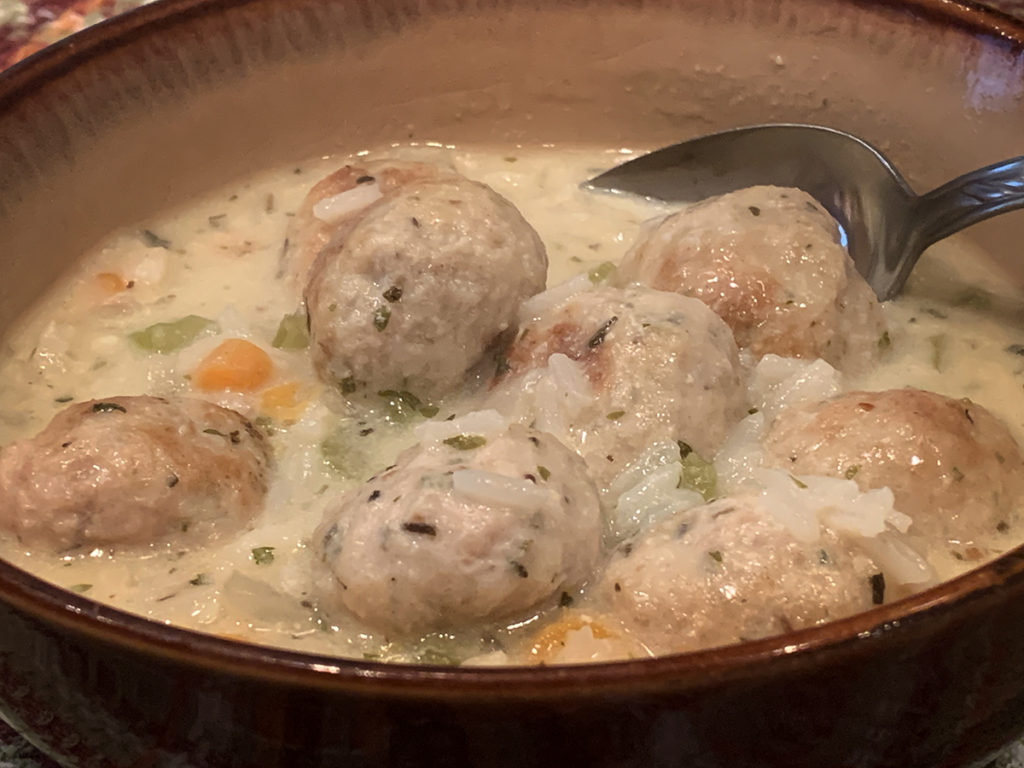
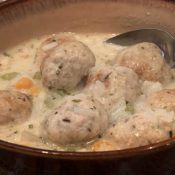
Chicken Meatball Soup with Creamy Lemon Rice

April 23, 2020 Menu No Comments

This recipe started with the intentions of making a simple lemony chicken broth-based soup. As I began to build on the ingredients that I wanted to include, the recipe took on a rich and creamy life of its own, and I was very pleased with the results. The beauty of this recipe is that its texture can be adapted depending on the ingredients that you choose and how they are incorporated.

Being that we are currently living through these strange and uncertain times where grocery shopping can be difficult and frustrating, I focused on using as many basic and common ingredients as I possibly could. Pretty much all of the ingredients in this recipe are standard, however I have given suggestions for substitute ingredients in case you do not have certain items on hand.

Let’s start with the liquid base. I used 4 cups of low sodium chicken broth, adding 1 cup of evaporated milk (which I happened to have on hand in my pantry). The evaporated milk will help thicken the broth and add a bit of a sweet creaminess. If you don’t have evaporated milk, but would still like to give a creamy texture to the broth, you can use 3/4 cup whole milk plus 1/4 cup half and half. Or if you prefer to go a non-dairy route, you can use a cup of almond, soy or coconut milk. If you are looking for a more liquidy, not-so-creamy broth, just eliminate to milk all together, and add another two cups of broth – 6 cups total.

The rice that you choose – and how you decide to incorporate it – will also have an effect on the recipe. I chose to use white rice, and decided to cook the rice in the broth to create a thick and creamy, risotto-like texture. The cooked white rice will absorb much of the liquid, so you may have to add more liquid if necessary. The cooked rice also absorbs much of the seasoning and flavor, which is why I prefer this method. If you want to use white rice but are not looking for a very thick texture, you can cook the white rice on its own and add it to the simmering broth before you are ready to serve it.

You can choose to use a different type of rice or grain all together, like a wild grain rice or quinoa. You can also decide to cook the rice or grains directly in the broth, or cook it on its own and add it to the simmering broth. If you decide to cook the rice or grains in the broth, it will take a bit longer to cook, and it will not thicken up the broth as much as the white rice would.

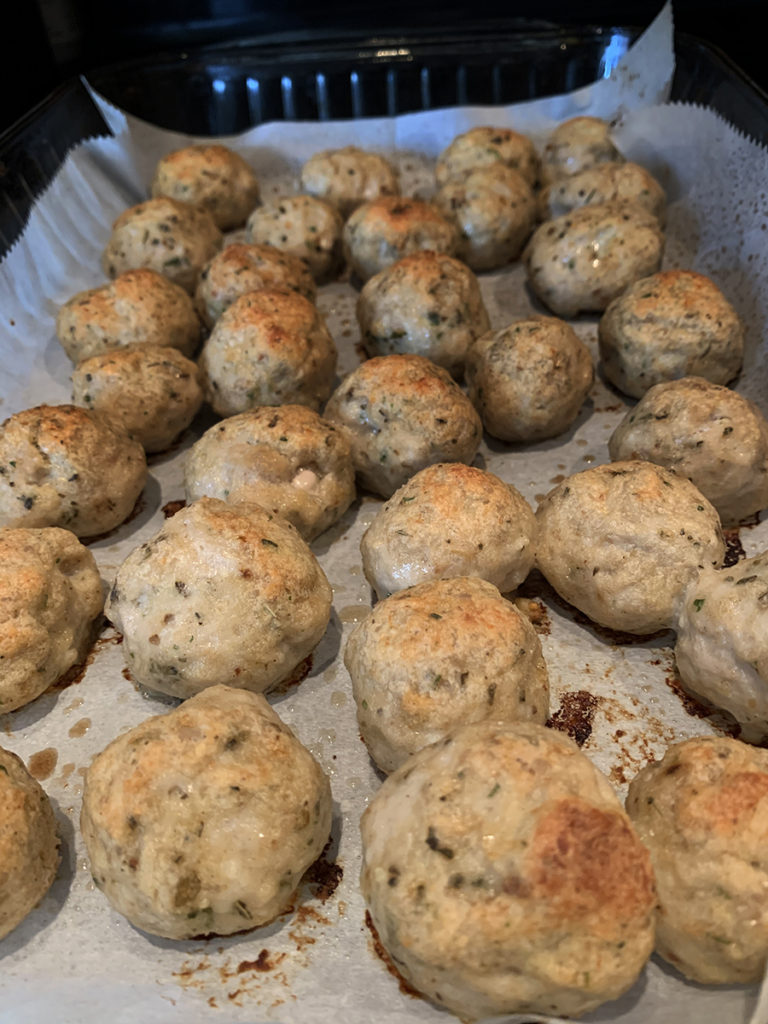
When using meatballs in soup, my personal preference is chicken meatballs. They are a bit lighter than traditional meatballs, and still carry the flavor that shredded or chopped chicken would add to a soup. Also, meat supplies can be sparse in the grocery stores during this time of quarantine. You may find ground chicken to be more easily available than ground beef. Of course, you can use whatever ground meat you prefer when making this dish!

As you can see, your choice of ingredients can take this dish into a number of different flavorful directions, and any of them would be quite tasty and enjoyable!

For the Chicken Meatballs:
1 lb ground chicken
1 large egg
1/2 cup breadcrumbs
1/4 cup grated cheese (parmesan or pecorino romano)
1/4 teaspoon garlic powder
1 teaspoon Italian seasoning
1/2 teaspoon chopped parsley
1/2 teaspoon salt
1/4 teaspoon black pepper

Preheat oven to 400 degrees and line a baking sheet or baking dish with parchment paper. Combine all ingredients in a mixing bowl, mix well. Roll the mixture into 1/2 inch to 1 inch size meatballs, depending on your preference. Place the meatballs on the baking sheet or dish, lightly spray with cooking spray. Bake for 20-25 minutes or until the meatballs start to brown. Remove from oven, set aside.

For the Soup:
4 cups chicken broth (plus additional broth or water if necessary)
1 cup evaporated milk *
*(If you don’t have access to evaporated milk, you can use 3/4 cup whole milk plus 1/4 cup half and half, or either almond, soy or coconut milk. Or you can use 2 additional cups of broth if you do not want a creamy texture.)
2 tablespoons olive oil
1 tablespoon butter
2 medium carrots, finely chopped
2 stalks celery, finely chopped
1 large onion, finely chopped
2 cloves garlic, minced
1 tablespoon lemon zest
1 lemon, sliced (optional, for additional lemon flavor)
1 cup uncooked white rice
1 tablespoon fresh thyme**
1 tablespoon parsley**
** (You can substitute 1 tablespoon Italian seasoning and/or oregano if necessary)
Salt and pepper to taste

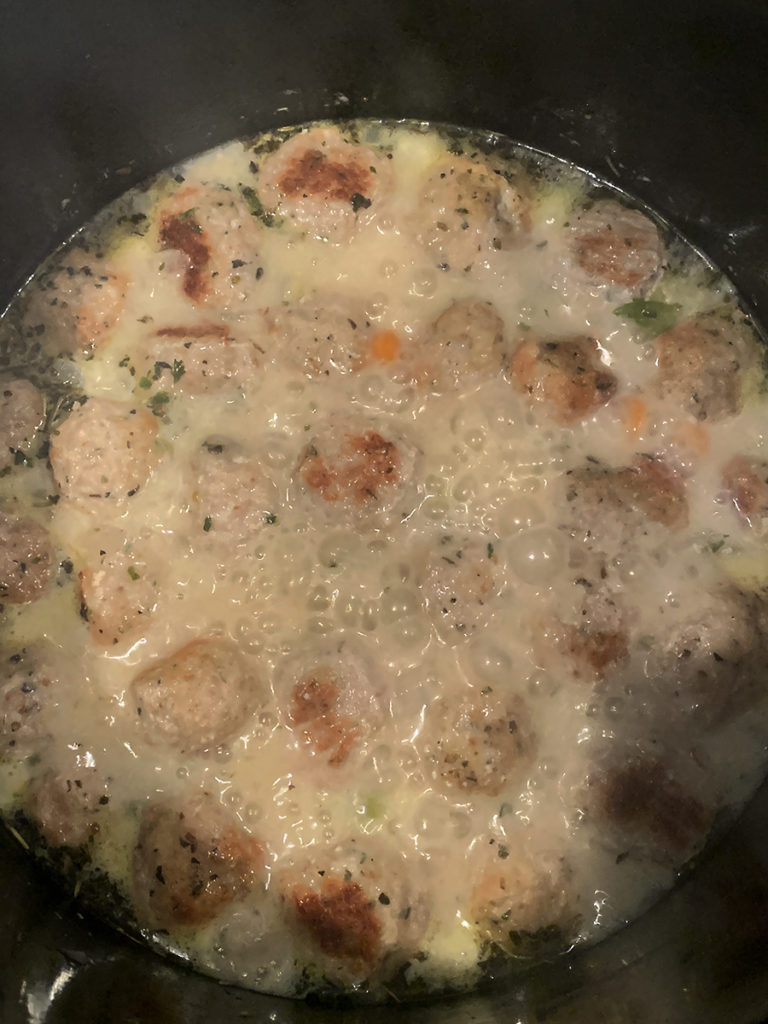
Heat the olive oil and butter in a large pot over medium heat. Once melted, add the carrots, celery, onion and garlic. Stir occasionally, let cook until fragrant and tender, about 3-4 minutes. Add lemon zest, stir together until you get a lemon fragrance, about 1 minute.

Add the chicken broth, evaporated milk (or whatever substitutes you decide on), lemon slices*, thyme and parsley. If you do not have thyme or parsley on hand, you can use a tablespoon of jarred Italian seasoning and/or oregano. Bring the soup mixture to a boil, stirring occasionally.
*The lemon slices are optional. The longer you keep the lemon slices in the soup, the more lemony the soup will taste. You can remove the lemon slices at any time, depending on your taste preference.

Add the chicken meatballs and uncooked rice to the boiling broth. If you prefer to add cooked rice, prepare it on its own and set aside, adding the rice during last 5 minutes of simmering the soup. Reduce heat to a simmer, continuing to stir occasionally. Let simmer for 20-25 minutes or until the added uncooked white rice is cooked (slightly longer if you are adding uncooked wild grain rice or other grains to the soup).

Season with salt and pepper. Serve immediately and enjoy!

Share

Mediterranean Farro Salad with Lemon Basil Vinaigrette

January 26, 2020 Menu 1 Comment

I’ve decided to start 2020 off with a healthy and tasty recipe for my food blog. The backbone of this recipe is farro, which is an ingredient that I haven’t used much of in the past, but I’m sure will now be part of our regular rotation. For those of you who are not familiar with farro, it is an ancient grain that is a great substitute for brown rice. It has a nutty taste and a bit of a chewy texture, and is a great source of protein and fiber. It is also an excellent ingredient in soups and makes for a really nice salad…hence this recipe!

There are many different ingredients that you could incorporate into a farro salad. Anything from kale, apples and chicken, to feta cheese, tomatoes ore even blueberries would work well. I decided to go the Mediterranean route and add artichoke hearts, tomatoes, black olives and chopped fennel, topped with an easy to make lemon basil vinaigrette. For those not familiar with fennel, it is a crunchy, celery-esque herb that is actually part of the carrot family. It’s taste pops with the flavor of black licorice. It is rich in protein, fiber, vitamins and minerals. It is a great addition to salads, and really helps balance out this recipe well.

This salad is actually very similar to the Mediterranean Couscous Salad that I often make in the summertime. The farro is a bit more hearty and flavorful than the couscous, which makes this a great salad for this time of the year…although either option is a good choice!

Mediterranean Farro Salad with Lemon Basil Vinaigrette

8 ounces farro
1 6.5 ounce jar marinated artichoke hearts, chopped
1/2 cup cherry tomatoes, halved
1 4 ounce can sliced olives
1 fennel bulb, chopped (for tips on how to chop fennel, click here)

Prepare the farro according to the instructions on the package. Set aside to cool. Stir in the remaining ingredients. Top with lemon basil vinaigrette, stir well. You can make and refrigerate the salad ahead of time. It is best served at room temperature.

Lemon Basil Vinaigrette
1/2 cup olive oil
1 clove garlic, minced
1/4 cup fresh chopped basil
juice and zest of 1 lemon
1/2 teaspoon dijon mustard
salt and pepper to taste
1/2 teaspoon sugar (optional)

Combine the garlic, basil, lemon zest and juice, and dijon mustard. Slowly drizzle the olive oil into the mixture, whisking to incorporate. Adjust the flavoring with salt and pepper to your liking. You can add sugar for a sweeter taste. The dressing can be used immediately or refrigerated for up to three days.

Share

Pesto Bacon Parmesan Pinwheels

December 28, 2019 Appetizer, Menu No Comments

Pinwheel appetizers are a party classic for just about any celebration during any time of the year. Whether you choose to serve them cold in a tortilla or warm in a baked and flaky pastry crust, pinwheels are the perfect appetizer…quick to assemble and easy to serve. Combinations are endless. Buffalo Chicken, Turkey BLT, Spinach Artichoke, Pepperoni Pizza and Italian Hoagie, just name a few. There is a guaranteed pinwheel variety for all crowds.

For this post, instead of trying to reinvent the wheel (see what I did there?), I’m offering up one of my favorite flavor combinations in a baked crescent crust. The zesty combination of pesto and shredded parmesan are a good balance to the salty goodness of the bacon. The warm and flaky crescent roll holds it all together, giving you a heavenly taste with each bite.

Be sure to use shredded parmesan, as opposed to grated. If you find a pack of 6 cheese Italian blend, all the better! There is also no need to worry about making a batch of homemade pesto. While homemade is always a great choice, a small jar of store bought pesto will do the trick.

Pesto Bacon Parmesan Pinwheels

Measurements are approximate. You can use more or less to your preference.
1 8-ounce can refrigerated crescent rolls
1/4 cup or one small jar of pesto
1/2 cup cooked bacon pieces
1 cup shredded parmesan cheese (or 6 blend Italian cheese)

Step 1: Separate the crescent dough into four rectangles. Pinch the perforated diagonal lines together to prevent the rectangles from breaking into triangular pieces. Spread a layer of pesto onto each rectangle, leaving about a 1/4 inch edge. Sprinkle the parmesan cheese on top of the pesto, then sprinkle with the cooked bacon pieces.
Step 2: Roll the dough starting from the far right side to the left side. Gently pinch the dough closed to avoid it from splitting or separating.
Step 3: Place the four rolls into the freezer for about 45 minutes. This will allow the rolls to slice easier.
Step 4: Using a serrated knife, slice each roll into six pinwheel pieces. Place the pinwheel pieces on a non-greased cookie sheet. Bake at 350 degrees for 15 minutes or until the pinwheels start to turn a golden brown.
Step 5: Remove from oven. Serve warm and enjoy!
Share

Butternut Squash and Goat Cheese Crostini

November 24, 2019 Menu No Comments

With Thanksgiving being less than one week away, my tastebuds have already started firing on all cylinders as we all get ready for the annual feast. Two of my favorite flavors that work well for a Thanksgiving dish are sweet and savory. The recipe that I’m sharing with you in this post brings both of those flavors together with an additional crunch factor to make for a fun and tasty appetizer.

If you are a fan of butternut squash, then you know that a beautiful and tasty sweetness comes through when seasoned and baked, especially when prepared with ingredients like cinnamon and maple syrup. Goat cheese, on the other hand, lends itself naturally to savory dishes. For me, it is an excellent spread for bread and crackers when accompanied by olives, crunchy vegetables, or seasoned with fresh herbs.

The key ingredient to this recipe, which helps bridge the sweetness of the butternut squash and the savory of the goat cheese, is fresh sage. If you’re not familiar with sage, it is a soft, almost velvety-like leaf that has an earthy flavor that is very complementary to butternut squash. A rich butter sage sauce screams all flavorful things autumn. The way that we are incorporating the sage in this recipe really helps drive home that savory taste.

In order to help bring out the flavor of the sage, we start by sautéing the leaves in olive oil for about 30-45 seconds, until the leaves become fragrant and start to crisp. After removing the leaves, the oil will retain the earthy sage flavor. The infused oil can now be used to coat the butternut squash prior to baking, enhancing the flavor of the butternut squash as it bakes. Adding a few of the chopped sautéed leaves to both the baked butternut squash and the goat cheese mixture will really help bring all of the flavors together.

Perfectly roasted butternut squash, seasoned and coated with sage-infused olive oil.

Aside from representing some of the classic tastes and flavors of Thanksgiving, this recipe is also fairly easy to make (although a food processor is recommended), and the butternut squash and goat cheese spreads can be prepared up to a day in advance. By allowing yourself 10-15 minutes for assembly, your appetizer will be ready to go without much effort involved on the big day. You can even purchase toasted crostini chips from your grocery store if you are short on time to toast up your own baguette slices. Now that’s something to be thankful for!

Butternut Squash and Goat Cheese Crostini

Makes approximately 36 Crostini

Ingredients:
1 medium-to-large butternut squash, peeled, seeded and cut into 1 inch cubes
6 fresh sage leaves
3 tablespoons olive oil, plus additional as needed
1 teaspoon salt, plus additional as needed
1/8 teaspoon ground black pepper
1/2 teaspoon cinnamon
1 tablespoon maple syrup (you can add a bit more syrup for a sweeter taste if you prefer)
1/4 cup garbanzo beans
4 ounces goat cheese
2 tablespoons sour cream or plain Greek yogurt
1/4 cup pecan pieces (optional, and toasted if you prefer)
One baguette or long thin loaf of crusty bread, cut into 1/2 inch slices (or you can purchase toasted crostini chips)

Preheat your oven to 400 degrees. Peel, seed and cut up your butternut squash. Next, you will heat up the three tablespoons of olive oil in a small sauce pan. Add the fresh sage leaves to the heated oil for about 30-45 seconds, until they start to darken in color. Remove the sage leaves from the oil, pat them dry and set aside. Let the sage-infused oil cool slightly.

Place the cut up butternut squash into a large mixing bowl. Add the sage-infused oil, one teaspoon salt, black pepper, cinnamon and maple syrup to the bowl. Mix together so that all of the butternut squash is evenly coated. You can drizzle a bit more olive oil if necessary to help coat the squash. Spread the squash on a large baking sheet that is lined with aluminum foil. Bake for 25-30 minutes, or until the squash is tender and starts turning a golden brown. Remove from oven and let cool.

If you are toasting up your own crostini, leave the oven on, turning the temperature down to 350 degrees

While the squash is baking, you will prepare the goat cheese spread. Add the goat cheese, sour cream or Greek yogurt (whichever you prefer to use), a pinch of salt, small drizzle of olive oil and three of the chopped sage leaves to a bowl. Mix well. For a creamier texture, you can mix it in a food processor. Adjust the salt and olive oil to taste. Set aside when mixed.

Once the squash has cooled, you will place the squash, garbanzo beans and three remaining sage leaves into a food processor or blender. Blend until smooth and creamy. You can season with additional salt, pepper and cinnamon to your liking.

If you are using purchased crostini chips, then you are ready for the assembly.

If you are toasting up your own crostini, place the slices of bread on a large baking sheet. Lightly drizzle each slice with olive oil and season with a bit of salt and pepper. Bake the crostini at 350 degrees for about 8-10 minutes, or until the bread is toasted. Remove from oven and let cool for a few minutes.

Now for the assembly! Spread a layer of the goat cheese mixture on each crostini. Add a dollop of the butternut squash mixture on top of the cheese. Sprinkle with chopped pecans if you desire. Plate, serve and enjoy!

Happy and blessed Thanksgiving wishes to you all!

Share

Archives

powered by
Socialbar