
Pumpkin Recipes Part 2: Coffee Can Pumpkin Bread
One of my favorite projects that I remember doing when I was kid (aside from restoring an old bike and building monster models, that is), was making pumpkin bread in a coffee can. We did this as a Campfire project, and sold the loaves at our school’s Christmas Bazaar. I remember finding this to be so much fun because not only did I love pumpkin bread, but we got to make it in a way that didn’t seem ‘cutesy’ or ‘girly’. Normally, my friends and I would just use a coffee can to kick around the street and chuck pennies into. But now, we were allowed to crack eggs, mix it into a goopy batter, pout it into the cans and load ’em into this big, monstrous industrial oven in the school hall’s kitchen. We were like 8-year old mad scientists!!!
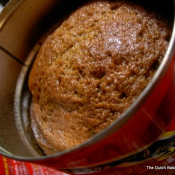
Pumpkin bread can be very versatile. Dry, moist, raisins, nuts, chocolate chips or coconut shavings….the choices are endless! While doing research for this post (and every variety that just mentioned was easily found), I came across a great recipe for coffee can pumpkin bread at a nice food blog called The Dutch Bakers Daughter. Cathy, the owner of the blog, not only allowed me to share her recipe, but was also gracious enough to allow me to use her coffee can photos as well. Thank you, Cathy!
Although coffee can pumpkin bread tastes almost the same as a traditional loaf, the coffee can method does offer is a really nice presentation. You get a perfectly rounded loaf with neat little grooves around the sides (this was the big selling point at the Christmas bazaar – the perfectly round loaves of bread). The coffee cans also make for great storage…just pop the lid back onto the can and you can store them in the freezer for future usage! It’s also a fun and nostalgic project to do with your kids this time of year.
If you do decide to give coffee can pumpkin bread a try, there are a few precautions that you should be aware of:
1. Use the proper type of coffee can
You want to make sure that you are using a steel coffee can. Years ago, when baking bread in coffee cans was more common, the cans were made of steel. Some of today’s cans are made of aluminum, and may have a coating on them that is not healthy to digest. And of course the plastic containers will melt in the oven. Steel cans are the way to go.
2. Prepare the can
In order for the baked bread to slide out of the can, there has to be no lip on top of the can. If there is, you can use a can opener to remove it. Once you are done doing that, smooth out the edges with a brillo pad. Then make sure to thoroughly wash out the cans and let them dry. Be sure to flour and grease the cans before adding the batter. Fill the cans no more than 2/3 full, to assure that there is no overflow when baking. You can also check out the following video on how to prepare the coffee cans for baking: http://www.youtube.com/watch?v=4nA8fVAGWoU
3. Don’t forget oven mits!
Just like a traditional pan, the coffee can will be hot when done baking. Be careful when removing it and let it sit until completely cooled. Do not place the lid back onto the hot can until it is cooled.
COFFEE CAN PUMPKIN BREAD

Recipe and photos courtesy of The Dutch Baker’s Daughter
(click here for the original post)
Ingredients
1 1/2 cups brown sugar
1 1/2 cups granulated sugar
4 eggs
1 (16 oz) can pumpkin
1 cup oil
1/2 teaspoon cloves
4 teaspoons cinnamon
1/4 teaspoon ginger
2 teaspoons nutmeg
1/4 teaspoon mace
1 1/2 teaspoons salt
2 teaspoons baking soda
2/3 cup water
3 1/2 cups flour
Preheat oven to 350 degrees F.

Recent Comments