Home » • Kitchen Time with Emma » Recent Articles:

Boston Baked Beans

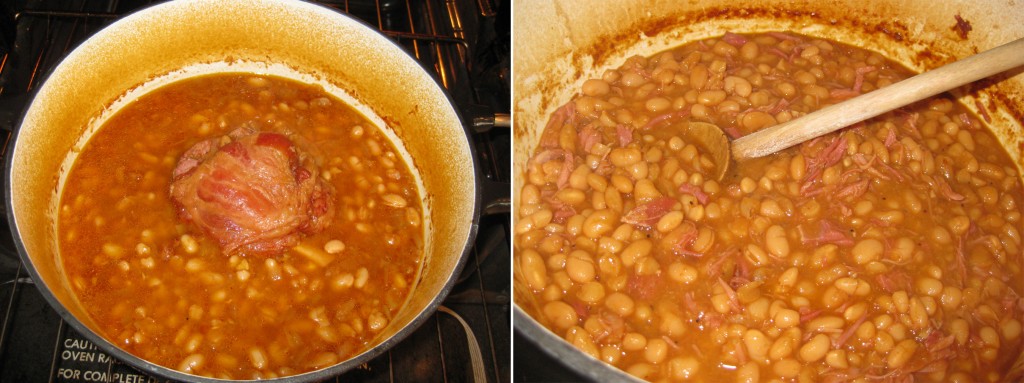
Hello everyone! It’s been a while since I’ve submitted a recipe to Cucina Domenico, but I thought that since Independence Day is this weekend, now would be a good time to share a great recipe for baked beans with you. I love it because it only requires one pot, it reheats wonderfully (actually, it’s even better the next day), it serves a crowd, and, if you’re not feeding a lot of people, it freezes well.

I found this recipe through Fine Cooking. I’m sure that by now you’ve noticed that Fine Cooking is one of my favorite sites for recipes. This is for a very good reason – their recipes almost always yield terrific results. This recipe in particular is one of them. I made one very minor change, but it made a huge impact on the flavor. The original recipe calls for salt pork, which is a saltier and usually much fattier version of bacon. Initially, I made it this way. It was very good, but not great. So I tried making it again using bacon instead. This time the results were much better, but still I felt it lacked something. Then I came across another recipe for baked beans which used a meaty smoked ham hock, so I decided to try it.

I’m still not sure what the difference between a ham hock and a ham shank is, but I purchased the latter one by accident. I use pork shanks to make soup all the time so I figured it would work. And it did, perfectly! Depending on the size I buy, I don’t always put all of the meat back in with the beans. Of course, none of it ever goes to waste. The leftovers make an awesome sandwich, ya know.

If, for some reason, you can’t find a ham hock or shank, do not hesitate to make this using the bacon. Don’t get me wrong, we ate the first two batches of baked beans without complaints. Both were better than anything you can buy in a can, but the third version is the cream of the crop. It is very meaty, and it has a wonderful smoky flavor.

Here’s a few tips:
First, don’t salt this dish (or any dish that has uncooked beans in it for that matter) until the beans are completely cooked. Adding salt before the beans are cooked can cause the beans to become tough or not cook through properly. Some people will dispute this, but, in my experience, I say not to. I’ve chosen to ignore this advice a few times and each time I regretted it.
Second, as I mentioned earlier, this is much better the next day. The flavors really come together and once it cools, it thickens nicely. That doesn’t keep me from making this the day I plan on serving it though. Oftentimes, I’ll just make it in the morning and let it cool on the stove until we are ready to eat. By then, the beans usually have a nice consistency, and no one ever complains about lack of flavor.

Boston Baked Beans
Adapted from Fine Cooking

Ingredients
1 lb. navy beans, yellow-eye beans, or other dried white beans (I use great northern beans, and the cooking time is approximately 2 1/2 to 3 hours. The cooking time will vary depending on the size of your bean.)
1 meaty smoked ham hock, ham shank, or 4 oz. of bacon or salt pork (rind removed and reserved)
1 chopped medium onion (5 to 6 oz.), cut into 1/2-inch dice
1 tsp. finely chopped garlic (optional)
4 to 5 cups water; more as needed
2 Tbs. dark molasses (but not blackstrap)
2 Tbs. maple syrup
3 Tbs. Heinz chili sauce or tomato ketchup (I always use ketchup)
2 Tbs. Dijon mustard
1 Tbs. Worcestershire sauce
Freshly ground black pepper to taste
1 tsp. kosher salt; more to taste
1 Tbs. apple-cider vinegar

Directions
Pick over beans and soak them in water overnight. The next morning, discard any beans that are floating on the surface, and drain the beans.

Heat oven to 350 degrees F.

Heat a large 5-qt Dutch oven. If using the ham hock or shank, add about 1-2 tbs extra virgin olive oil to the pan, and add the onion and garlic and cook until it begins to soften, about 5 minutes. If using the salt pork or bacon, omit the olive oil, add the salt pork or bacon to the pot, and cook until crisp and golden, about 10 minutes. At this point you should have enough fat to cook your onions and garlic in.

Add 4 cups of the water, the molasses, maple syrup, chili sauce or ketchup, mustard, Worcestershire sauce, and pepper. Stir well to combine. Increase the heat to high and bring to a boil. Add the drained beans and the reserved pork rind, ham hock, or ham shank (if using) and wait for the boil to return. Cover the pot and transfer it to the oven.

After the beans have been in the oven for 10 minutes, turn the heat down to 300°F. After 1 hour, check the pot and add water as needed to keep the beans just barely covered. Also, if using a ham shank, turn about every half hour to be sure it cooks evenly. Check it again every half hour. You may need to add up to 1 cup for navy beans and 1-1/2 cups water for yellow-eye beans, but be wary of making them too watery, especially near the end of cooking. If the ham shank or hock starts to fall off the bone before the beans are finished, carefully remove it from the pot with tongs and place it on a cutting board to cool. Once cool, shred the pork with your fingers and add the meat back to the pot with the beans.

The beans are ready when they’re very soft and tender yet still retain their shape, about 2 to 2-1/2 hours for navy beans; 3-1/2 hours for yellow-eye beans. Remove the beans from the oven and discard the pork rind (if using) or the ham shank or hock if you haven’t done so earlier and proceed as described above. Add the vinegar and season the beans with salt and more pepper, if you like. Stir the beans gently; as you stir, the starches will be released and the baked beans will become lightly thickened. Don’t over mix when they’re this hot. Let them sit for at least 20 minutes before serving. They can also be cooled completely, refrigerated, and then gently reheated.

 

Share

Cooking with Beer

Over the past few years, I have started to develop a taste and understanding for quality beers. Along with it has come the appreciation of pairing a good beer with food. Just as you would choose which wine to serve with you meal, a nice beer selection can often help accentuate the flavors of just about any dish. It’s not uncommon for me to now consider what beer to order or serve before selecting or preparing my main course. Needless to say, I was very excited when my sister-in-law (a.k.a. my SIL) gave me a cookbook full of beer-based recipes. We’re talking way more than just a hot dog beer boil here, people. Just as you would select the proper oil or vinegar as a liquid base, the style of beer that you use can help bring out a sweet maltiness to a sauce or a hoppy essence to a marinade. I’ll be sure to share some recipes with you as I experiment with this book. Thank you SIL!

This week, my good friend Emma shares with us her own beer-infused recipe…Gluten-Free Beer Battered Onion Rings! Just the combination of beer and home-made onion rings alone is enough to make my mouth water. But to put the two together? Genius!!!

Also featured this week is a delectable recipe from the one and only Una Mamma Italiana, as she shares with us her recipe for Italian Herb Beer Bread. Be sure to check out the Una Mamma Italiana blog for this and many more creative and tasty dishes.

Mangia and enjoy!

GLUTEN-FREE BEER BATTERED ONION RINGS


By Emma Caperelli Loerky

A few weeks ago my husband celebrated his birthday. When I asked him how he’d like to spend his day, he immediately spewed off a dinner and dessert menu. The menu consisted of filet mignon, sauteed mushrooms, Caesar salad, onion rings, and for dessert he asked for a key lime pie. Since my husband has Celiac disease, I knew I’d need to make some adjustments, but I felt that all of the things on the menu seemed pretty doable. I had a recipe for Caesar dressing that I had been wanting to try (no dairy and no raw egg), gluten-free croutons couldn’t be that hard (they weren’t and they were delicious!), I’ve made mushrooms countless times, and my husband is in charge of grilling the steaks. Even the pie, without the dairy and gluten, didn’t faze me. But the thought of making onion rings made me cringe.

You see, a few months ago I attempted to make gluten-free onion rings without success. They were greasy and gritty and I was in no rush to try my hand at making them again. However, being someone who adores onion rings, I completely understood how they would make this pretty basic dinner seem special, so I decided to try again. Am I glad I did! My experience making them this time was so much better than the last and the results were spectacular. Aside from the onion rings at my favorite BBQ joint, these were the best I’ve had. No lie.

The key is to have everything set up and ready to go. You want to make sure you have your oven preheated to 200 degrees (to keep the cooked onion rings warm while you are frying up the rest), a wire rack lined with paper towels close by, as well as a cookie sheet to transfer the freshly fried rings to the oven on. Oh, and lets not forget the batter and the onions themselves. It needs to be sort of an assembly line. Once that is accomplished, you want to make sure that you have your oil at the perfect temperature. If your oil isn’t hot enough, they will end up greasy and inedible. If it is too hot, they will burn QUICKLY. Even at the right temperature, these cook very fast, so you don’t want to let them out of your sight for very long. The time it takes you to transfer the rings to the oven is about all I would allow myself to be away from the frying pan. I used a cooking/candy thermometer to make sure that my oil was at the perfect frying temperature (365 degrees).

I almost forgot to mention the dipping sauce, which complimented the onion rings perfectly. In a nutshell – MAKE IT! Do yourself a favor though, double the recipe. I certainly will next time. 

Both recipes are adapted from http://www.glutenfreecookingschool.com/archives/lazy-mans-beer-battered-onion-rings/

Ingredients
1 Large Vidalia onion (or other sweet onion)
Approximately 2 cups soy milk
2 tbsp lemon juice
**Note: If you aren’t lactose intolerant, omit the soy milk and lemons and use buttermilk.

1 1/2 cups brown rice flour
1 tsp salt
about
1/8 tsp black pepper
1 tbsp canola oil
2 eggs, lightly beaten
3/4 cup Redbridge Beer **(This is the amount the original recipe calls for, however, I had to add at least and additional 1/4 cup, possibly 1/2 cup more in order to get the right consistency. Unfortunately, I didn’t measure exactly how much I added. Start off with the recommended amount and slowly add more beer until it’s a nice thick consistency, similar to a pancake batter.)
Vegetable oil (for frying)

Directions
Mix together the lemon juice and soy milk and let stand while you slice the onions into rings about 1/2 inch wide. Soak the onions in the soy milk mixture (or buttermilk) for about an hour in the fridge. Make the beer batter by mixing all remaining ingredients, adding as much beer as described above. Let the batter rest in the fridge while the onions soak.

After about an hour, heat enough vegetable oil to coat a large frying pan (or cast iron skillet) by about 1 inch. The temperature should read 365 degrees on a thermometer. Drain the onions in a colander while waiting for the oil to come to temperature. When the oil is ready, dip the onion rings, one at a time, into the batter and gently lower them into the hot oil. Do not overcrowd the pan. After approximately 3 minutes, flip the rings and cook on the other side for about another 3 minutes. They should be a light golden color when finished. Transfer the rings to a wire rack lined with paper towels to drain the excess oil and sprinkle with additional salt while they are still hot. Repeat with the remaining onions, keeping the cooked onion rings warm in the oven.

Creamy Wasabi Dipping Sauce

Ingredients
1/4 cup mayonnaise
1/4 cup sour cream or plain yogurt (I couldn’t find plain soy yogurt, so I just used 1/2 cup mayonnaise)
2 heaping tsp ketchup
1 heaping tsp tomato paste
1 tsp Wasabi paste (I used a bit more)
Dash of Tabasco sauce (This was a last minute addition made my me but can be omitted)
Salt, black pepper, and cayenne pepper to taste

Mix all ingredients together thoroughly and enjoy.


ITALIAN HERB BEER BREAD  


By Una Mamma Italiana


Most simple Italian recipes stem from the poor regions of Italy, where they cooked with whatever foods grew regionally. I’m talking about authentic Peasant Food, which happens to be my FAVORITE way to eat Italian. Don’t get me wrong, I can appreciate gourmet Italian fare, but I grew up on the simple flavors of Italian cooking straight from the garden. This is one of those recipes.


Ingredients

3 cups flour

1 Tbsp baking Powder

2 tsp garlic powder

1 tsp sugar

1 tbsp Italian Seasoning

2 tsp salt

12 z. beer


Directions

Mix all dry ingredients. Add the beer and stir (dough will be slightly wet, like a biscuit dough). Place dough in a well oiled loaf pan. Brush the top with Extra Virgin Olive Oil. Bake at 350 degrees for 45 minutes. Once it comes out of the oven, brush the top with e.v.o.o. again and sprinkle with sea salt. Let cool for 10 minutes, then slice.

BONUS RECIPE!!!

As coincidence may have it, Una Mamma has also posted a tasty Onion Ring recipe this week on her blog. Since I was FINALLY able to put an end to her ongoing food challenge victories, I thought it would only be appropriate that I share with you the link to her Italian Fried Onion Rings as well. Enjoy!
Share

Pastina With A Poached Egg

So the holidays are over and it’s time once again time for the season of icy cold weather, cabin fever and, unfortunately, the coughs and sniffles that go along with it. This week, my good friend Emma shares a fantastic, old-fashioned home remedy meal that I’m sure will help put that skip back into your step. Enjoy…and be healthy!


By Emma Caperelli Loerky

My next post is something I wasn’t quite sure if I should blog about. Not because it doesn’t taste wonderful, because it does, but it wasn’t the most photogenic recipe. On the flip side, it’s super easy (one pot), it only consists of 5 ingredients (all of which are almost always in my fridge or pantry), and it tastes great. So, I’d say the the good outweighs the bad.

I got the idea for this recipe from a blog I found last month when I was sick. You see, not only was I sick, but I was desperate. It was right before Christmas and besides having all of the usual holiday stuff to do, I was getting ready to go out of town to visit my family in Philly. I needed to get better. Fast! So, I Googled home remedies for colds and came across this blog: http://chefprivato.blogspot.com/2009/01/pastina-for-babyitalian-grandma-food.html. But I didn’t make it right away. Instead, I opted to make a Hot toddy. It really was all I could muster up the energy for at the time. However, I got the perfect opportunity to make this recipe when I got sick this past week. Again. How fun.

For those of you who are Italian like me, pastina is probably a staple in your pantry. I make it quite often and the way I make it changes all the time. It’s one of the dishes I whip up for my teenage son when I make something he doesn’t like or when he’s not not feeling well. Ever since he was a baby, he has always gobbled it up. This time was no exception. In his opinion, this is his new favorite way to eat pastina and I agree.

One of the things I love about cooking is that everyone can read a recipe then translate it to suit their taste. So, I changed the original recipe a bit (okay, a lot). If any of you make it, I’d be eager to hear how you put your own spin on it.

PASTINA WITH A POACHED EGG


Ingredients

1/2 cup Pastina
1 tbsp butter
1 egg
About 2 cups Chicken Broth (more to taste)
Parmigiano-Reggiano (for sprinkling on top, if desired)

Directions

In a small saucepan with a lid, melt butter. Add pastina and toast lightly for about 1 minute. Add 1 cup of the chicken broth, stir and bring to a simmer, stirring often for about 6 minutes, adding more broth if necessary. Once al dente, make a well in the center of the pasta and add some chicken stock. Add additional stock to the pastina so that it does not stick to the pan. Crack the egg in the well and gently cover the well with some of the pastina. Cover and cook for approximately 2 minutes. Gently spoon into a bowl and sprinkle with cheese, if desired.

Share

New Guest Recipe – Gingerbread

It’s beginning to look (and feel) a lot like Christmas! As we quickly approach the holidays, what better way to celebrate than with a delicious gingerbread! This week, my good friend Emma shares with us a fantastic gingerbread recipe, and also works her magic to give us a gluten-free version! Enjoy!

Where to begin with this month’s blog? I guess I should start by telling you that I had every intention of blogging about Struffoli (aka Honey Balls) for the Christmas season. My intentions were so good that I actually went out and bought an expensive, imported bottle of Limoncello for that exact purpose. However, a million other little things happened to prevent me from getting the chance to make it. For example, my cat got sick…twice! And I took in some foster kittens even though I said I was going to take a break until after the holidays. And, of course, I got hit with the cold from hell. All of this in between wanting to spend as much time with all of the people whom I love that happened to be visiting from out of town this month.

So, I decided to blog about a recipe that I had made before and knew would turn out well. It’s a gingerbread recipe by Emeril that I came across a few years ago. This recipe has been bulletproof for me. Seriously, I have made countless substitutions to this recipe and each time I’ve had perfect results. I’ve done everything from using dark molasses in place of the regular (and/or a combination of the two when I’ve fallen short of one or the other), to adding bittersweet chocolate chips. In case you’re thinking about adding the chocolate chips (which I highly recommend), let me just warn you that they did sink to the bottom of the pan during baking. I’m pretty sure this can be remedied by coating the chips in 1 – 2 tbsp of the flour mixture before adding it to the batter, or you can always try sprinkling the chips on top before baking. Either way, I think they were a delicious addition and worthy of trying again.

When making this recipe into the gluten-free version, I discovered that I didn’t have quite enough of any of the various gluten-free flours that I keep around. So, I ended up using equal parts of two different gluten-free flour blends. In the end, the recipe worked. My only complaint is that it rose a little too high and collapsed slightly in the middle after baking, but that can easily be fixed by adjusting the amount of baking soda in the recipe. Most importantly, it had no negative effect on the taste or texture of the bread.

Oh, and did I mention that dark beer plays a huge role in this gingerbread? I didn’t, did I? Well it does, and I think it may be what sets this gingerbread apart from all other gingerbread recipes. Since making this bread a few years ago, I have learned that while I don’t care for the taste of dark beer on it’s own, I love the flavor it lends to baked goods. And, more often than not, I will have a few bottles of it stashed in my fridge just in case I get the urge to bake with it.

GINGERBREAD
by Emeril Lagasse

Ingredients
1 stick unsalted butter (room temp)
1 cup turbinado sugar
3 large eggs
2 cups all-purpose flour
2 teaspoons ground ginger
1 1/2 teaspoons baking soda
1 teaspoon cinnamon
1/2 teaspoon salt
1/2 teaspoon cloves
1/4 teaspoon freshly grated nutmeg
1 cup molasses (regular or dark will work, but I prefer the dark)
1 cup Guinness, or other dark beer

Directions
Preheat oven to 350 degrees F. Grease a 13 x 9-inch cake pan and line with parchment paper. (Please note: I usually use the mini foil loaf pans instead of the cake pan and bake for approximately 10 minutes more than called for. I get two loaves, which are the perfect size for gift-giving. On several occasions, I’ve even made it in a full loaf pan. I can’t quite remember how long it took to bake but I want to say about an hour and 15 minutes, and you may need to tent the pan with foil to prevent the top from getting too dark.)

In a large bowl, cream together the butter and sugar. Beat in eggs one at a time. In a medium bowl, sift the flour, ginger, baking soda, cinnamon, salt, cloves, and nutmeg, In a third bowl, combine the molasses and beer and stir to dissolve. Add the dry ingredients and beer mixture alternately to the egg mixture, starting with and ending with the dry ingredients. Pour into the prepared pan and bake until puffed and set, about 35 minutes. Remove from pan and let cool in the pan on a wire rack.

GLUTEN-FREE GINGERBREAD
adapted from Emeril Lagasse

Ingredients
1 stick unsalted butter (room temp)
1 cup turbinado sugar
3 large eggs
2 cups gluten-free flour mix (I used 1 cup King Arthur Flour’s g/f flour blend and 1 cup Bob’s Red Mill g/f flour blend)
1 teaspoon xanthan gum
2 teaspoons ginger
1 1/2 teaspoons baking soda (I had a minor issue with this recipe puffing up and collapsing slightly in the middle, so you may want to adjust the amount of baking soda used.)
1 teaspoon cinnamon
1/2 teaspoon salt
1/2 teaspoon cloves
1/4 teaspoon freshly grated nutmeg
1 cup molasses (regular or dark will work, but I prefer the dark, especially since the g/f beer I used is not as dark as the Guinness)
1 cup Redbridge Gluten-free beer

Directions
Preheat oven to 350 degrees F. Grease a 13 x 9-inch cake pan and line with parchment paper. (Please note: I usually use the mini foil loaf pans instead of the cake pan and bake for approximately 10 minutes more than called for. I get two loaves, which are the perfect size for gift-giving. On several occasions, I’ve even made it in a full loaf pan. I can’t quite remember how long it took to bake but I want to say about an hour and 15 minutes, and you may need to tent the pan with foil to prevent the top from getting too dark.)

In a large bowl, cream together the butter and sugar. Beat in eggs one at a time. In a medium bowl, sift the gluten-free flour, xanthan gum, ginger, baking soda, cinnamon, salt, cloves, and nutmeg, In a third bowl, combine the molasses and beer and stir to dissolve. Add the dry ingredients and beer mixture alternately to the egg mixture, starting with and ending with the dry ingredients. Pour into the prepared pan and bake until puffed and set, about 35 minutes. Remove from pan and let cool in the pan on a wire rack.

Share

Recent Comments

Archives

powered by
Socialbar