Recent Articles:

Fiadone con Formagio (Italian Savory Easter Cheese Pie)

April 11, 2017 Dessert, Menu 3 Comments

As I was going through my recipes to gather the ingredients to make my Easter pies for this upcoming week, I was quickly reminded of the adventure that I had gone through a few years back, tracking down the recipe for what was known to me as ‘pastiche’ (pronounced pah-steech). Long story short, my quest for this recipe started years ago when I was trying to duplicate an Italian cheese bread that our friend Lorena’s mom had shared with us. Her mom had referred to the bread as pastiche, but I could never find any such recipe by that name. It wasn’t until a few years ago that I came across the recipe for Umbrian cheese bread, which offered almost the same taste and consistency. The bread has since become part of our family’s Easter tradition.

I thought that I had solved the pastiche mystery…until I had mentioned it to our neighbors. They were also familiar with pastiche through their Italian neighbor, and I had assumed that it was the same recipe. But after sampling their version of pastiche, it turned out that it was nothing at all like what we were familiar with. This version was more of a savory cheese pastry. What I have learned over the years is that it is not uncommon for similar Italian dishes to be region-specific, whether the difference be in name or ingredient. What one family may refer to as a dish in their town, the next town over may refer to it as something else. My guess is that pastiche is a perfect example of this – it is more of a dialect term than a specific recipe.

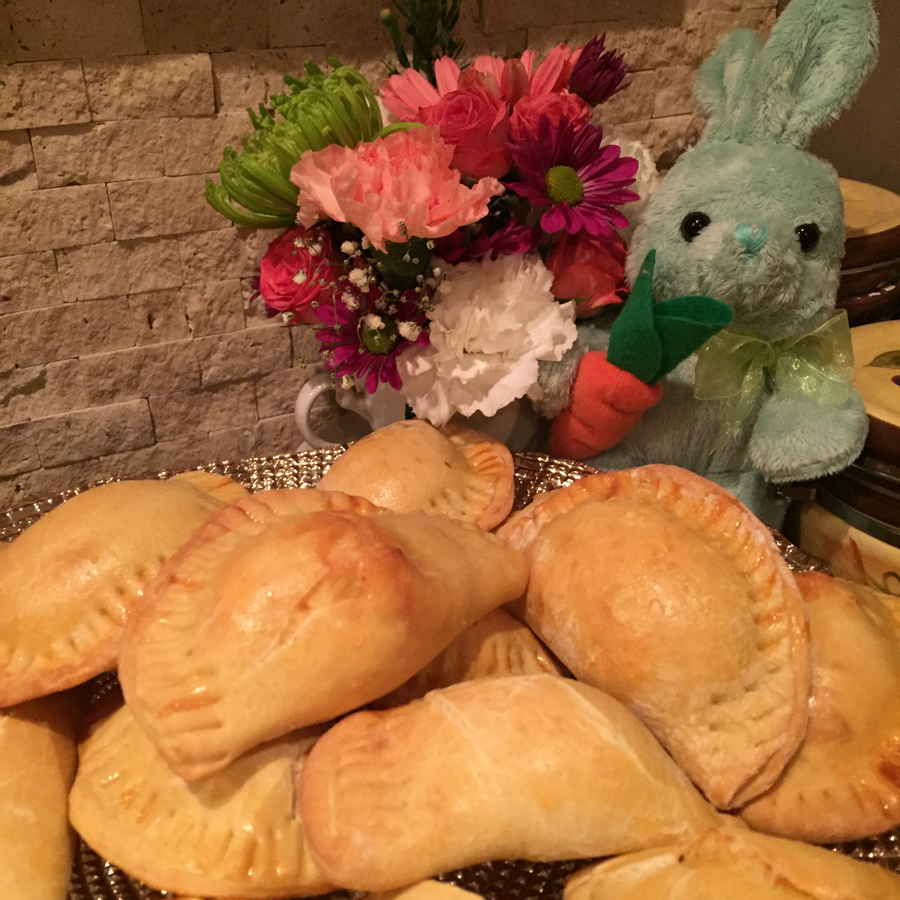
This whole pastiche conundrum led me to try and search out yet another new recipe, to find a match to this delicious new version that I had tasted. Unlike my long hunt for the Umbrian bread recipe, this time I was able to track down a recipe fairly quick. My search for Italian Easter cheese pastry led me to a recipe for Fiadone cone Formagio, which is an Italian Easter pie made up of a savory cheese and egg filling, wrapped in a firm dough and folded into a half-moon shape. There are different variations that appeared to be regional-specific. Some used a filling combination of Parmigiano Reggiano, Romano and Caciotta cheeses, while others used a Ricotta filling. Some added meats to their fillings, while others added vegetables. Regardless of the unique regional flare, they all had one thing in common….none of them were referred to as pastiche.

I may never find out the true meaning or origin of the term pastiche. But one thing that I have learned over the years is that there is no shortage of phenomenal Italian Easter recipes. Below is my interpretation of Fiadone con Formagio. You can also find the link to my Umbrian Cheese Bread recipe, and my other Easter recipes below.

Buona Pasqua!


Fiadone con Formagio (Italian Savory Easter Cheese Pie)

As I was doing my research for this post, in true Italian recipe fashion I found various versions using various ingredients and measurements. One of the key ingredients that was consistent was Caciotta cheese, which is a rural semi-soft cheese from central Italy that could be made from either cow’s, goat’s, ewe’s or buffalo’s milk. You may find this during Easter season sold as ‘basket cheese’. I chose to use fontina, which is my personal preference for a semi-soft Italian cheese. Regarding the measurements, I went ahead with the measurements that I felt most comfortable and familiar with, based off of other similar recipes that I have made.

For the dough:

5 eggs, plus one egg for egg wash
3 tablespoons vegetable or canola oil
3 cups flour, sifted, plus more as needed
pinch of salt
1 teaspoon milk

Mix the 5 eggs and oil together. Mix the flour and salt together. Slowly fold in the flour into the eggs, either by had or by using a dough hook on a mixing machine. Add the teaspoon of milk. Continue to fold/mix for about 8-10 minutes, until well incorporated and a dough ball forms. You can add additional flour if needed to avoid sticking. Place the dough into a lightly sprayed bowl, cover with a towel and let it sit in a warm area for one hour. You can make one day ahead of time and refrigerate – be sure to wrap the dough ball in clear plastic wrap prior to refrigerating.

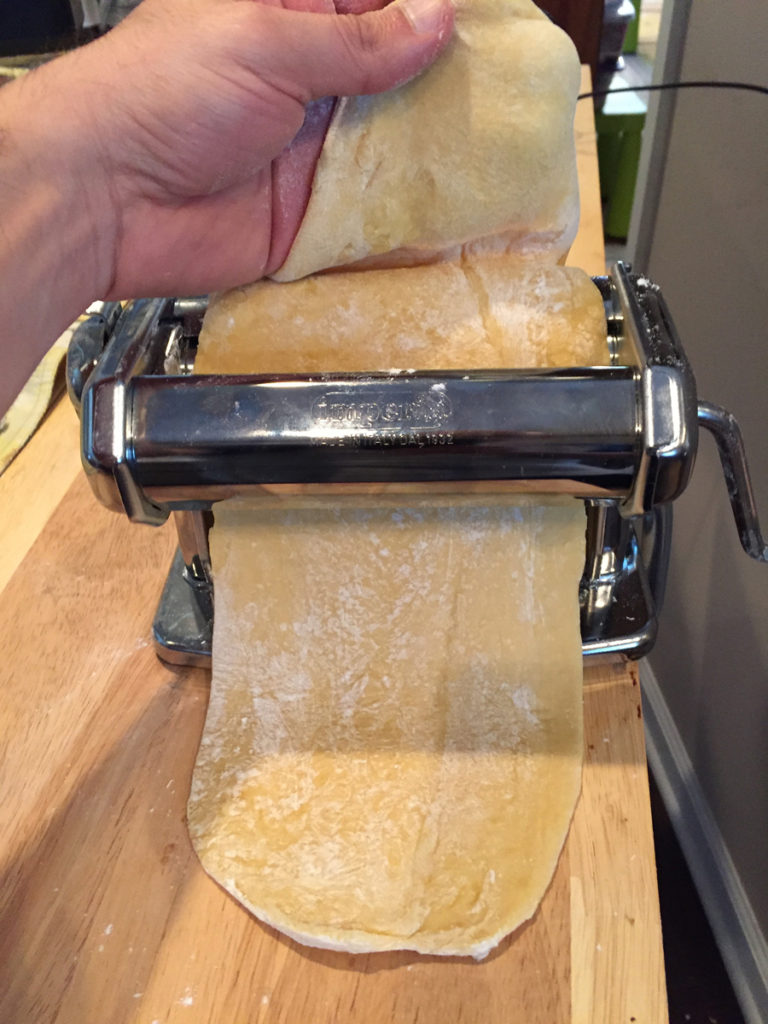
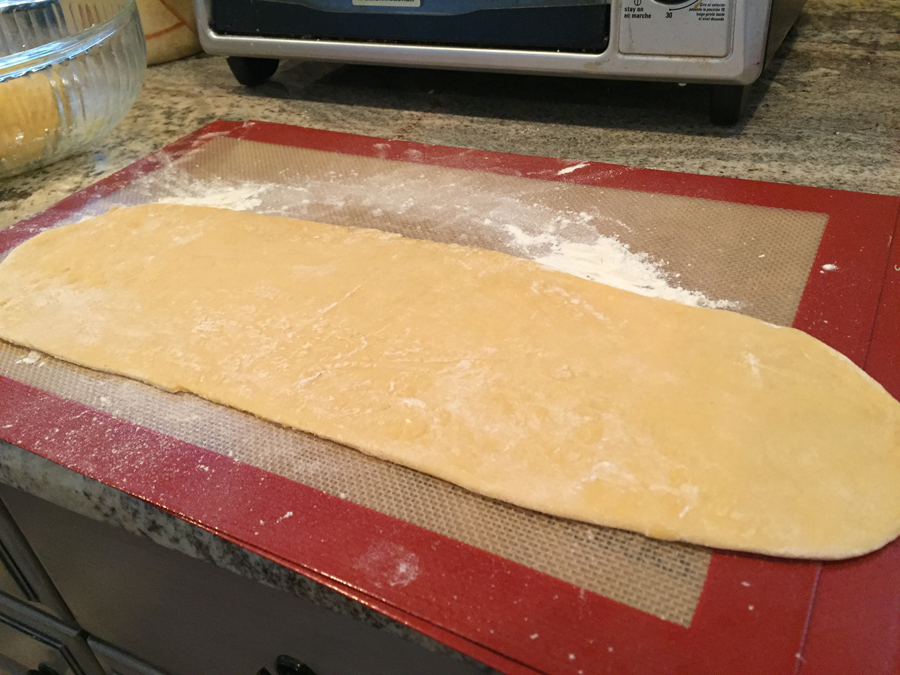
After the dough has sat for one hour, you want to roll it out to approximately 1/8″ thin. To help with this process, I used my pasta machine for a more consistent thickness. Of course, you can roll it out with a rolling pin if you do not have a pasta machine. Be sure to keep the dough floured to avoid sticking. Once rolled out, you can use a cookie cutter (approximately 3″-3.5″ wide) or a juice glass to cut the dough into circles. You should get 24 circles from this batter.


For the filling:

3/4 cup grated parmesan cheese
3/4 cup grated pecorino romano cheese
3/4 cup grated fontina cheese
3 eggs, beaten
dash ground black pepper

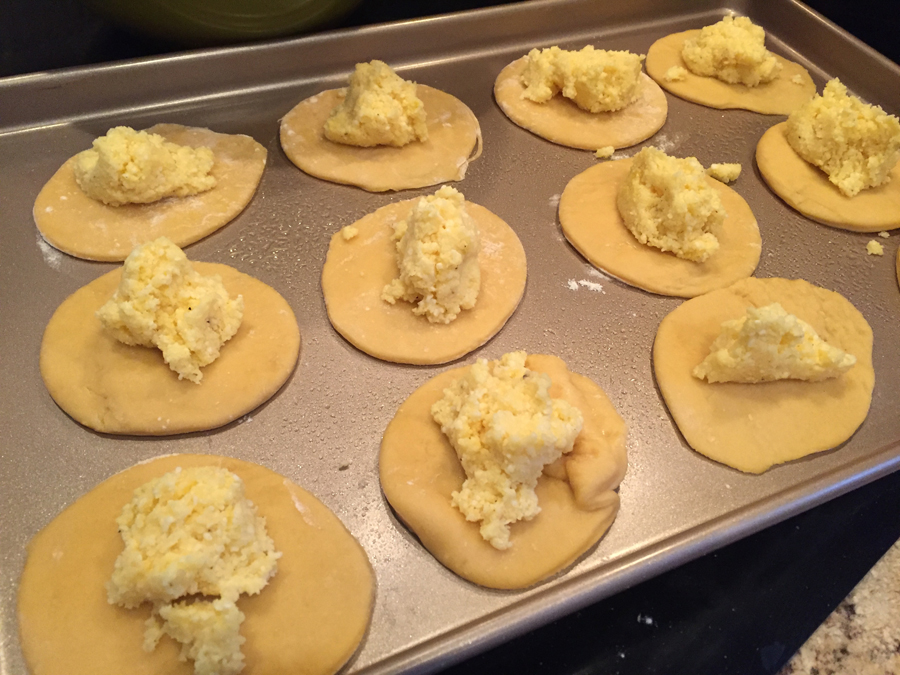
Mix the cheeses, eggs and pepper together using a spatula.


Assembly:

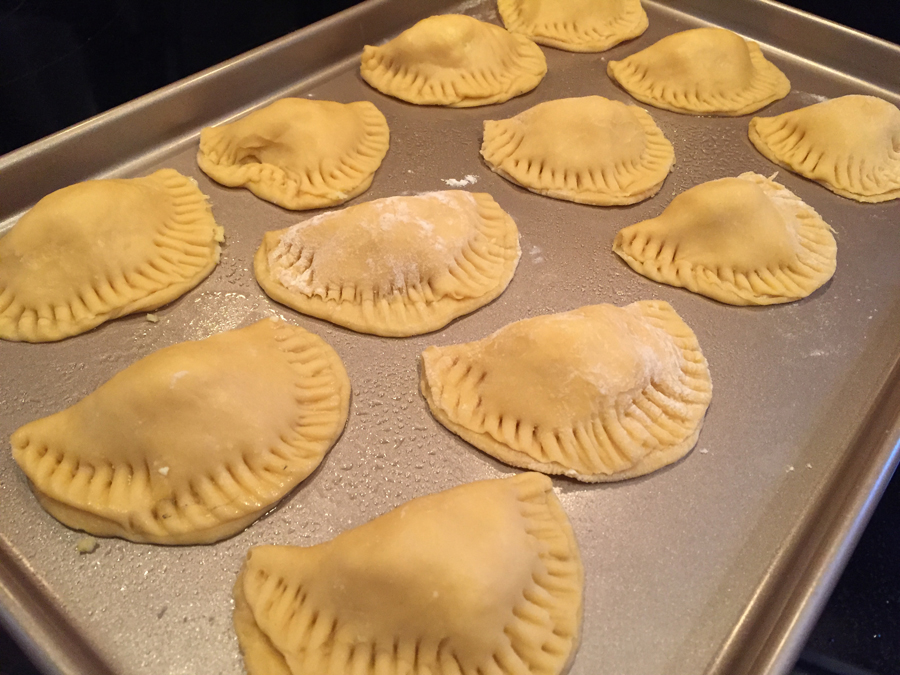
Pre-heat oven to 350˚. Once the cheese mixture is combined, you will want to add a heaping teaspoon of the filling to the center of each circle. Fold the circles in half, pinch them together and seal them with the edge of a fork. Lightly scramble the remaining egg for the egg wash, and brush the top of the circles with the egg wash. Place the filled pastries onto lightly sprayed baking sheets. Bake at 350˚ for 15 minutes. Lower the heat to 325˚ and bake for another 20 minutes. Remove from oven, let cool completely.

Serve once cooled, or you can refrigerate the pastries for up to one week. You can warm them in the microwave oven for 15 seconds before serving.

Other Easter Recipes

Umbrian Cheese Bread

Easter Ham Pie and Easter Rice Pie

Easter Strata

Italian Love Cake

Share

Tomato, Basil and Ricotta Salata

March 28, 2017 Menu, Salads No Comments

Recently, I shared with you my recipe for game-day empanadas, and one of the fillings that I decided to use in my empanadas was ricotta salata. Up until this point, I had not really been all that familiar with this particular cheese. Ever since, it has become a staple in our house. For those of you who are still not familiar with this flavorful gem, it is an Italian cheese made from whey that is re-cooked (ricotta), and has been pressed, salted (salata) and aged for at least 90 days. The end result is a beautiful, milky white cheese with a slight nutty flavor, that is perfect for slicing, shredding or crumbling. Texture-wise, it is more like a feta than a traditional soft ricotta, with a taste that packs a delightful punch. It is also a very reasonably priced cheese, which makes it all the more enjoyable.

While my wife and I were perfectly content with simply enjoying slices of this cheese drizzled with a little balsamic, the wheels in my mind quickly started spinning on how to incorporate it into recipes. The first, and most obvious recipe that came to mind was the classic Caprese Salad, which of course is simply made up of fresh sliced mozzarella, tomatoes, fresh basil, olive oil and herbs. My thought was that not only would the texture of the cheese hold up well with the tomatoes and fresh basil, but also that the lively flavors would not require any additional seasonings. My hunch was correct. The in-your-face, vibrant flavor marries perfectly with the sweetness of fresh chopped basil, swirled together with a splash of rich, golden olive oil. The crumbly, chunky texture plays well with chunks of juicy tomato. Traditional Carpese Salad may be one of my all time favorites, but the ricotta salata version is definitely a nice and inviting alternative.


Tomato, Basil and Ricotta Salata

This is a very simple recipe. Measurements can be adjusted to your preferred serving size.

one chunk of ricotta salata
1-2 roma tomatoes
fresh chopped basil
Extra virgin olive oil

Chop the cheese and tomatoes into slices or cubes. Sprinkle with fresh chopped basil. Drizzle lightly with olive oil. Serve and enjoy!

Share

Book Update 2.0

March 7, 2017 Menu 1 Comment

It’s been a while since I’ve given you a status on my book project, so I thought I should let you know what I’ve been up to and where things stand.

I’m happy to say that I am very optimistic with the progress that’s been made so far.

All of the written material has been compiled and edited, and photos are being gathered. There’s a nice variety of new recipes, along with many of my classic recipes…some which have been modified and updated.

Why the updates to some of the my original recipes, you ask?
As I have continued to use my recipes over the years, I have found that some adjustments have worked for the better – maybe due to a measurement modification, or maybe due to what ingredients are more fresh, available and in season at the time. You can read more about my thoughts for these updates in the book, but I promise that you will enjoy the modified versions.

The book will not only feature my recipes, but also the story on how I’ve had this incredible food journey and the fun paths that I have taken as a food blogger. I’ve been very fortunate with the opportunities that have come my way. I am very excited to share this memoir with you.

I have also finally settled on a book title, cover design and interior layout. This is where my years as a graphic designer have come in to play, and where much of my focus on this project has been spent. The visual appeal was one of my top priorities with this project, so I hope you find it just as appealing to look at as it is to read.

The next steps are to combine all of the written material into the layout, and make sure that it all looks nice and pretty. After that, it will have to go into a final proofreading phase…then it’s off to the races!

I’d say that we’re about 70% there. I started this project in the summer of 2016 and gave myself a solid year to finish it, and I think I’m right on target. There is still a solid, hard working 30% left to do, but slow and steady wins the race. We’re movin’ and shakin’!

So stay with me on this. I promise you good things to come. And thank you for the continued encouragement and kind words along the way…it’s been the additional fuel needed to get this project up and running!


Share

Honey-Butter Salt and Pepper Wings

February 16, 2017 Appetizer, Entrees, Menu No Comments

I was never a huge fan of easy pickin’ foods that are slathered with sauce. Whenever I grill ribs or chicken, I always opt for a nice dry rub as opposed to brushing it with barbecue sauce. Because of this, chicken wings are not usually on my radar. And when they are, I am very particular on how they are prepared. I don’t like them breaded, I don’t like them fatty and I don’t like them floating in a sauce bath. This past Superbowl weekend, I decided it was time to give it go and figure out how to prepare wings to my liking.

The last time that I had enjoyed wings, they were prepared with just a salt and pepper rub on them, and they were finger-licking good. The salt and pepper blend was baked perfectly into the juicy chicken meat, making the plate of tiny wings and drumsticks truly addicting. This was the recipe that I decided I was going to start with for my game-day party plate.

Te recipe that I used was very simple: 1 teaspoon of salt and 1 teaspoon of pepper, combined, for each pound of wings (which is approximately a dozen wings). Making the adjustments for a larger batch would be simple using the ratio of 1:1:1 (meaning 1 teaspoon salt and 1 teaspoon pepper per 1 pound of wings). The challenge that I had was how to properly cook them. Frying is the traditional method used to cook the perfect crispy and meaty wing, rendering off any of the unnecessary fat. But my preference is almost always baking over frying. However, baking wings often leaves the skin a bit fatty, which is one of my wing no-nos. In order to achieve the desired crispness, you really have to crank your oven temperature up to at least 425˚. While the higher temperature will help achieve the desired texture, the high-heated fat will start to splatter, which will lead to a smoky oven. Not fun if you have a smoke alarm close to your kitchen quarters.

This is where celebrity chef Alton Brown’s admirable food and science knowledge comes in to play.

Alton’s method is to steam the wings prior to baking them. As Alton says, “the trick is to steam them first to render out a lot of the fat. Then you cool them to tighten the skin.” This step, which does involve a little bit of labor, will help cut back heavily on oven splatter, since much of the fat has been rendered off. The end result is a beautiful crispy and flavorful wing, without a smoke-filled kitchen when you remove the tray from the oven!

As I mentioned earlier, I am not a big fan of wings that are slathered in sauce. But I also did not want serve wings that were too dry. Because my wife and kids do not like hot or spicy food, I opted to make a sweet honey-butter sauce that I would quickly toss over the wings. This quick sauce was just enough to coat the wings, and was a great complement to the salt and pepper rub. Just enough of a sweet coating without over-saturating the wings.

Below is the step-by-step process to my wings. Again, you can use the ratio method of 1:1:1 for the salt and pepper rub. The honey and butter measurements for the coating can be increased per pound as well.  The ingredients are simply a starting point. Additional spices can be added to the rub, and hot sauce can be added to the honey-butter coating to your liking.


Honey-Butter Salt and Pepper Wings

Makes approximately one dozen wings.

1 pound party chicken wings
1 teaspoon salt
1 teaspoon pepper
2 tablespoons butter
1 tablespoon honey
(optional – fresh chopped parsley for garnish)


Step 1: Steaming the Wings

This is Alton Brown’s method for steaming the wings. This step helps render the chicken fat, which will reduce the amount of splatter and oven smoke while baking. You can eliminate this step if you do not have a steamer basket, but there will be some oven smoke and splatter made while baking.

For Alton Brown’s complete Buffalo Wing recipe, click here

Load a 6-quart saucepan with a steamer basket and 1 inch of water in the bottom, over high heat, cover and bring to a boil.

Place the wings into the steamer basket, cover, reduce the heat to medium and steam for 10 minutes. Remove the wings from the basket and carefully pat dry. Lay the wings out on a cooling rack set in a half sheet pan lined with paper towels and refrigerate for one hour. You can do the wings in batches if you can’t fit them all into the steamer basket at once.


Step 2: Coating and Baking the Wings

Preheat the oven to 425˚. Combine the salt and pepper. Once the wings have completely cooled and dried, coat the wings on both sides with the salt and pepper rub. Either place the wings on a small rack sitting in a baking dish (my preference for even cooking), or place the wings on a baking sheet lined with parchment paper.

Bake the wings on the middle rack of your oven for 20 minutes. Flip the wings and bake for another 20 minutes, or until golden brown.


Step 3: The Honey-Butter Coating

While the wings are in the final 20 minutes of baking, you can prepare the honey-butter coating. Melt the butter in a sauce pan. Add the honey, stir well and continue to heat until warm and thoroughly combined.

*Note – you can add hot sauce or spices to your liking to add heat to the honey-butter coating.

Once the wings are done, toss them with the honey-butter coating. Sprinkle the wings with some fresh chopped parsley, serve and enjoy!


Share

Recent Comments

Archives

powered by
Socialbar