Home » Entrees » Recent Articles:

Lemon Mint Risotto with Zucchini

August 6, 2012 Entrees, Menu 2 Comments

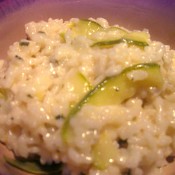
Now’s the time to put that fresh harvest of vegetables and herbs to good use! One of the new herbs that I planted this year was mint. If I had known how abundant this herb was, I would have started planning recipes to use it with months ago! After putting together multiple batches of mint pesto, mint iced tea, and mint seasoned chicken to name just a few, I searched out  a delicious combination that would put not only my mint to use, but fresh zucchini and lemon as well. This dish adds lemon zing, mint accent and fresh zucchini to classic risotto. What I found most interesting about this dish was how the zucchini was sliced and added. By simply using a vegetable peeler to make long, thin slices, the zucchini takes on a beautiful ribbon shape and texture that holds up well in the warm risotto. The ribbons gently wrap around the creamy rice, yet melts in your mouth with every bite. The mint gives the perfect refreshing accent without overpowering. If you are a fan of risotto, I suggest you give this recipe a try.

LEMON MINT RISOTTO WITH ZUCCHINI

6 cups chicken stock
2 tablespoons unsalted butter
1 tablespoon olive oil
1 small yellow onion, chopped
2 cups arborio rice
1/2 cup dry white wine
1/2 cup grated Parmigiano-Reggiano cheese, plus extra for garnish
1/2 medium zucchini, thinly sliced with a vegetable peeler
juice and zest of 1 lemon
2 tablespoons chopped fresh mint leaves, plus extra for garnish

Bring stock to a simmer. Reduce heat to lowest setting and keep warm.
Heat 1 tablespoon butter and oil in a deep skillet or pot over medium heat. Add onion and sauté until softened, 2 minutes. Add rice and stir to coat. Add wine. Cook, stirring, until the wine evaporates. Add stock 1 cup at a time, stirring until nearly all of the liquid is absorbed before adding the next cup. Continue until the rice is tender but not mushy. When almost finished, stir in the zucchini, adding stock as needed and stirring continuously.Remove pan from the heat. Stir in 1 tablespoon butter, 1/2 cup parmesan cheese, lemon juice and lemon zest. Add mint leaves and serve immediately in bowls garnished with extra cheese, extra lemon zest and mint.

Share

Burger-grilling Fun!

June 14, 2012 Entrees No Comments

When it comes to grilling hamburgers, I’ve become a bit of a purist. An 80/20 mix of ground chuck (80% lean for more flavor), some salt and pepper, well-oiled grill grates, flipped once, cooked to medium. If I’m making turkey burgers, I’ll use a 90/10 mix and may add a packet of onion soup mix for a little more flavor. I used to add all kinds of spices and seasonings (Italian salad dressing was the go-to for me), but as I developed more of an interest in grilling, I have learned that less can be more. Let the burger speak for itself.

Of course, I also like to experiment when I get the chance. This past weekend, when we were having a family grill-out, an interesting idea came to mind. Now if you have kids, you know that a staple at all grill-outs and picnics are cheese curls. If there is anything less than a half of a bowl on the table, there is a crisis brewing. Since we had the oversized tub of cheese curls on hand, I started to think what would happen if I added ground cheese curls to the burger mixture? Adding cheese to a burger is a given. You can also add breadcrumbs for texture. Why not combine the two?

I crushed up about a half cup of cheese curls in the food processor to get a breadcrumb-like consistency, and folded it into the mix with the salt and pepper. The verdict…thumbs up! A half cup of the crumbs for a pound of meat offered just enough of a zing without overpowering the burger itself. If you are trying to kick up the zing even more, maybe try using nacho chips instead. Sure, I wouldn’t make this part of my regular burger routine, but for a fun get together, and to have something to talk about over a beer or two while standing around the grill, I say go for it! Just remember….only flip the burgers once.

Share

Mamma’s Peperonata

A few months back, Una Mamma Italiana and I shared with you another of our fun and creative food battles, going head-to-head with a vegetable dish. Her zucchini fritters came out on top, but apparently my peperonata dish was still strong enough to coax Una Mamma into trying it! This past week, Una Mamma put together her own version of peperonata, and what a great job she did with it. Nice job, Una Mamma! Now when’s the next challenge?

FROM THE MAMMA…

If you are an avid “Mamma Meets The Cucina” fan, then you might recall when my foodie friend and blogging nemesis…(jk) Dominic Condo…. made Peperonata for our Veggie Challenge.  It was pretty awesome, I must admit.  But I had to do what I always do andtry to show him up!

Peperonata is one of those dishes that is very hearty and can be a side dish or a meal in and of itself.  The way I make MY twist on Peperonata, is a bit spicier and, actually quite different all around.  It lacks the onions seen in Cucina Domenico’s recipe, and it uses whole baby peppers instead of sliced bell peppers. Throw in a couple Jalepenos for some kick and you’ve got a trendy twist on an Italian classic!!

The instructions for my recipe are minimal – you wash and pan sear your peppers in a bit of e.v.o.o. and pancetta.  The flavor from the rendered panceta is the secret in this dish.  Then you finish them off in the oven, roasting at around 400 degrees, turning occasionally.  Serve alongside crispy Italian bread or with chunks fo fresh Parmiggiano!  Buon Appetito!

Mamma’s Peperonata!
Share

Italian-style Quesadillas

Whether you are enjoying a traditional Mexican meal at home or at a family-friendly restaurant, you are sure to find quesadillas on the table at some point. The popular and tasty dish, made up of a flour or  corn tortilla stuffed with cheeses, vegetables, meats and beans is perfect dish to either share as an appetizer with friends, or (as in my case) enjoyed on its own as a main course. This week, to help celebrate Cinco de Mayo, I am going to put an Italian spin on this Mexican favorite.

First, let’s start off with the filling. Instead of the traditional quesadilla filling, I will be using some of my favorite go-to Italian vegetables. You will need:

1 green zucchini, chopped
1 yellow squash, chopped
1 medium eggplant, chopped
1 small jar artichoke hearts
1 red bell pepper, chopped
2 cloves garlic, minced
1 teaspoon Italian seasoning
salt and pepper (to taste)

Mix all of the above in a bowl. Add some olive oil and stir together until well-mixed. Refrigerate for 30-60 minutes to allow all of the flavors to come together. Pour in a baking dish, bake at 350˚ for about 20 minutes. Remove from oven, set aside.

If you want to add some meat to the filling, traditional chicken or shrimp would work well. Or for a little more Italian spice, try adding some cooked ground sausage!

Next, we’re going to add some cheese. While quesadillas usually use cheddar, colby or monterey jack cheese, we’re going with shredded mozzarella and some parmesan.

Assembling the Italian quesadillas is the same as the traditional version. You start by heating up a pan over medium heat, lightly coated with butter or oil. Place a tortilla shell into the pan, let heat for about 15 seconds. Add some of the filling to one half of the tortilla, topped with the cheeses and some fresh herbs (fresh chopped basil is my choice here!). Fold the shell in half to make a half moon shape. Carefully flip the quesadilla so that it even cooks on both sides. Remove from pan, cut into three equal triangles. You may need to add more butter or oil to the pan before each additional quesadilla. Serve with a side of marinara sauce or bruschetta for dipping (in place of traditional salsa).

Share

Recent Comments

Archives

powered by
Socialbar