Home » Dessert » Recent Articles:

Strawberry Vanilla Infused Vodka

May 16, 2017 Dessert, Menu 1 Comment

It’s that time of year again, to start thinking about the summertime cocktails that you will be preparing to serve at your cookouts, sip on while down the shore or simply enjoy while on your back porch. Today, I’m sharing with you my recipe for an incredibly easy to make – and even easier to drink – strawberry vanilla infused vodka.

Infusing certain fruits with vodka, especially citrus fruits, can take a few weeks up to a few months to really extract the flavor to its fullest. However, the seasonal plump and juicy strawberries that are now available this time of year need only about 5 to 7 days to release their sweet juices when infused with vodka. There is no need to use a higher percentage alcohol base for this recipe. Basic 80 proof vodka will do just fine.

The trick, of course, is to use good quality vodka. You want this to be an enjoyable sipping drink. And let’s be honest…you don’t want to be serving cheap booze to your guests either. You have a couple of different directions that you can go with this recipe, depending on how involved you want to get. The easiest choice is to simply use a bottle of vanilla flavored vodka. There are a few brands available, but again, be sure to pick a decent brand. Don’t go cheap! If you want to take more of a purist approach, you can add 2-3 vanilla beans to unflavored vodka to make your own vanilla vodka. The process will take a bit longer, but will make for really tasty results…and it sounds impressive too!

Once the infusion process is done, you can either serve as is (over ice, as a mixer, etc.), or you can add simple syrup to it and serve it as a liqueur. You can add the simple syrup either per serving, or mix it with the entire batch. Just be sure to allow an extra day or so for the flavors to come together if you are adding the syrup to the entire batch.

However you decide to serve your strawberry vanilla vodka, be sure to have a lot of it on hand. I promise you it will be enjoyed!

Strawberry Vanilla Infused Vodka

1 pound fresh strawberries, cut into quarters, stems removed and discarded,
1 750-ml bottle good quality vanilla vodka*

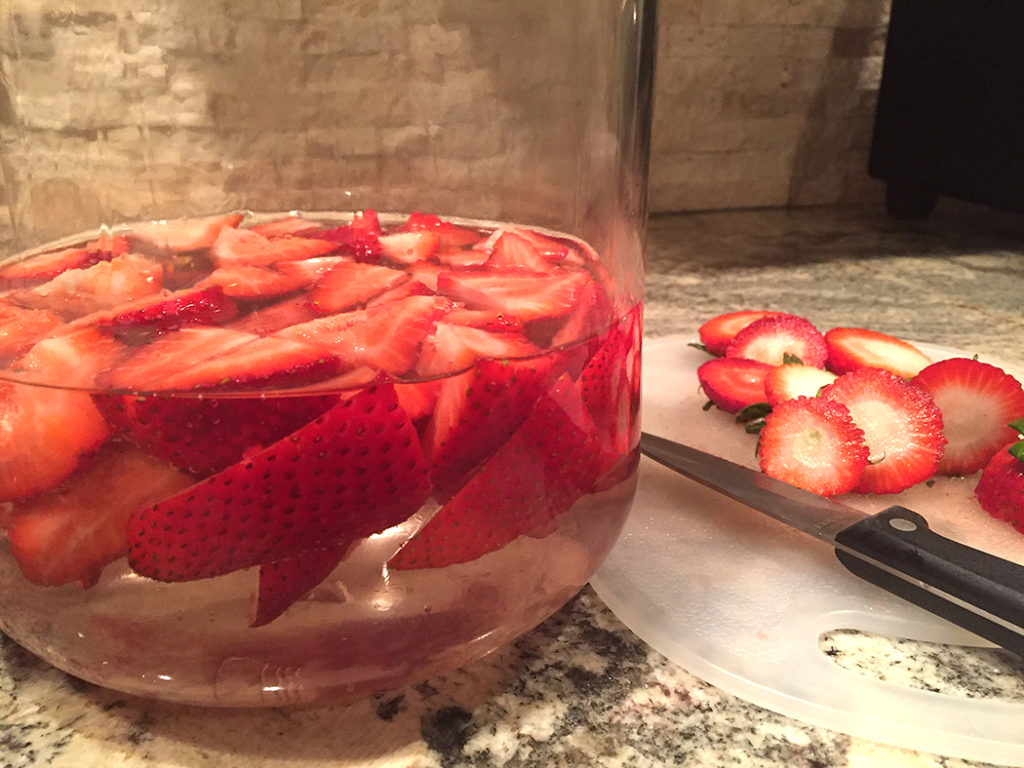
Place the strawberries into a large air-tight container. Pour the vodka over the strawberries, seal the container closed. Store in a dark, cool place for 5-7 days. Give the jar a light shaking once a day. The strawberries will lose their color once the flavor is extracted, and the vodka will turn a reddish-pink color. Strain and discard the strawberries from the vodka.

You can serve as is, or you can add simple syrup to sweeten it up.


Simple Syrup Recipe

1 cup water
1 cup sugar

(you can increase or reduce the amount needed by using the 1:1 ratio )

In a medium saucepan combine sugar and water. Bring to a boil, then let simmer, stirring until sugar has dissolved. Allow to cool. Combine with the infused vodka. If you are adding the simple syrup to the entire batch of infused vodka, allow it to sit for an extra day once mixed, so that the flavors come together.


*Infusing Vodka with Vanilla Beans

To make your own vanilla vodka, you will want to start with a good quality unflavored vodka. Add 2-3 vanilla beans, split length-wise but not scraped, to the vodka. Let the beans sit in the vodka for at least 7-14 days (the longer it sits, the stronger the flavor). Remove and discard beans once done. Then follow the steps above to infuse the strawberries with your vanilla vodka.

Share

Italian Desserts: The Ultimate Guide

April 19, 2017 Dessert, Menu No Comments

Although we are now a few days beyond the 2017 Easter celebration, I am still in recovery mode from all of the sweet and delectable treats that were enjoyed throughout the weekend. If your family is anything like mine, your refrigerator is still stocked with leftover cheese pies, cannoli and various other Italian desserts. There is, of course, no other way to celebrate a holiday (big or small) or special event in an Italian family than with a sweet table that appears to stretch miles long, stocked with dozens of decadent and creative mouth-watering desserts. As luck would have it, just about every Italian dessert that I can think of has been compiled, along with a description and photograph, in a recent article by Peter Genovese on nj.com. Fun videos and recipes also accompany many of the descriptions, which makes this compiled list all the tastier! So pour yourself a nice cup of coffee, pull up a chair, click on the link below and enjoy!


Courtesy of Peter Genovese/www.nj.com

Share

Fiadone con Formagio (Italian Savory Easter Cheese Pie)

April 11, 2017 Dessert, Menu 3 Comments

As I was going through my recipes to gather the ingredients to make my Easter pies for this upcoming week, I was quickly reminded of the adventure that I had gone through a few years back, tracking down the recipe for what was known to me as ‘pastiche’ (pronounced pah-steech). Long story short, my quest for this recipe started years ago when I was trying to duplicate an Italian cheese bread that our friend Lorena’s mom had shared with us. Her mom had referred to the bread as pastiche, but I could never find any such recipe by that name. It wasn’t until a few years ago that I came across the recipe for Umbrian cheese bread, which offered almost the same taste and consistency. The bread has since become part of our family’s Easter tradition.

I thought that I had solved the pastiche mystery…until I had mentioned it to our neighbors. They were also familiar with pastiche through their Italian neighbor, and I had assumed that it was the same recipe. But after sampling their version of pastiche, it turned out that it was nothing at all like what we were familiar with. This version was more of a savory cheese pastry. What I have learned over the years is that it is not uncommon for similar Italian dishes to be region-specific, whether the difference be in name or ingredient. What one family may refer to as a dish in their town, the next town over may refer to it as something else. My guess is that pastiche is a perfect example of this – it is more of a dialect term than a specific recipe.

This whole pastiche conundrum led me to try and search out yet another new recipe, to find a match to this delicious new version that I had tasted. Unlike my long hunt for the Umbrian bread recipe, this time I was able to track down a recipe fairly quick. My search for Italian Easter cheese pastry led me to a recipe for Fiadone cone Formagio, which is an Italian Easter pie made up of a savory cheese and egg filling, wrapped in a firm dough and folded into a half-moon shape. There are different variations that appeared to be regional-specific. Some used a filling combination of Parmigiano Reggiano, Romano and Caciotta cheeses, while others used a Ricotta filling. Some added meats to their fillings, while others added vegetables. Regardless of the unique regional flare, they all had one thing in common….none of them were referred to as pastiche.

I may never find out the true meaning or origin of the term pastiche. But one thing that I have learned over the years is that there is no shortage of phenomenal Italian Easter recipes. Below is my interpretation of Fiadone con Formagio. You can also find the link to my Umbrian Cheese Bread recipe, and my other Easter recipes below.

Buona Pasqua!


Fiadone con Formagio (Italian Savory Easter Cheese Pie)

As I was doing my research for this post, in true Italian recipe fashion I found various versions using various ingredients and measurements. One of the key ingredients that was consistent was Caciotta cheese, which is a rural semi-soft cheese from central Italy that could be made from either cow’s, goat’s, ewe’s or buffalo’s milk. You may find this during Easter season sold as ‘basket cheese’. I chose to use fontina, which is my personal preference for a semi-soft Italian cheese. Regarding the measurements, I went ahead with the measurements that I felt most comfortable and familiar with, based off of other similar recipes that I have made.

For the dough:

5 eggs, plus one egg for egg wash
3 tablespoons vegetable or canola oil
3 cups flour, sifted, plus more as needed
pinch of salt
1 teaspoon milk

Mix the 5 eggs and oil together. Mix the flour and salt together. Slowly fold in the flour into the eggs, either by had or by using a dough hook on a mixing machine. Add the teaspoon of milk. Continue to fold/mix for about 8-10 minutes, until well incorporated and a dough ball forms. You can add additional flour if needed to avoid sticking. Place the dough into a lightly sprayed bowl, cover with a towel and let it sit in a warm area for one hour. You can make one day ahead of time and refrigerate – be sure to wrap the dough ball in clear plastic wrap prior to refrigerating.

After the dough has sat for one hour, you want to roll it out to approximately 1/8″ thin. To help with this process, I used my pasta machine for a more consistent thickness. Of course, you can roll it out with a rolling pin if you do not have a pasta machine. Be sure to keep the dough floured to avoid sticking. Once rolled out, you can use a cookie cutter (approximately 3″-3.5″ wide) or a juice glass to cut the dough into circles. You should get 24 circles from this batter.


For the filling:

3/4 cup grated parmesan cheese
3/4 cup grated pecorino romano cheese
3/4 cup grated fontina cheese
3 eggs, beaten
dash ground black pepper

Mix the cheeses, eggs and pepper together using a spatula.


Assembly:

Pre-heat oven to 350˚. Once the cheese mixture is combined, you will want to add a heaping teaspoon of the filling to the center of each circle. Fold the circles in half, pinch them together and seal them with the edge of a fork. Lightly scramble the remaining egg for the egg wash, and brush the top of the circles with the egg wash. Place the filled pastries onto lightly sprayed baking sheets. Bake at 350˚ for 15 minutes. Lower the heat to 325˚ and bake for another 20 minutes. Remove from oven, let cool completely.

Serve once cooled, or you can refrigerate the pastries for up to one week. You can warm them in the microwave oven for 15 seconds before serving.

Other Easter Recipes

Umbrian Cheese Bread

Easter Ham Pie and Easter Rice Pie

Easter Strata

Italian Love Cake

Share

Oh, Fudge! Dark Chocolate and Zinfandel Fudge

December 18, 2016 Dessert, Menu No Comments

I once had a friend tell me that wine plus dark chocolate equals heaven. Being a fan of both, I have no problem agreeing with this statement. There is something magical about the pairing of a crisp, fruity, complex wine with the creamy, lush texture of dark chocolate. And according to an interesting article in the Huffington Post, there are also health benefits to this decadent combination!

If you are looking for some last minute ideas for home made goodie gifts for the holidays, and if your family and friends are fans of wine and chocolate, give this fudge recipe a try. The recipe is very simple and doesn’t take much time to make, yet your family and friends will be impressed! You can add nuts or maraschino cherries for additional texture and flavor. Just be sure to keep this sweet treat out of the children’s reach, because the alcohol does not fully cook down. To make a kid-friendly version, simply eliminate the wine.

Cheers to you and yours!


Dark Chocolate and Zinfandel Fudge

1 20-oz package of dark chocolate morsels
7-oz sweetened condensed milk (1/2 can)
1/2 cup Red Zinfandel

Place all ingredients in a sauce pan over medium-low heat. Stir often until the chocolate morsels are almost melted. Remove from heat, continue to stir until completely melted. Carefully pour the batter into an 8″x8″ pan lined with parchment paper and lightly sprayed. Smooth out the batter to evenly fill the tray. Let cool in the fridge until the fudge sets completely. Cut into small squares to share.

Be sure to wrap the fudge in wax paper, then store the fudge in an air-tight package or container. The fudge will have longer shelf life if stored in the fridge, just be sure to let it return to room temperature before serving.

Share

Recent Comments

Archives

powered by
Socialbar