Home » Appetizer » Recent Articles:

The Kitchen’s Yogurt Pesto Dip

February 22, 2018 Appetizer, Menu No Comments

I always find it fun and exciting when inspiration for a new recipe comes my way while watching one of my many favorite food television programs. Most times, the recipes that I gravitate towards are ones that grab my attention for their simplistic ingredients and the flexibility of shaping them into my own little creations. However, a recent recipe that I saw on The Food Network’s The Kitchen had me both intrigued and perplexed.

Dapper-dressed tv chef and co-host Geoffrey Zakarian was mixing up a low-calorie, low-fat, low-cholesterol, heart-healthy party dip that called for only two ingredients….pesto and Greek yogurt. While I am a huge fan of both ingredients when used separately, the mere suggestion of the two distinctive tastes coming together as one had me stumped. Co-host Sunny Anderson’s reaction seemed just as confused as mine, but she quickly agreed that the combined ingredients made for a great, tasty dip. There was no turning back for me at this point.

Yogurt Pesto Dip: Take 1

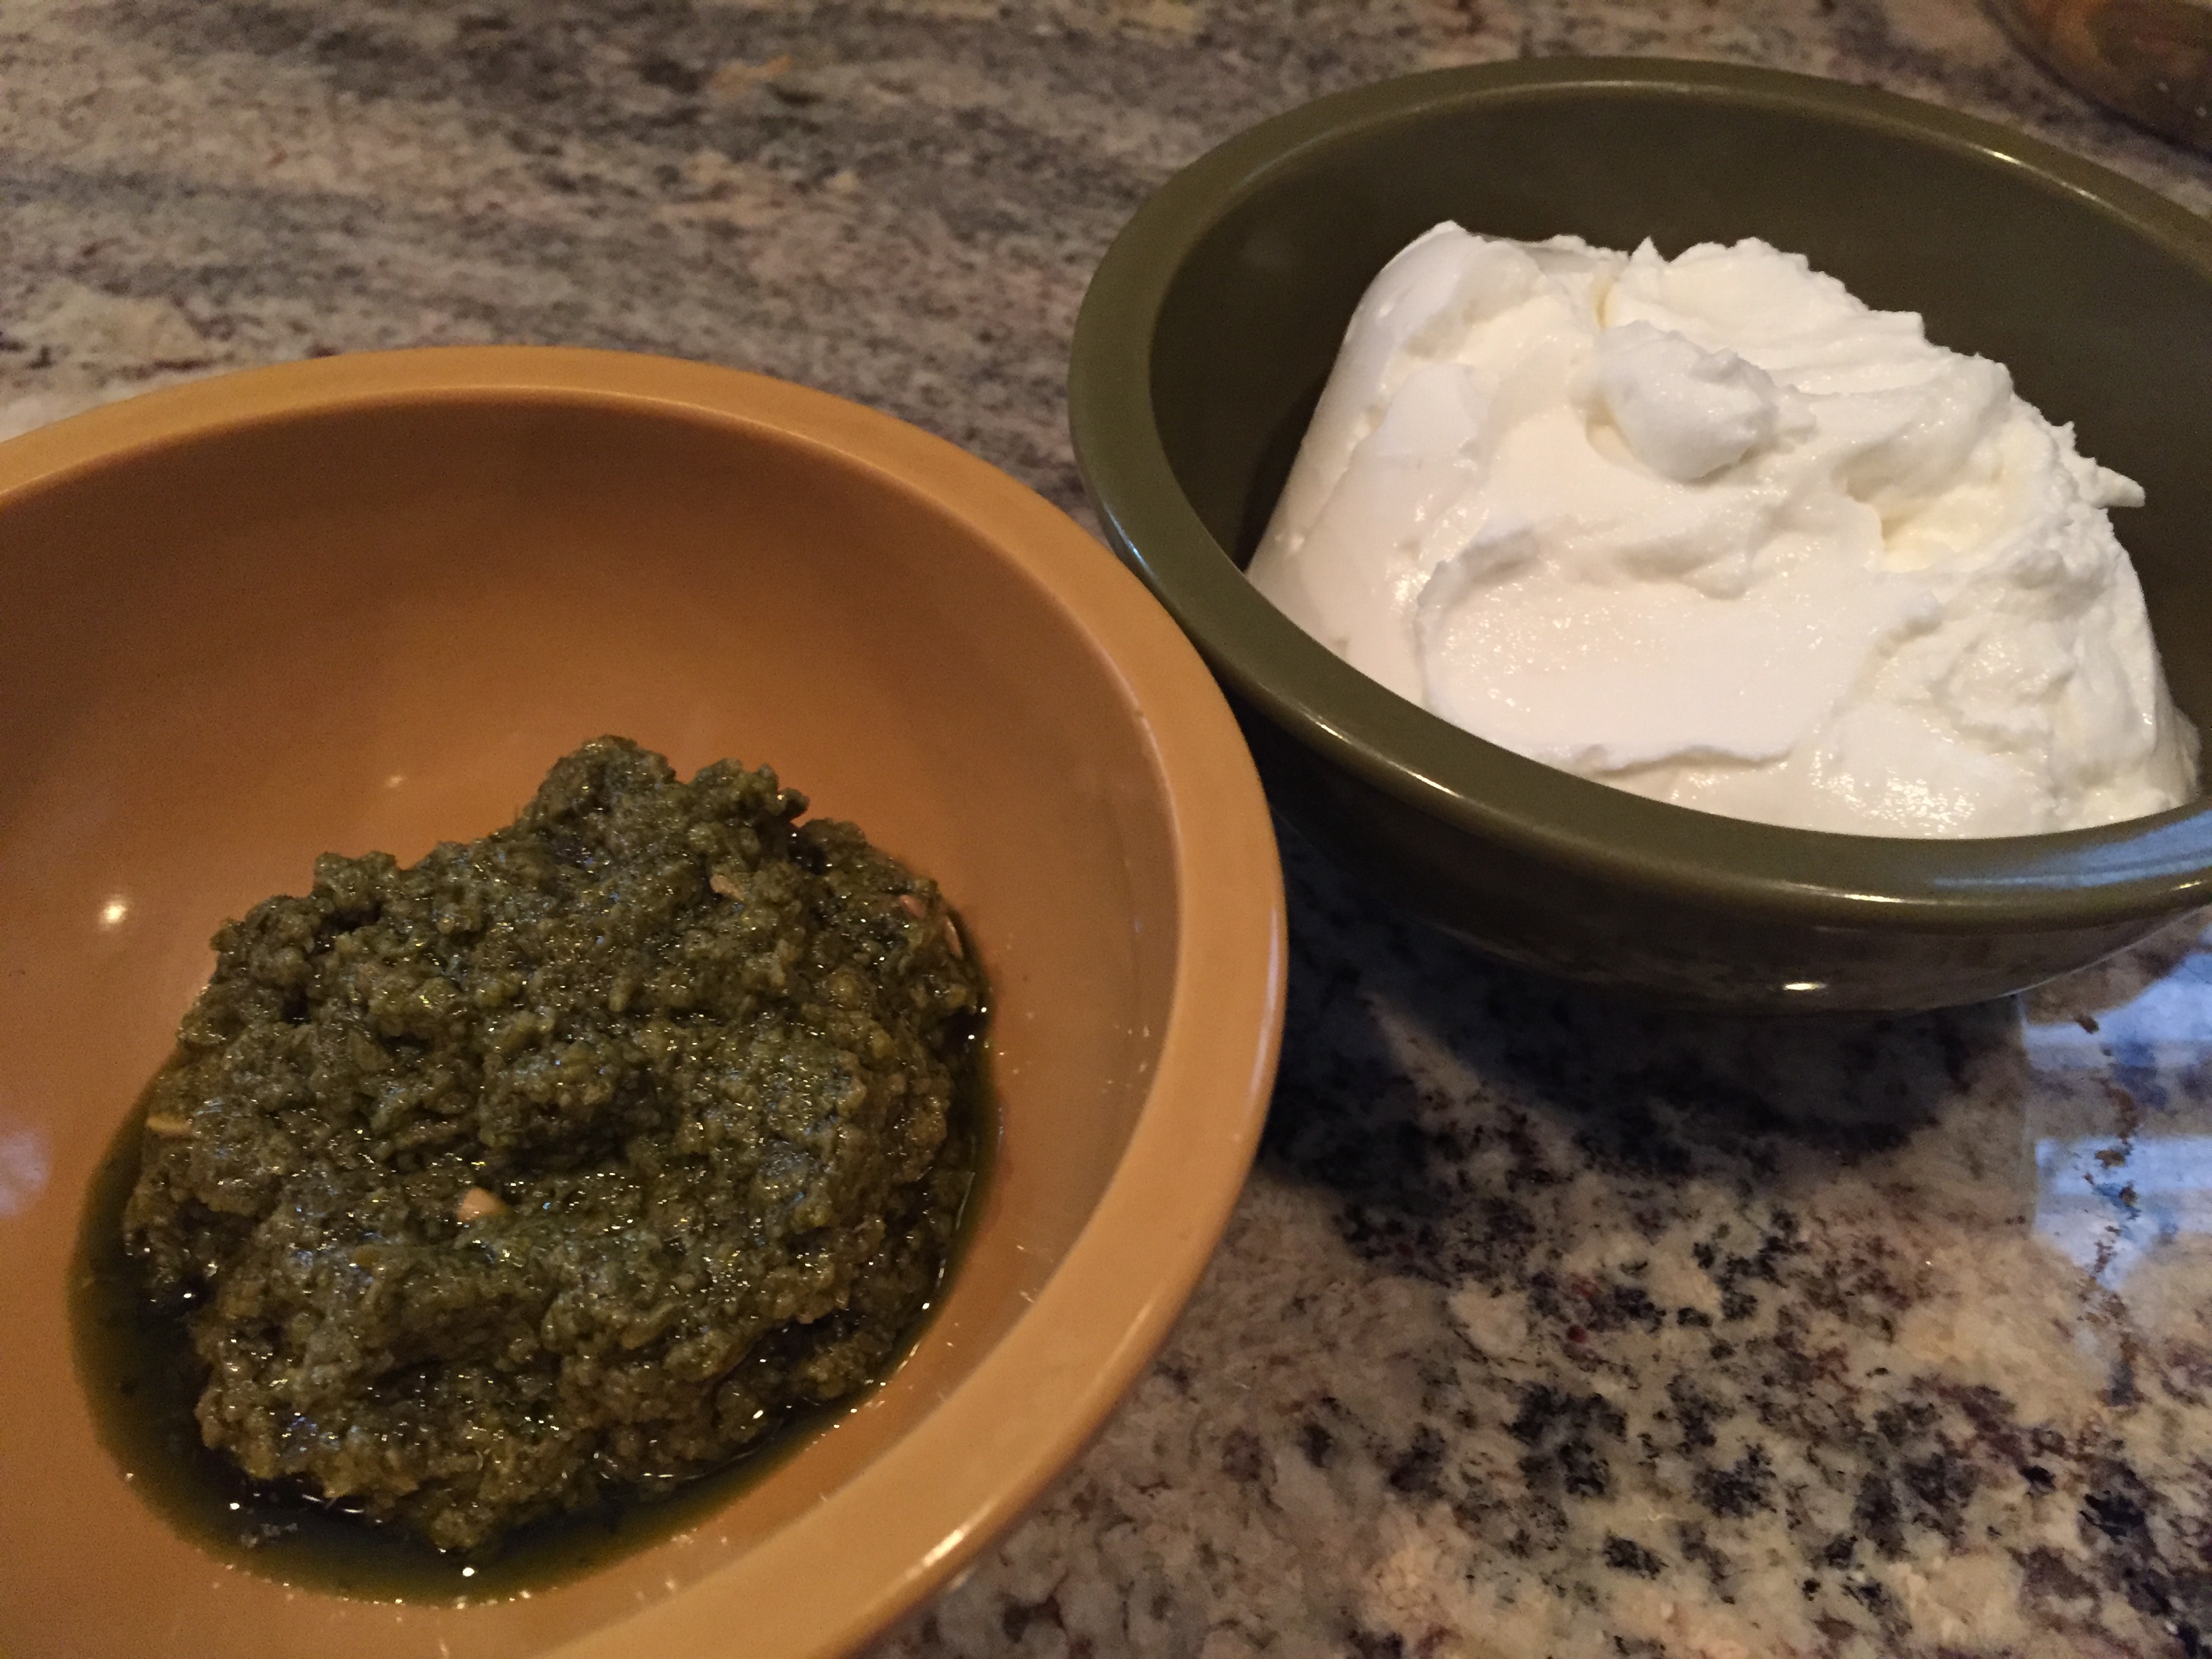
The ingredients, as I mentioned earlier, are very simple: 1 cup plain Greek yogurt and 1/4 cup pesto (store bought is fine, home made is even better), with a bit of Kosher salt and fresh ground black pepper for taste. Geoffrey’s suggestion was to use full fat Greek yogurt. I understand that the full fat variety would offer more texture and richness to the recipe, however finding a single serving cup of full fat Greek yogurt can be a challenge. Usually you would have to buy the full fat plain variety in a large quart size container. Whenever I eat Greek yogurt, I opt for the fat-free variety. To avoid having a container of leftover full fat Greek yogurt on hand, I decided to give the recipe a try by using the fat-free variety. The dip was very good. The balance of the zesty pesto and creaminess of the yogurt made for a nice, refreshingly tasty dip with a tart zip to it. But, as predicted, the texture was a bit thin. Adding some olive oil for additional flavor only made the texture even thinner.

Yogurt Pesto Dip: Take 2

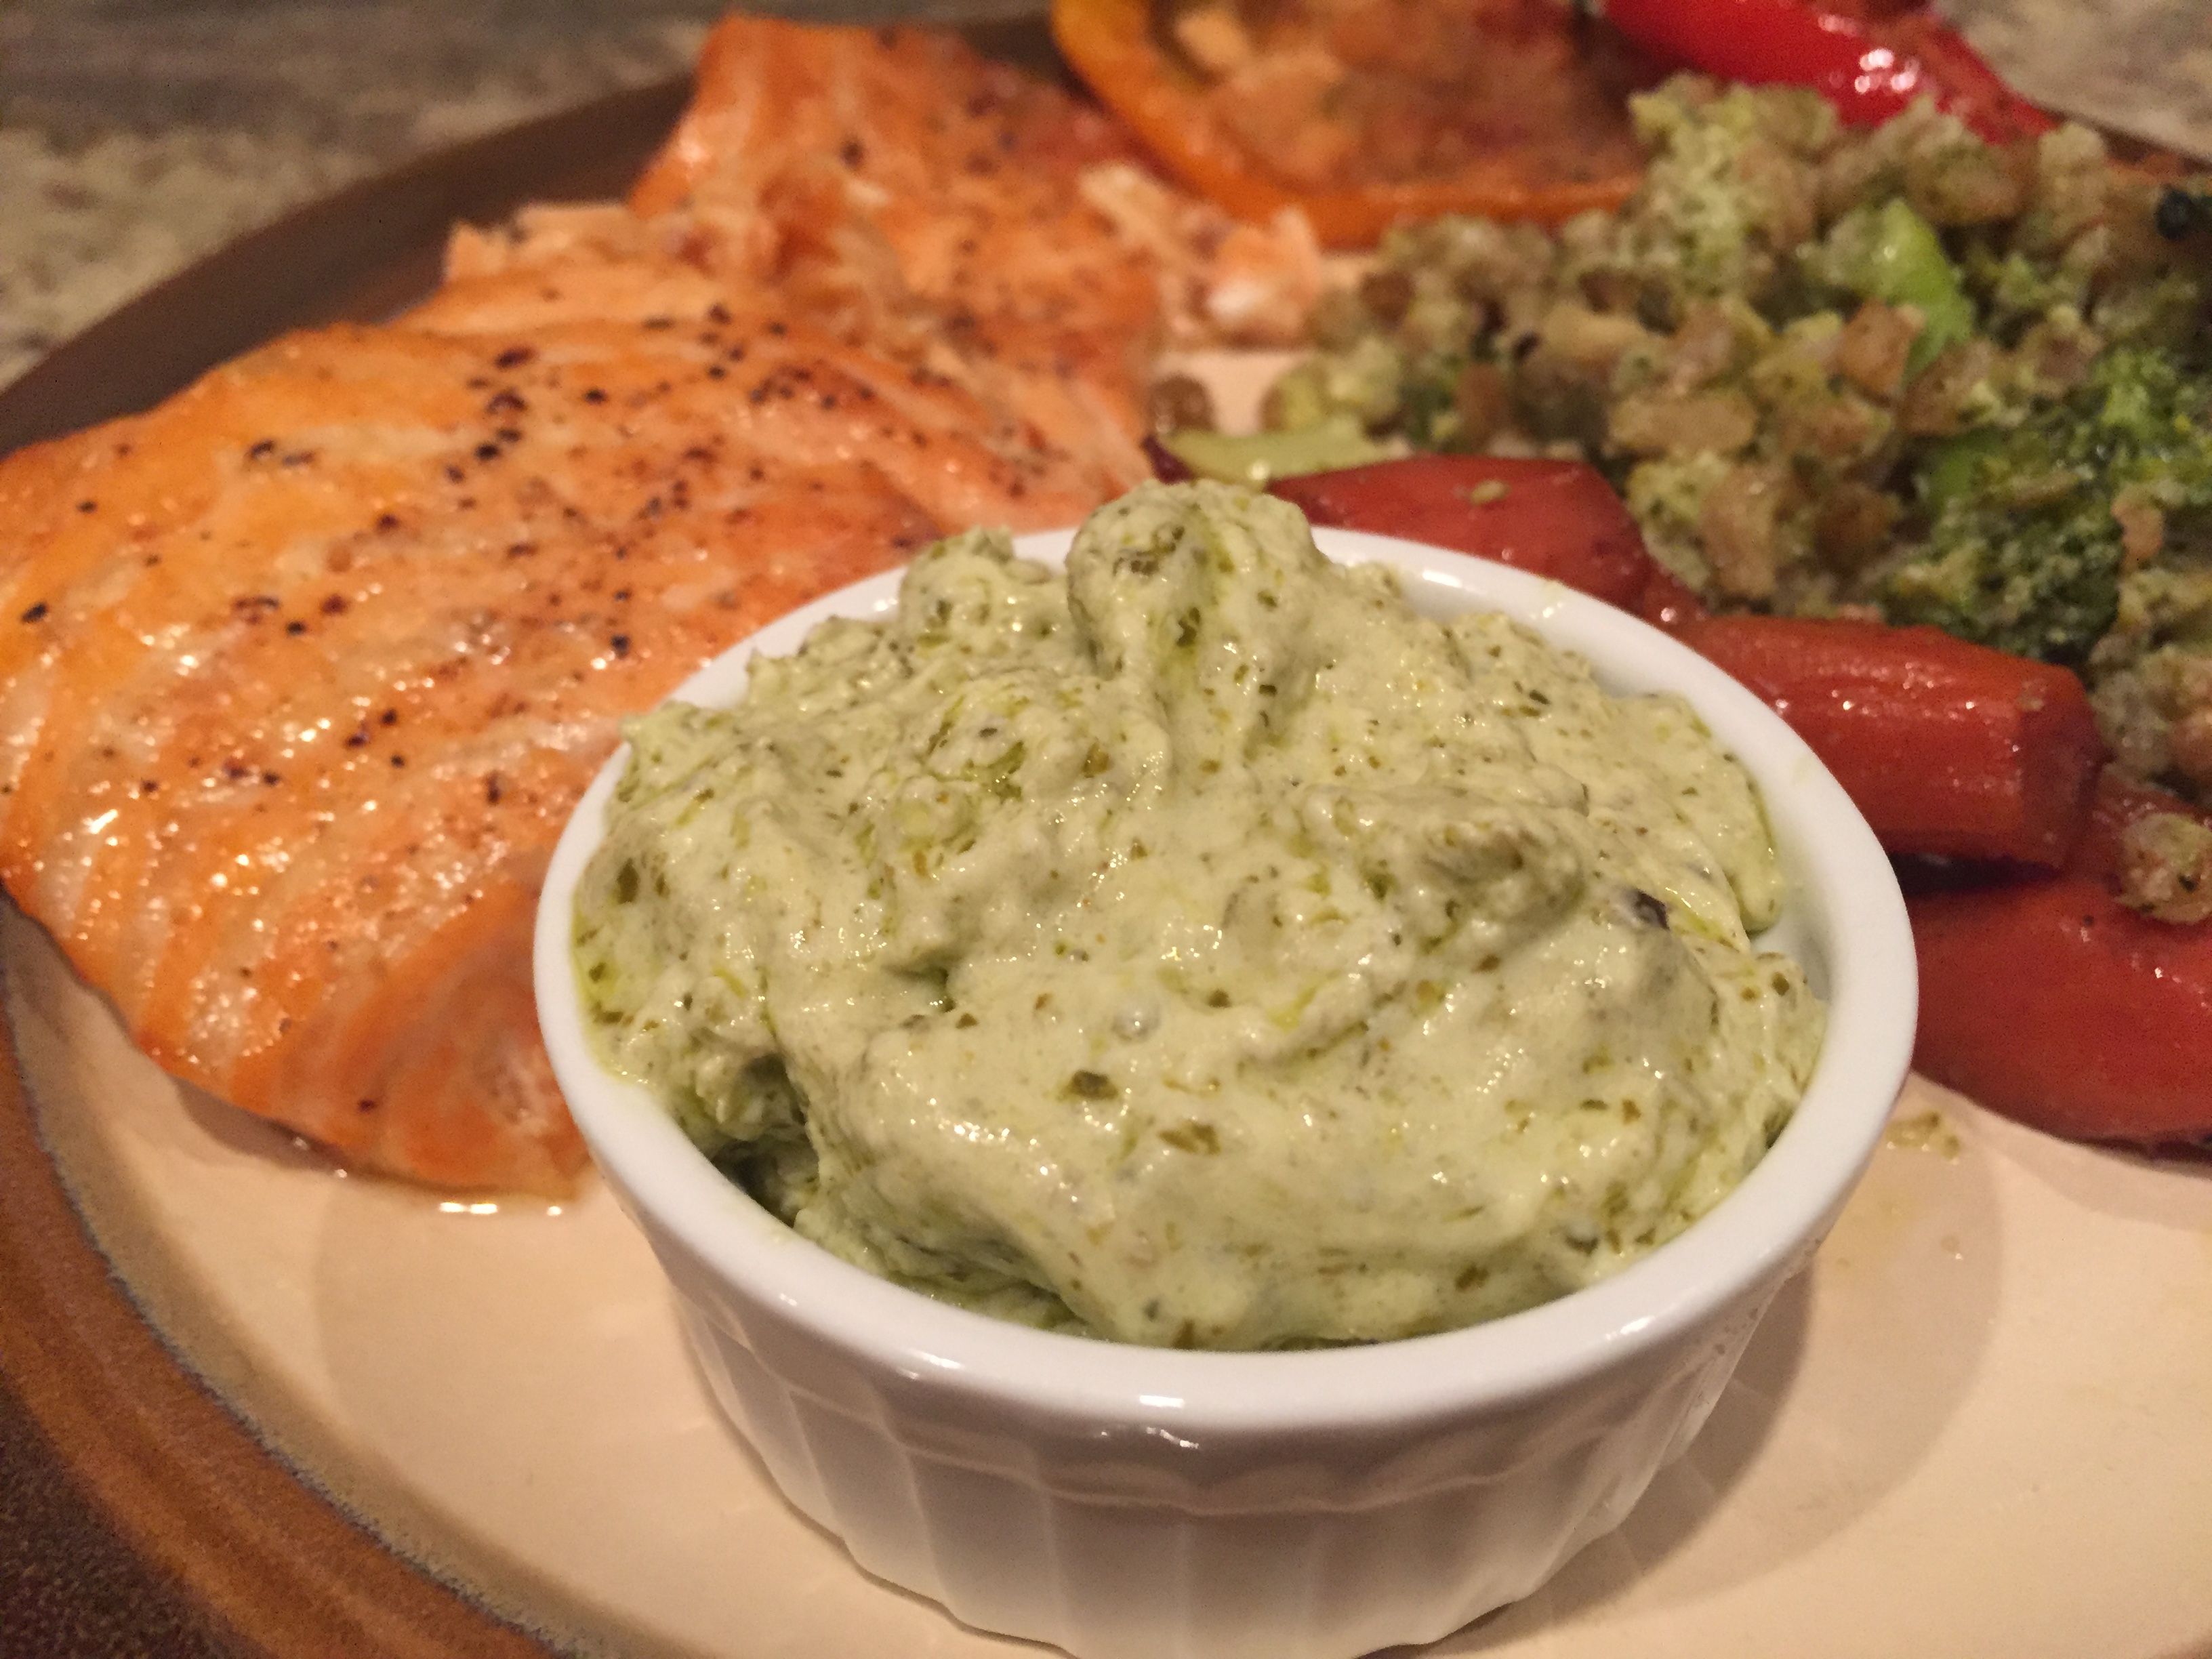
Still not wanting to give in to the purchase of a full fat container, I decided to give the recipe a try with a 7-oz single serving container of 2% Greek yogurt. There was definitely a difference in texture. Much thicker and creamier, and again with the addition of a drizzle of olive oil and some Kosher salt and fresh ground black pepper…mmmm mmmm, good!!!

What I really like about this dip is its versatility. Not only are there lots of health benefits to it – the fresh herbs and healthy olive oil benefits in the pesto, and the proteins, calcium and probiotics found in the yogurt – there are also a number of ways that you can serve the dip. Sure, it serves well with chips and fresh cut vegetables. But it also worked amazingly well with baked potatoes, chicken and salmon. I’m sure it would even complement a nice steak…I just haven’t gotten to that yet.

So, if you are looking for a recommendation for a versatile, tasty and healthy dip…and if you are a fan of pesto and Greek yogurt…this is the one you have to try!


Yogurt Pesto Dip

Adapted from The Kitchen’s Yogurt Pesto Dip recipe

1 7-oz single serving container of 2% plain Greek yogurt
1/4 cup pesto (store bought or home made)
Kosher salt and fresh ground black pepper
1 tablespoon olive oil

Add the yogurt and pesto to a medium bowl and stir until fully combined. Drizzle in the olive oil. Add the salt and pepper to taste. Stir and serve.

Share

Game Day Taquitos

January 19, 2018 Appetizer, Entrees, Menu No Comments

Game time is here, and football fever is running rampant! Even if your beloved team didn’t make it to the playoffs, chances are that you will still be joining family and friends for fun food at a game day party.

As I’ve discussed in previous game day posts, the key to a successful party dish is to make it a quick hitter that is fun, tasty and easy to eat. The recipe that I’m sharing with you today tackles all of those requirements!

Taquitos are a Mexican dish that consists of rolled-up flour tortillas stuffed with a filling, and is crisp-fried. Think of it as a rolled-up taco. During one of our recent holiday gatherings, I decided to make my own version of taquitos, coming up with a few different filling options and choosing to bake the taquitos instead of frying them. Not only were they a big hit, they were also enjoyed by both adults and kids. Prep time (for the most part) was minimal, and the ingredients were tasty. Although the taquitos were served as a picky appetizer, they were filling enough and tasty enough to keep everyone satisfied and coming back for more. Hence, the perfect game day food!

The best part about taquitos is that you can get as creative as you wish with the fillings. While traditional fried taquitos use a flour tortilla, I found that the baked version works just as well with both flour and wheat tortilla shells. I’ve used both types of tortilla shells for my taquitos and and was happy with both versions. Listed below are a few of the fillings that I prepared, along with a few other filling suggestions that I think would work well. As always, I encourage you to get as creative as you wish.


STEP 1: THE FILLING

The key to a good taquito is the filling. So far, I have made two different types of taquito fillings: sautéed vegetables and chicken, cheddar and bacon. Both were able to be prepared ahead of time, and both worked well and were enjoyed by everyone.

For the sautéed vegetable filling, you will need the following:

2 tablespoons olive oil
1/2 cup chopped onion
1 clove garlic, minced
1 zucchini, finely chopped
1 yellow squash, finely chopped
1 red pepper, finely chopped
1 tablespoon chopped Italian parsley
1 teaspoon oregano
1 teaspoon dill weed
salt and pepper to taste
shredded mozzarella or cheddar cheese

Heat oil in medium skillet or wok over medium-high heat until hot. Add bell pepper, onion and garlic; cook and stir 2-3 minutes or until crisp-tender.

Stir in zucchini and squash; cook and stir 5-7 minutes or until tender.

Stir in herbs, cook until thoroughly heated. Season with salt and pepper to taste. Set aside to cool slightly. You will top the vegetables with the shredded cheese when you assemble the taquitos.


For the chicken, cheddar and bacon filling, you will need the following:

1/2 lb cooked and seasoned chicken breast, chopped (Perdue Short Cuts works well for this)

8-ounce package of shredded cheddar cheese

4-6 slices of cooked bacon, cut into small pieces


Other filling suggestions:

• steak, peppers and provolone

• meatballs and mozzarella

• seasoned chicken with blue cheese

• pulled pork, roasted red peppers and broccoli rabe

• marinated shrimp and scallops

….honestly, you can go any number of directions!

Regardless of what filling you prefer to try, one suggestion that I would make is to not make your fillings too wet. If you think that your fillings would go well with a sauce (say a marinara or a barbecue sauce), I would suggest that you serve those sauces as a side for dipping. Incorporating the sauces into the filling may make the tortilla shells soft and mushy, and they may not bake properly.


STEP 2: THE ASSEMBLY

Preheat your oven to 400˚.

As I mentioned earlier, I have used both flour and whole wheat tortilla shells and was very happy with the results of both.

To assemble your taquitos, lay a tortilla shell out flat, and place a 1″ strip of your filling down the middle. Tightly roll up the tortilla shell, as if you were rolling up a cigar.

Place the rolled tortilla shells seam side down into a lightly sprayed 9″ x 12″ baking dish. Medium-sized tortilla shells will work the best with a 9″ x 12″ baking dish. If you have larger sized tortilla shells, you can trim the rolled shells to fit into the pan. You will fit about 8 rolled shells into the pan.

Lightly spray the top of the shells. Place the dish, uncovered, into the oven. Bake for 20-25 minutes, or until the shells start to brown and crisp. Remove from oven, let cool for a few minutes. Remove from baking dish and cut the baked taquitos in half. Serve and enjoy!

Share

Foiled! Tips and Recipes for Grilling Foil-Wrapped Packs

Quick-hit videos and recipes for foil-wrapped packs have recently taken social media by storm. Just this past week alone, I’ve watched at least three new recipe videos for foil-packed meals on the grill…and this was after I made a delicious foil wrapped lobster tail, baby potatoes and corn on the cob meal on the grill for my birthday last weekend!

Foil-wrapped packs are assembled by placing a single-serving of ingredients onto large sheets of aluminum foil. The foil sheets are then folded up into sealed packets, then cooked either on the grill or in the oven. There are many benefits to preparing foil pack recipes, especially if you are preparing the foil packs on the grill. Because all of the ingredients are contained (including your main dish, sides, herbs and spices), you do not have to put any effort into brushing, seasoning, stirring or flipping anything during the cooking process. All of the ingredients get the work done on their own! The foil packs also make for a fun presentation when serving them to your friends or guests, so it cuts back on post-dinner clean up. Since everything is contained within the foil packs, there is also less chance of flare-ups caused by drippings.

Seasoned vegetables, ready for the grill.

fresh salmon with asparagus in foil paper, ready for cooking.

Baked mexican chicken fajitas with spanish rice.

The recipes that you could make in a foil-wrapped pack are virtually endless. At the end of this article, there are links to some of the foil-wrapped recipes that I have made. I also have links to articles from tablespoon.com and foodnetwork.com, offering up 75 different foil-wrapped recipes. From appetizers, vegetables, seafood, pasta and fajitas, to roasted garlic, mussels, meatballs, popcorn and chocolate marshmallow banana boats….the list is just amazing! Again, many of these recipes could also be made in the oven, so the fun does not have to stop when grilling season comes to an end. But don’t worry, we have plenty of grilling time ahead of us!

A few things that you should keep in mind when preparing foil-wrapped packs:

• Be sure to use heavy aluminum foil (non-stick is preferred), or double up on the sheets if you are using thinner foil. You do not want any of your food to poke through or rip the foil at any time.

• If some of your ingredients naturally take longer to cook than others, you should prepare the items that take longer prior to adding them to the foil pack. A perfect example is potatoes. Even when cut down to small pieces, potatoes could take a while on the grill. If you are adding them to a pack with chicken, the potatoes should have enough time to cook on the grill. However, if you are adding potatoes to a pack with fish, the fish will cook much quicker than the potatoes. You will be better off preparing the potatoes ahead of time, then adding the cooked (or semi-cooked) potatoes to the pack.

• Always be very careful when removing the cooked foil packs from the grill, and especially when you unfold the cooked packs. The cooked food will be hot, and steam will be released when the packs are opened. Depending on the meal that you have made, there may also be hot oil in the pack that can burn you. Take your time removing and opening the packs, and be sure to use oven mitts.

• Most of all, be creative and have fun!


Recipe suggestions:


Grilled Tilapia Tacos

Grilled S’mores Sandwiches

Lobster Tail Foil Pack

Pack it Up! Pack it In! 15 Foil Meals for the Grill

50 Things to Grill in Foil


Images courtesy of istock.com

Share

Honey-Butter Salt and Pepper Wings

February 16, 2017 Appetizer, Entrees, Menu No Comments

I was never a huge fan of easy pickin’ foods that are slathered with sauce. Whenever I grill ribs or chicken, I always opt for a nice dry rub as opposed to brushing it with barbecue sauce. Because of this, chicken wings are not usually on my radar. And when they are, I am very particular on how they are prepared. I don’t like them breaded, I don’t like them fatty and I don’t like them floating in a sauce bath. This past Superbowl weekend, I decided it was time to give it go and figure out how to prepare wings to my liking.

The last time that I had enjoyed wings, they were prepared with just a salt and pepper rub on them, and they were finger-licking good. The salt and pepper blend was baked perfectly into the juicy chicken meat, making the plate of tiny wings and drumsticks truly addicting. This was the recipe that I decided I was going to start with for my game-day party plate.

Te recipe that I used was very simple: 1 teaspoon of salt and 1 teaspoon of pepper, combined, for each pound of wings (which is approximately a dozen wings). Making the adjustments for a larger batch would be simple using the ratio of 1:1:1 (meaning 1 teaspoon salt and 1 teaspoon pepper per 1 pound of wings). The challenge that I had was how to properly cook them. Frying is the traditional method used to cook the perfect crispy and meaty wing, rendering off any of the unnecessary fat. But my preference is almost always baking over frying. However, baking wings often leaves the skin a bit fatty, which is one of my wing no-nos. In order to achieve the desired crispness, you really have to crank your oven temperature up to at least 425˚. While the higher temperature will help achieve the desired texture, the high-heated fat will start to splatter, which will lead to a smoky oven. Not fun if you have a smoke alarm close to your kitchen quarters.

This is where celebrity chef Alton Brown’s admirable food and science knowledge comes in to play.

Alton’s method is to steam the wings prior to baking them. As Alton says, “the trick is to steam them first to render out a lot of the fat. Then you cool them to tighten the skin.” This step, which does involve a little bit of labor, will help cut back heavily on oven splatter, since much of the fat has been rendered off. The end result is a beautiful crispy and flavorful wing, without a smoke-filled kitchen when you remove the tray from the oven!

As I mentioned earlier, I am not a big fan of wings that are slathered in sauce. But I also did not want serve wings that were too dry. Because my wife and kids do not like hot or spicy food, I opted to make a sweet honey-butter sauce that I would quickly toss over the wings. This quick sauce was just enough to coat the wings, and was a great complement to the salt and pepper rub. Just enough of a sweet coating without over-saturating the wings.

Below is the step-by-step process to my wings. Again, you can use the ratio method of 1:1:1 for the salt and pepper rub. The honey and butter measurements for the coating can be increased per pound as well.  The ingredients are simply a starting point. Additional spices can be added to the rub, and hot sauce can be added to the honey-butter coating to your liking.


Honey-Butter Salt and Pepper Wings

Makes approximately one dozen wings.

1 pound party chicken wings
1 teaspoon salt
1 teaspoon pepper
2 tablespoons butter
1 tablespoon honey
(optional – fresh chopped parsley for garnish)


Step 1: Steaming the Wings

This is Alton Brown’s method for steaming the wings. This step helps render the chicken fat, which will reduce the amount of splatter and oven smoke while baking. You can eliminate this step if you do not have a steamer basket, but there will be some oven smoke and splatter made while baking.

For Alton Brown’s complete Buffalo Wing recipe, click here

Load a 6-quart saucepan with a steamer basket and 1 inch of water in the bottom, over high heat, cover and bring to a boil.

Place the wings into the steamer basket, cover, reduce the heat to medium and steam for 10 minutes. Remove the wings from the basket and carefully pat dry. Lay the wings out on a cooling rack set in a half sheet pan lined with paper towels and refrigerate for one hour. You can do the wings in batches if you can’t fit them all into the steamer basket at once.


Step 2: Coating and Baking the Wings

Preheat the oven to 425˚. Combine the salt and pepper. Once the wings have completely cooled and dried, coat the wings on both sides with the salt and pepper rub. Either place the wings on a small rack sitting in a baking dish (my preference for even cooking), or place the wings on a baking sheet lined with parchment paper.

Bake the wings on the middle rack of your oven for 20 minutes. Flip the wings and bake for another 20 minutes, or until golden brown.


Step 3: The Honey-Butter Coating

While the wings are in the final 20 minutes of baking, you can prepare the honey-butter coating. Melt the butter in a sauce pan. Add the honey, stir well and continue to heat until warm and thoroughly combined.

*Note – you can add hot sauce or spices to your liking to add heat to the honey-butter coating.

Once the wings are done, toss them with the honey-butter coating. Sprinkle the wings with some fresh chopped parsley, serve and enjoy!


Share

Recent Comments

Archives

powered by
Socialbar